Twintania Phase 5: Twister / Dreadknight
Ahh… the infamous Twister phase. First off, lets talk about the two new mechanics in this phase. An interesting note to healers – It doesn’t matter if non-tanks have 1hp or 100% hp in this phase. Any ability that hits a raid member will instantly KILL them. This phase lasts from Aetheric Profusion until Twintania drops to 29%
Phase Specific Abilities
Twister – Targets 4 raid members at random. There is no indication as to who gets targetted. To dodge a twister, there are a few things to consider:
- Never back-pedal.
- Never settle to ANY PIXEL another person dodged Twister to.
- Never retrace your steps when dodging Twister.
Twister is a weird skill that isn’t fully understood (at least by us). It lands on the foot of its target, on a “random” place where they were walking during the Twister cast. As I always put it:
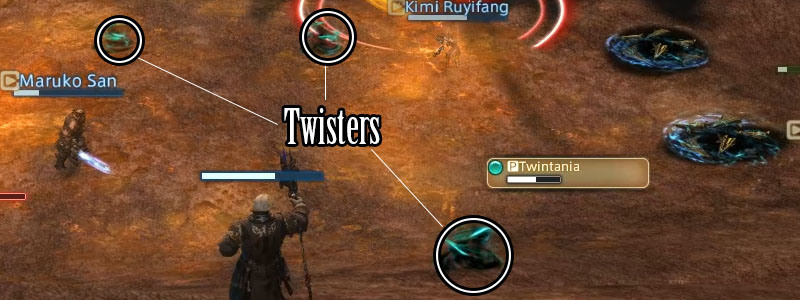
“Think of it this way, your entire raid leaves imaginary lines when dodging Twister.
DO NOT STAND on any of those lines once the cast ends.” – Mahiko San, FFXIVGuild.
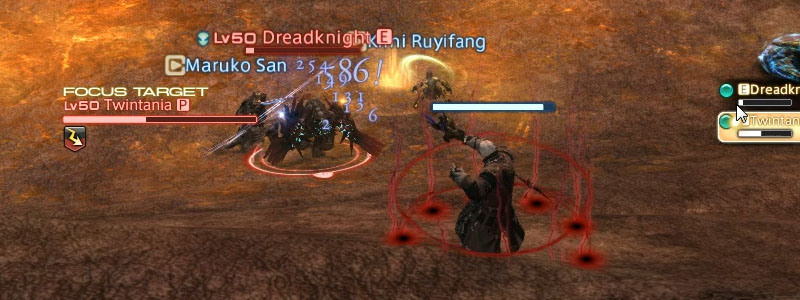
Dreadknight – Dreadknights spawn in the middle-ish of the stage. After a short time, they will randomly pick a target. That target gets stunned, and cannot do ANYTHING until the Dreadknight dies. It will slowly walk to this target. If the Dreadknight reaches it, the target is instantly killed and he will proceed to stun and walk towards another target. Dreadknights can be Stunned and Heavied.
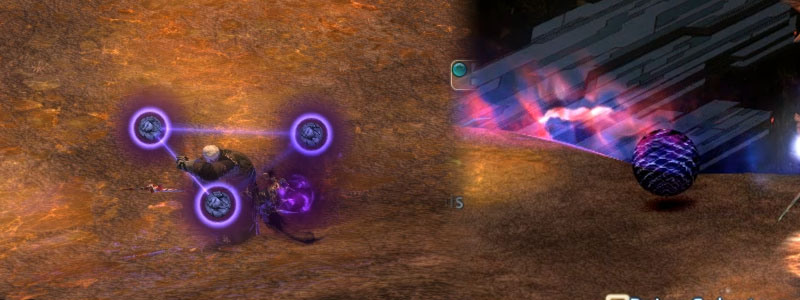
Twister Positioning
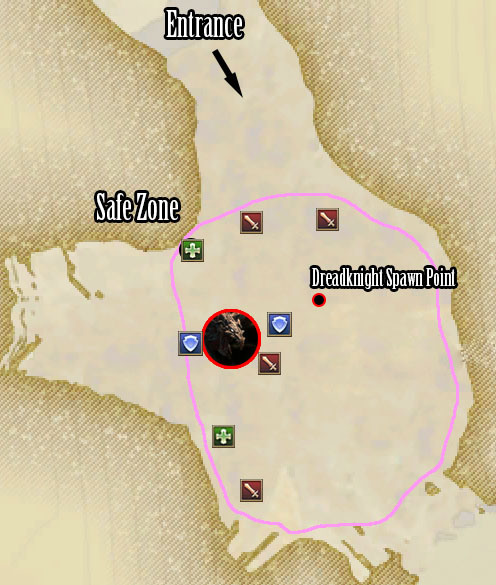
So, your position in this phase must consider two things. 1) Far enough from the center, so Dreadknights have maximum travel time. and 2) Enough space so EVERYONE has a “unique” place to run to from Twister. Here’s a simplified diagram of how we handle positioning in this phase.
Dreadknight Tips
As mentioned earlier, Dreadknights can be Heavied and Stunned. First things first, Heavy should be applied on DK’s asap.SMN Miasma
- SMN Miasma is legit since it’s already part of their rotation.
- BLM Ice I / Lethargy are good choices. Ice I lasts much longer but has a cast time.
- SCH Miasma when no DPS can do it.
- WHM Stone I when no DPS can do it.
- Most other heavies are too impractical.
Always have a “chain” of responsibility on Heavy. For example if your SMN cannot heavy due to being targetted by a DK, have your BLM do it.
As for STUNS…
- PLD Stun is the best, hands down. A DK can be stunned a max of 3 times. Lasting 6,4 and 2 seconds respectively. Don’t stun pre-emptively, it’s best to wait the entire duration and smack it again. 30 seconds after the final stun wears off – it may be stunned again. If you do reach this point, however, you’re likely dead.
TO MAXIMIZE THE TRAVEL TIME of a Dreadknight, Try to get as far as possible from it when you see it flying down! This is important especially for Melee DPS.
Twister DK Ability orders
- Twister (After Aetheric, possibly after Death Sentence.)
- DK (Few seconds after first Twister.)
- Twister
- DK (DK’s spawn 40 seconds after the previous one spawned.)
- Twister
- DK + Twister (The third DK almost always has Twister in it. Be Prepared)
- Twister
- DK
- Ideal time for 3rd Neurolink.
5th DK onwards, it’s pretty rare to see. You’re on your own if you reach this point!
Since DPS is distracted by Twisters and Dreadknights, leaving DoT’s on Twintania should be your first priority. Otherwise, the phase may take too long, straining your raid.
Once Twintania reaches 29% the third and final Neurolink drops, and you have finally made it to the Final Phase.
Twintania Phase 6: Hatch / Liquid Hell Spam
The notoriously anti-climactic final phase. Often people kill Twintania the first time they see this phase. Don’t relax, though! This phase can still go horribly wrong.
Phase Specific Abilities
Hatch – Hatch targets a random raid member.. A ball spawns under Twintania and will make its way towards the target. It will hit any person it makes contact to on its way. If anyone is hit by hatch who is NOT STANDING on a neurolink, he or she will likely die. Standing on Neurolink will significantly reduce the damage (less than 2k).
Liquid Hell Spam – If you’ve reached this point, you’re far too familiar with what this does. No need to remind you. The main difference – Twintania does it FIVE times in succession to the same target.
Positioning
Positioning is much looser now than you have access to the middle of the stage again. A popular strategy here is to have your OT soak up ALL hatches. Check out the diagram below:
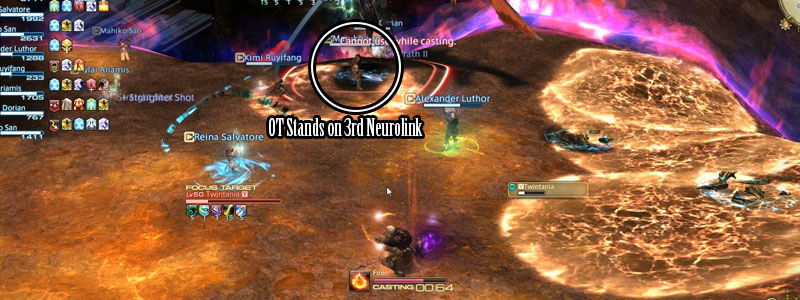
The idea is to catch every hatch right when it spawns. Now there are a few things to keep in mind
- If MT gets spit on, simply rotate a bit after all 5 spits happen.
- if OT gets spit on, have him or her use a defensive CD for the burn duration.
While it’s not a huge problem if MT gets hit, some unlucky hits on the OT can quickly turn things sour. Here’s a few things you should be doing to prevent this.
- OT gets hit? BLM Apocatastasis can help reduce burn damage.
- Fire-ward potions actually work.
- Healers & Tanks should not be shy using cooldowns. Fire on tanks is the only reason this phase will fail!
- Tanks getting critical!? A DPS can sub in a pinch.
For everyone else – Liquid Hell Spam is much easier. Run towards a space where nobody else is. That simple. But keep in mind, try to find a path or make sure you won’t be too far. Every second not DPSing or healing is critical at this point, because…
Enrage Timer
Twintania enrages after about 13 minutes. We have actually reached this, on the pull right before our first down. All Neurolinks will disappear, and she will continue to cast Aetheric Profusion until everyone is dead.
After Asceplius dies, you’re free to use DPS cooldowns as long as they’re up. Stat potions too! Poison! Everything! Remember Kharas’ words of wisdom all the way up there. The DPS race starts right at the beginning.
Follow us on Facebook for more FFXIV updates!
Navigation
Seriously, what a stupid name for a Boss? Twintania? Twintails? Huh? Just stupid.
How about you add me. JohnnyTeamKill on PS4 and help me and my buddy beat this dungeon please! Lol
um… it’s Alagan pants of healing, you’ve got Alagan tunic of healing there lol
fixed