FFXIV Alexander Loot List & System, Accuracy Caps

Loot list and loot system of Alexander: Gordias (Normal). Accuracy caps will be included!

Here we track various information regarding the current FFXIV Endgame raid: Alexander Gordias (Normal). Naturally, two weeks from now this very page will contain Alex ‘Savage’ information. Stay tuned!

How do I unlock Alexander normal? The quest details: “Disarmed”, Idyllshire (X:7 Y:6), NPC: Slowfix.

Alexander: Gordias (Normal) Loot system

Alexander normal has a token system, wherein completion of various parts of the dungeon rewards items you turn-in for high level equipment. YOU CAN ONLY LOOT 1 TOKEN PER TURN, PER WEEK. For a maximum of 4 tokens a week. In 5 weeks, you can have full i190.

Loot is exhanged in: Idyllshire (X:5 Y:5), NPC: Sabina

The items you can obtain off Alex Normal are iLevel 190, and have the Prototype Gordian prefix.


Item TypeRequired TokenNumber of Tokens
HeadTarnished Gordian Lens2
BodyTarnished Gordian Shaft4
HandsTarnished Gordian Crank2
WaistTarnished Gordian Chain1
LegsTarnished Gordian Spring4
FeetTarnished Gordian Pedal2
AccessoriesTarnished Gordian Bolt1


Which token drops where?

Each turn drops 2 tokens from a pool of possible tokens per turn (did that even make sense?). As we farm more tonight, we will learn more and update.

  1. ACC / BOOTS / WAIST
  2. BOOTS / HEAD / ACC
  3. LEG / HEAD
  4. LEG / CHEST

Prototype Gordian (Alex Normal) Gear: Stats table

Temporary formatting: will improve ASAP

TankAccuracyDetCritSkill SpeedParry
Hat4733
Chest7754
Gloves3347
Waist3625
Pants7754
Boots3247
Choker3625
Earring3425
Bracelet2536
Ring3624
HEALERAccuracyDetCritSpell SpeedPiety
Hat4733
Chest5478
Gloves3247
Waist2436
Pants5478
Boots5434
Choker3625
Earring2536
Bracelet2536
Ring3425
CASTERAccuracyDetCritSpell Speed 
Hat4733
Chest7752
Gloves3347
Waist3625
Pants7454
Boots4733
Choker2436
Earring2536
Bracelet3625
Ring2536
DRAGOONAccuracyDetCritSkill Speed 
Hat4733
Chest7754
Gloves4732
Waist3624
Pants5477
Boots3345
Choker3625
Earring3425
Bracelet2536
Ring2436
MONKAccuracyDetCritSkill Speed 
Hat4732
Chest5477
Gloves3345
Waist3625
Pants5277
Boots4733
RANGEDAccuracyDetCritSkill Speed 
Hat3345
Chest7754
Gloves3347
Waist2536
Pants5277
Boots4733
Choker3425
Earring2536
Bracelet2436
Ring2534
NINJAAccuracyDetCritSkill Speed 
Hat4732
Chest5474
Gloves3247
Waist3625
Pants5477
Boots4533

 Temporary formatting: will improve

Alexander: Gordias (Normal) Accuracy Cap

It’s currently impossible to accurately determine this. Wait for data collation. I wonder if this is even needed for Normal Mode. I secretly hope this isn’t needed as it’s a nightmare to obtain, haha.

Alexander: Gordias (Savage) Loot system

RESERVED

Alexander: Gordias (Savage) Loot system

RESERVED

Good luck out there with robot crunching! We will be updating the loot list and accuracy caps on Alex Normal consistently.

Follow us on Facebook for more FFXIV updates!

FFXIV Turn 13: Bahamut Prime Strategy Guide

Turn 13: Bahamut Prime Strategy Guide! EARN your Final Witness title! Enter Heavensward as a KING and not a CHUMP! Let our T13 Guide help YOU!

   SO! You’re finally here! Turn 13 – the final boss of 2.0… Bahamut Prime! Let our turn 13 guide help you get past this unbelievably epic trial! Like Samuel L Jackson always says, “Hold on to yer butts!”. After thirteen turns of struggle – and an endless grind for tomestones… Bahamut Prime stands as your final challenge. Begin your journey into Heavensward as a Final Witness.

Navigation:
Page 1: Pull to 52% (First Divebomb) | Page 2: “Zoo”, Akh Morn

Bahamut Prime: Phase 1

Megaflare: Megaflare is a multi-part skill. Lets see what happens step by step:
1) a random number of people in your party get tagged by Megaflare initial damage. This is AoE (Spread out, don’t hug your partymembers)
2) Those not hit by the initial AoE become “Friends“. Friends are marked by a ring around them.
3) 3 random people get a large circular ground effect under them. This explodes after some time – GTFO (dont put many these in the melee/stack zones)
4) ALL FRIENDS MUST UNITE (stack on top of each other), or else bad things happen. IE, Death.

As a general reminder: Succor > Split > No Hugs > Friends Unite > Medica II > Prepare for a Flame Breath

Flatten: Flatten is the early T13 tank buster. It deals HEAVY damage. Tank must mitigate this, to be safe. Healers must always shield this. To make matters worse, flatten is always followed by FOUR FLAME BREATH in phase 1.

Flame Breath: Massive elemental damage cleave. Happens many, many times during the fight and is something you should get used to ASAP. Your healers shouldn’t “be surprised” by this as you progress with learning the fight.

So here’s what happens: Megaflare > Flamebreath > Flatten > Flamebreath x4. Your MT must be healthy because the Flamebreath before Flatten CAN be lethal if you slacked on regens and got some unlucky hits. Make sure you guys prepare for that first of all. After that first one, the long flatten channel time begins. Stoneskin and Adloquium should be cast on tank. Once flatten completes, precast cures and physics to prepare for the next 4 Flame Breaths. Don’t just spam Cure II and Adlo here… save some mana by adjusting the cure needed depending on how heavy the damage is.

Tanks should ALWAYS spend a mitigation skill here if available.

Earthshaker: Chooses two random people between all DPS and Offtank. After a short delay Bahamut will fire lasers that damage everyone in its path, towards each selected person. Upon each impact, a pool of sludge remains – this happens 3 times. Standing on sludge will WRECK you for 3k a second so it’s not a good idea. Maximize efficiency by having each guy line up the sludge in opposite corners. Healing? This does physical damage. Healing this can easily go sour if you time it incorrectly. Channeling your heal right after the marker disappears is generally a safe timing. The safest rotation would be WHM: Cure II, Cure I, Regen. SCH: Adlo, Physick, Physick. Each healer should choose which “side” they’re going to heal. The afflicted guys, of course, have to travel to opposite sides quickly.

at 75% Gigaflare signals the phase change. This does an extreme amount of damage. Arcanist Virus should be SAVED for this and make sure there is no antibody. Get everyone up to full, Cure 3 if needed. Succor and Soil – hope for the best. Casting Succor at 76% prevents alot of BS. He may cancel his Flatten Combo just to phase – be wary of this combo. Make sure your Scholars Virus finger is fast.

A Note on Gigaflare: Gigaflare has a notoriously late check in our experience. a really late virus doesn’t actually reduce the damage. Same with succor shields… often times Giga goes off with our Galvanize intact. Counter this by pre-empting it more than you’re used to.

Bahamut Prime Phase 1 Rotation:
Megaflare, Flatten Combo, Earthshaker, (Repeat until 75%), Gigaflare -> Phase 2

Rotation Prime Phase 1 Rotation with Flamebreath:
Megaflare, Flamebreath, Flatten, Flamebreath x4, Earthshaker, Flamebreath (Repeat until 75%), Gigaflare -> Phase 2

All of these skills happen in different occasions in the fight. Get used to them ASAP cause you’ll be seeing them for a loooooooong time. On to phase 2: Balls.


Bahamut Prime: Phase 2 Balls

Adds (Shadow Of Meracydia): Hard hitting, each add should be virused (pref BLM or WHM). Two sources of Virus can tag all 3 dragons (You’ll be seeing 3 of these before phasing btw). These adds should be dragged all the way across from Bahamut, otherwise a tether forms between them and gives DEF+ and DMG+ to both of ’em. Do not want. These guys spawn around 1 minute apart from each other. Rouse and Divine Seal line up perfectly with this so keep it in mind.

Before we go any further, you WANT to use up your limit break sometime during this phase. Melee LB on bahamut is recommended. Use your judgment on this one. The idea is to wipe your LB bar sometime in the middle of P2. Melee LB1 or 2, either or – the reason is you need LB3 for Last Bastion later on, and don’t wanna waste excess LB. Using Eye for an Eye on Bahamut when each add spawns is a good practice, too.

Flare Star: spawns 1-3 “balls” that have to be picked up by raidmemers. These balls are tethered to somewhen upon spawning, and will slowly travel towards them. After a short period of time the balls rush. They can spawn randomly in sets of 1,2,3 or 4 – but will always total to 7 per total rotation. Each ball gives a stack of STACKNAME, increasing damage dealt by a skill later on – Bahamuts Rage. Taking 3 balls is pretty much lethal for a non-tank. 2 balls is still risky – and extra attention will be needed to survive Bahamuts Rage. (more on this later)

Megaflare upgrade – Tower: Each Megaflare now comes with a tower. This tower spawns on a random raidmember before friends explode. The tower must be absorbed by somebody, taking moderate damage. If you fail to do so, massive AoE damage and partywide Bleeding debuff WILL CAUSE A WIPE. Note that you have to stay in the tower until you HEAR the explosion and SEE the visual effect. Just standing there as it disappears won’t cut it – better safe than sorry. It is unadvisable for friends to absorb towers – this can be fatal depending on composition and HP. (TIP) Healers shielding themselves before mega can have massive value. If healer is a friend, and tower spawns under you – you might have to move out and cancel your own cast (which is integral at this point). If you’re shielded, you can safely survive Friends + Tower combo – and fire your heal off.

Bahamuts Rage: This skills damage goes up for each Flare Star ball you ate. 1 is pretty standard, and you shouldn’t really worry about it. TWO is pretty heavy. BLM Apocatastasis is the best way to ensure someone with a 2-stack lives. Otherwise, full HP and shields would be good. Sacred Soil is some value here, since it happens right after megaflare. The main reason Rage is lethal is because your party will likely be damaged from the previous Megaflare. Stacking up for Cure III is the most value you’re gonna get from MP (ratio wise)

Think of this phase as 3 rotations. Each rotation will have an add, 7 total flarestar balls (3 times cast), megaflare and rage! Just survive this rotation thrice and you’re good!

at 52% Gigaflare signals the phase change. Mitigate it the same way as P1 Giga. Virus is essential, full HP, Succor/Shield. If it’s your first time past this phase – you will wipe to divebombs in about 10 seconds. There is a sucky way to phase which you should avoid. Having him phase with the combination of “Mega, Rage, Giga” is extremely painful. DPS harder to avoid this – Potions, Melee LB, etc…

Bahamut Prime Phase 2 Rotation:
Add, Flare Star, Flare Star, Flatten, Flare Star, Megaflare, Bahamuts Rage (Repeat until 52%), Gigaflare -> Phase 3

Bahamut Prime Phase 2 Rotation (With Flamebreath):
Add, Flare Star, Flame Breath, Flare Star, Flatten, Flame Breath, Flare Star, Megaflare, Flame Breath, Bahamuts Rage (Repeat until 52%), Gigaflare -> Phase 3

Follow us on Facebook for more FFXIV updates!

Navigation:
Page 1: Pull to 52% (First Divebomb) | Page 2: “Zoo”, Akh Morn

FFXIV T12: Phoenix Strategy Guide (FCoB T3)

How to beat Turn 12’s boss: Phoenix. Beat the birds and bennys using our anti-avian strategy guide!

So you’ve beaten Kaliya, huh. Well get ready for Turn 12’s boss: Phoenix! I hope you channel your own revival powers – this may take more than a few wipes! Let our Phoenix guide help you out reducing that!
Navigation: [Page 1: Pull to 52%] [Page 2: Bennyland, Fountains]

Phoenix Phase 1: Benny, Blackfire & Whitefire

Bennu spawns every minute starting around 5s~ in. Don’t underestimate this little dude, he hits like a truck. Any free Virus should be used on benny (SMN, but BLM or WHM preferably). While killing Bennies isn’t too hard, Bennys must not die too close to each other (From here on we will call them Benny). Kill them fast or else Phoenix gets a stack of (forgotname). YOU DONT WANT THIS. Each time a raidmember dies, he also gets a stack.

Revelation is Phoenix’s tank buster. It’s a massive elemental damage nuke that cleaves. A tank CANNOT eat 2 straight revelations or he will die (it gives a debuff that increases the next revelations damage… to around 40k). This is why SMN and SCH Virus should be saved for Revs, and untraited Virus for Benny.

Blackfire & Whitefire: These two mechanics are right next to each other. Blackfire targets ONE DPS, ONE HEALER and OFFTANK always (considering all people are alive). It leaves an add (Blackfire is the name of skill and the add). You must not have 2 blackfires too close to each other. and never walk into a blackfires hitbox. Failing to do these things will result in a damaging pulse and a vulnerability up debuff.


Whitefire also targets ONE DPS, ONE HEALER and OFFTANK. A large white circular AoE spawns on the targets. They will take heavy damage. Remember not to get “venn diagrammed” by two whitefires – you will likely die. Whitefires AoE must hit Blackfires. Successfully tagging them gives then a HUGE HP DOWN debuff. Once the debuff is applied, kill the Blackfires.

How do we deal with this? Have all DPS pile up… both healers pile up… and offtank go off somewhere on his own (haha). This prevents blackfires from spawning too close to each other. For the following Whitefire, DPS tags the DPS Blackfire… Healer tags healer Blackfire… and tank on tank. Prevent alot of BS and reduces the needed communication when taking care of this mechanic.

Help! Blackfire timing is a little weird!! Yeah… its just something you have to get used to. After the castbar finishes, theres a short delay, then Blackfire spawns. The instant it spawns you HAVE to get out. Again, a few attempts at this and you should be okay.

We got three Benny?! Okay, theres no HARD CODED penalty to having alot of Bennys. However, practically speaking, having 3 Benny in Phase 1 means you’re sorely lacking DPS. A total of 5 Benny during Phase 1 + Phase 2 is the “practical maximum”. Bennys spawn around 1 minute after the last – so the first phase should last no longer than ~3 minutes.

Phoenix’s phase 1 rotation:
Benny – Revelation – Blackfire – Whitefire (Repeat)

Again, this is a really short phase. Here’s what your Phase 1 should look like ideally:
Benny – Revelation – Blackfire – Whitefire – Benny – Revelation – Blackfire – Whitefire (79%). Below 80%, Phoenix enters Phase 2.

Phoenix Phase 2: Brands, Blue + Red

Brand of Purgatory is the first skill you’ll encounter in this phase. It leaves a green (or sometimes purple) mark on a random (likely ranged or healer) party member. This skill has a few mechanics.
1) When phoenix casts Flames of Unforgiveness, if the debuff wasn’t passed… the current owner dies.
2) Passing the debuff is done by simply sticking together.
3) Damage is done to BOTH parties upon switching. A short delay later another chunky damage is done to the original owner.
4) Reminder is: Unforgiveness? Pass – Damage on both – Damage on Initial.

How do we deal with this? We pass it between both healers. Everyone else should be mindful to avoid their little area. Stoneskin and Adloq on the original holder, and a small shield on the recipient should be okay. We have the CLEAN healer approach the DIRTY healer when flames is being cast. The dirty one casts a large heal on him or herself while the recipient is travelling (to survive the second hit). Passing happens shortly after bluefire – so keep it in the mind of your healers “Bluefire? Shields up“.

Help! Brand went to a non-healer! It’s okay. Shield him and have the healer take it on Unforgiveness.

Next up in this phase Bluefire and Redfire. Bluefire is similar to T9 stardust. Once the blue marker expires a freeze field will spawn where the person was. Being in this field shortly after it spawns gives you a slow, heavy and DoT… it generally sucks. Once the field goes away it leaves a little pool of ice. Standing in this pool gives you a bebuff (Buff?) – It’s used for Redfire. Redfire spawns a slow moving fireball. It gets tethered to a random person in your raid. Have 1 guy (Healer or Bard, preferably) take the ice buff and stand in the redfire tether – this cancels it out. Failing to cancel out redfire tether will result in massive raidwide damage and a huge DoT.

Benny continues to spawn in this phase. Remember what was earlier mentioned, they have to die far from each other, a good formation is a huge X, with each point on the sides and middle becoming a benny death spot.

Phoenix’s phase 2 rotation:
Brand (only phase change) – Blue – Unforgiveness – Red – Revelation (Every ODD red) – Repeat (Benny every 1 minute)

This keeps repeating until Phoenix reaches 52% – then onto Phase 3 “Bennyland”. Again, remember to kill Bennies fast, and keep deaths to a minimum – you DO NOT want any stacks if possible. When it phases GTFO of the nearby area surrounding Phoenix. An autokill field spawns and you don’t want to be there. Getting to Phase 3 with 5 or less Bennys and having your party in good shape is the first hurdle you face in Phoenix – so remember to DPS hard and NO DEATHS!

CONSIDER USING MELEE LIMIT BREAK to Phase before a third Benny spawns in Phase 2. Having a total of 4 Bennys is a massive stress reliever for the next phase.

Follow us on Facebook for more FFXIV updates!

Navigation: [Page 1: Pull to 52%] [Page 2: Bennyland, Fountains]

FFXIV Bahamuts Coil Guide Directory

Final Coil of Bahamut

Turn 13 (FCoB T4): Bahamut Prime 

Turn 12 (FCoB T3): Phoenix 

Turn 11 (FCoB T2): Kaliya

Turn 10 (FCoB T1): Imdugud

See: Endgame loot list and accuracy caps

-Currently refining some of the current bosses. Finishing text before adding more images / other refinements.
-Any older boss guides may be different currently due to Echo Buffs and Overgearing. The original guides are preserved for posterity.


Second Coil of Bahamut

Turn 9 (FCoB T4): Nael

Turn 8 (FCoB T3): Avatar (never got around to this)

Turn 7 (FCoB T2): Melusine (never got around to this)

Turn 6 (FCoB T1): Rafflesia

See: Endgame loot list and accuracy caps

Binding Coil of Bahamut

Turn 5 (FCoB T5): Twintania

Turn 4 (FCoB T4): Elevator Gauntlet

Turn 2 (FCoB T2): ADS

Turn 1 (FCoB T1): Caduceus

See: Endgame loot list and accuracy caps

Follow us on Facebook for more FFXIV updates!

FFXIV T11: Kaliya Strategy Guide (FCoB T2)

How to beat Kaliya! Our strategy guide to beating the boss of Turn 11 (FCoB T2)! Don’t let this chumpy hydra tear you up!

So you’ve beaten Imdugud and well on your way to becoming a Final Witness! Don’t take a rest yet, chump – If you’re reading this, then that means you’re only 25% of the way!!!  Get off your butt and get your free kill on this MFing Hydra! How to beat the T11 boss: Kaliya!!! Luckily Kaliya doesn’t have a ton of mechanics but the fight culminates in a rather stressful final phase.

Navigation

T11 Kaliya Phase 1: Pull to adds (60%)

“Okay I’ll MT” – Lisie Quiloud, last words (from our first pull)

Lets discuss some mechanics that happen thru most of the fight (except the P2 Adds phase).

Double frontal cleave – Kaliya does a two-hit wombo combo frontal cleave. This is deadly to non-tanks, if it isn’t obvious by now. This damage is shared by both tanks. While you can solo tank this, it’s recommended to double tank for 99% of groups. We gave this skill(s) a nickname: “HHHAAAAAUNK“.

Nerve Gas – covers 1/3rd of the map with a nasty ground effect. Do not be here when the cast ends. You will take heavy damage and a Vulnerability Down debuff. Nerve Gas always happens in sets of 3. A good reminder for your raid is to keep in mind that “After third, HHHAUNKing”. Drill that into your mind, people dying to haunk after cloud is more common than you think.

Secondary Head – a rather unexciting tank buster.

At 90% Kaliya casts Barofield. This remains up until Kaliya is dead. Barofield just meant you cannot pass THROUGH Kaliya during Nerve Gas. A dangerous field that does heavy damage, a slow and VULN UP if you enter it. Yeah, it’s a bad idea. So get used to dodging Nerve Gas WITHOUT passing inside Kaliya.

After Barofield goes up Kaliya gains two new abilities. They’re some kind of “missile” that Kaliya shoots in the air. We call them “Stack and Split” (sometimes Blue for Stack, Red for Split). After each Nerve Gas rotation Kaliya fires BOTH of these missles – the only question is which one lands first. Stack (as the name implies) means you have to stack to share the damage – 3 guys is enough, 4 recommended. Split (You guessed it) means you have to stay far from each other so you dont get tagged by two. Tips on surviving this:

  1. You can easily hear the sound effect of these missles. Be aware of it!
  2. If you DO NOT see a marking after the sound effect, it’s SPLIT first then STACK.
  3. Inversely if there is a marking after the sound effect, it’s STACK first then SPLIT.
  4. For the sake of consistency, make your splits look the same each time or at least assign a general area to prevent hugs.

Phase 1 is basically a tutorial for the basic mechanics of Kaliya. Phase 3 is pretty much a mirror of phase 1 (with 2 additional mechanics). This goes on until Kaliya reaches 60%. Once Kaliya reaches 60, she finishes whatever skill is happening and then proceeds to walk to the middle. GTFO of the middle because an insta-kill field will come up a few seconds later. Onto Phase 2!!!


Kaliya Phase 2: Kindergarten Shapes (Ball, Egg, Cube)

“Animation locked… haha, I wonder how strong this laser is?” – Eirlys Castillo, last words.

At 60% three adds spawn. The Cube, Ball and Egg (Not their in-game names). This phase is time-based, regardless if you complete what you need to do – Kaliya will phase after around 2 minutes 30 seconds (double checking). First of all lets summarize your objectives during this phase:

  1. Kill Ball & Cube at roughly the same time.
  2. Kill egg before phasing (roughly 2:30 duration)
  3. DO NOT have any 2 shapes come near each other.
  4. Prepare for massive AoE during phase transition (Nerve Cloud)

Sounds simple enough, ey? LOLNO! There’s tons of things that can go wrong here! But lets go through it one by one to maximize your chances. The Egg keeps moving around in a circle – again, they ANY ADD MUST NOT BE NEAR EACH OTHER. The main challenge is dealing with the ball.

Ball has a chunky amount of HP. It also greatly reduces magic damage taken. So it’s ideal that you use physical DPS to kill it. It has a strong cleave and good old Repelling Cannons, which is shared damage to all partymembers near the ball. Have all your physical DPS and 1 healer stay near the ball at all times. If thunder happens to go to this pile, simply have the victim move backwards. Most of the fatal damage comes from the Ball, so it’s recommended to throw a random virus on it when you can, and cycle Eye for an Eye on the ball tank. Also, we use WAR to tank the ball so he can be Storms Path’d. It does all magic damage so Halones STR Debuff doesn’t work on it.

Cube greatly reduces physical damage taken. So obviously have your MDPS beat it up. Aside from this, it’s not really special. Again, you should aim to kill ball and cube within 5 seconds of one another. If not, Egg will absorb the other – turning into Voltron and will wipe the floor with your face. Keep in mind the Cube has considerably less HP than the Ball.

Egg doesn’t have many special properties. It can only take damage when you’re near it. Aside from this, it’s main purpose is to punish parties that kill the cube or ball sooner than the other. If you’re struggling with DPS, consider Melee Limit Break on egg after both the Cube and Ball die.

One healer (preferably WHM) should walk around the inner circle following the ball group. This is so Medica II can heal the entire party – theres alot of random damage so keeping it up every 30s is a good idea.

Lastly there’s a few environmental effects while all of this is going on. Triple lasers which are insanely deadly on a long cast time. A periodic random Thunder Debuff(very similar to T9’s Thunderstruck). Also, touching the inner circle results in instant death. Get used to calling out thunder in your VOIP, it’s a common mess-up.

Egg is dead! Now what!? Prepare to resume your position from Phase 1. Nerve Cloud is coming right up. Make sure to soften the damage from Nerve Cloud by: Arcanist Virus, Succor and Sacred Soil. Warrior Storms Path, Monk Dragon Kick. Also, you may want to Stoneskin, Adloq or Apocatastasis those who may have weakness. This nuke is rather strong!!!

This phase may be confusing so lets summarize yet again what you need to do:

  1. Call out Thunders, Avoid Lasers
  2. Reduce damage of ball (Eye for Eye, Storms Path, Virus, Dragon Kick)
  3. Coordinate kill speed of ball and cube.
  4. Kill Egg (consider Melee LB)
  5. Prepare for Nerve Cloud (into Final Phase)

If you’ve survived, it’s on to Kaliyas Final Phase!

Kaliya Phase 3 (Final): Tethers (Nanospore Jet)

“Where does blue stack again?” – Mahiko San, last words.

Welcome to T11 final phase! The most annoying and stressful mechanic rears its ugly head here almost instantly: Nanospore Jet (commonly refered to as Tethers). Before we get into that – Kaliya RETAINS ALL SKILLS from Phase 1. By now, I hope you guys can avoid them well! Because tethers are effin’ annoying.

Nanospore Jet targets 2 sets of 2 people. One couple will be the “Green” tethers and the other will be the “Blue” tethers. From here on we will distinguish the two by calling it Green and Blue. First of all there is no difference between colors – they have the exact same effects. Here are the rules for each tether:

  • You can see the color of your tether from the status bar, or a visual effect.
  • They take some time to “settle in” – position during this settling time.
  • Once tethered you CANNOT GO TOO FAR from your partner.
  • ANY GREEN may not be near ANY BLUE; vice versa.
  • Failing the above results in heavy damage + Vulnerability Up.
  • Any tethered person who dies, instantly kills their partner.
  • Tank + Non-tank is never a tether combination. If one tank is tethered, the other tank will always be it’s partner.

You got that!?!? Drill it into your head! Nanospore Jet doesn’t F around and punishes slackers. As easy as Kaliya is; FOCUS is ultimately important in the final phase. So you’ve survived your first set of tethers? Good job! Now welcome to the real stress – Tethers + Nerve Gas.

How to deal with Tethers + Nerve Gas!? This basically sums up Final Phase. If you can do this well, this is gonna be a walk in the park. Otherwise, it’s gonna be a walk in the shart. Luckily we’ve devised a barbaric way to deal with this, or at least a way with the smallest amount of thought applied. For this we have 2 rulesets to follow: Positioning Rules and Movement Rules.

Positioning Rules determine where green or blue will initially stay (to prevent killing each other due to proximity). If you follow these by order, you shouldn’t have a problem!

  • If Tanks are tethered, other couple must be in complete opposite side.
  • If Melee is tethered, partner must approach melee.
  • No melee or tank tether? (Worst) Blue left, Green right.
  • All non-tethers people stack~ on any tethered couple (for baiting nerve gas, explained below)

These three simple rules will get you past the first hurdle of simply dying once tethers settle in. Once you’ve gotten used to this, here we have the Movement Rules.

  • Dodge to path of least resistance (wherever the clean floor is nearer)
  • Head on nerve gas? Dodge left (Clockwise). Opposite pile adjusts accordingly.
  • Keep in mind – after third Nerve, haunk.

Easy as that. If you followed the positioning rules and movement rules – tethers play out themselves. Of course, this may take a few wipes to get used to! I cannot stress the above mentioned POSITIONING RULES and MOVEMENT RULES. If your group refuses to organize or at least have a set behavioral pattern for tethers – Kaliya will best you 99 times out of 100. If you’re struggling with pugs, feel free to suggest the rules above! It’s better than winging it!

Turn 11 Kaliya Loot List

I really don’t know how to present by-turn loot list nicely so check this out for now: Bahamuts Coil Loot List.

Well, that’s about it! Feel free to comment with any other advice or (hopefully nonviolent) reactions! Best of luck killing Kaliya and getting past Turn 11!!!

Follow us on Facebook for more FFXIV updates!

FFXIV T10: Imdugud Strategy Guide (FCoB T1)

Strategy guide on beating Imdugud! Charges, Prey! All you need to know about this SHOCKING fight!

So you’ve taken your first step into Final Coil! Good luck! The first boss you face is no pushover. I’d say the main points you need to maintain here are Focus and mechanics awareness! Our strategy guide for the boss of Turn 10 (Final Coil Turn 1) Imdugud!

“He’s too good.” – Everyone who stepped into T10

Navigation:
[PAGE 1: Phase 1: Pull to 85% – Phase 2: Adds]
[PAGE 2: Phase 3: Heat Lightning – Phase 4 Adds II – Final Phase]

Imdugud Phase 1: Full to 85%

Right off the bat we’re faced with 3 of his basic mechanics you’ll be seeing throughout the fight.

– Massive frontal cleave that does heavy damage to all guys. Naturally you want to face the boss away from the raid for this. I will reiterate that this cleaving mechanic is MASSIVE and the damage is no less BEEFY.
– Tailswipe that is easily avoidable. You can “bait” this to come out by going behind Imdugud. (He doesn’t do basic attacks during this time so it’s advisable to do so)
– Critical Rip is your usual tank-buster. A long wind up leading to a haymaker. It’s your tanks responsibility to use a mitigation skill for this. Healers should Stoneskin / Adloq this when possible.
— The above abilities will be used throughout the fight. The next two abilities will be, too, but I’d consider them special mechanics.

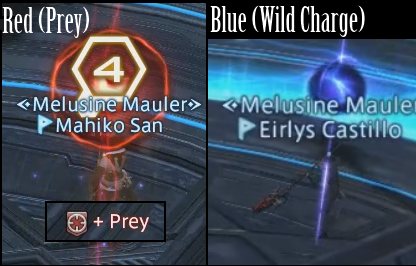
prey wild charge imdugud t10 ffxivWild Charge (Blue)
A two part mechanic. First a blue marker appears on top of a random, non-tank raidmember. There is no debuff icon for this. After a short delay, ALL PARTYMEMBERS NEARBY (and including) the marked person will be stunned and a Vulnerability UP debuff placed.

Next up Imdugud channels Wild Charge. He makes a beeline to the marked guy and will deal heavy damage to all guys in his path. However, this damage can be reduced by standing in front of Imdugud. The more people blocking, the less damage the victim takes. There is a caveat – the frontmost guy takes the most damage. Only a tank can survive this! So make sure the engine on your choochoo train is your offtank :D. Virusing charge is the largest value you can squeeze from Virus in this fight.

Prey (Red)
Another two part mechanic, albeit much simpler. First a red marker is placed on a random raidmember. Once the timer of this expires, it will deal MINOR damage to the afflicted person (500~). Easy to spot since there is a debuff icon. If this damage goes through (ANY of it), a new debuff is placed. Once this second debuff expires, it will deal a cripplingly huge amount of damage, coupled with a paralysis. Prevent all this BS by having your SCH Adloq or WHM SS after the initial red marker appears.. For SINGLE reds, it’s advisable for SCH to do it since Adloq has a significantly less cast time. For doubles, it’s discussed in P2.

For the remainder of this guide I will refer to them by (what our static uses) Blue & Red. Again these 5 attacks will be used for the ENTIRE DURATION OF THE FIGHT.

——————————————————————-

Before we discuss the second phase we will discuss a bit on Positioning and Markings

adds spawn points imdugud t10 ffxiv

A & B are where the adds spawn in both add phases (more on this later) Mark these areas whenever you zone into T10 so you won’t get confused. Easy reminder: The first dot in the first ring direct East and West is A and B. There are two practical ways to position boss (and adds, too):

  • Outwards Facing (less space efficient, safer for mechanics)
  • Sideways Facing (more space for your team, slightly higher risk for cleave)

A basic cycle of Red, Blue, Rip will repeat until he’s at 85%. He will become invincible at this point then on to Phase 2. The skill “Electrocharge” means he’s phasing – have your tanks position accordingly.


Imdugud Phase 2: Adds (Sons and Daughters)

“Cream the daughter first!! R@P3 the son now!” – Normal T10 Conversations

So, in case you haven’t noticed by now, the stage gets smaller and smaller, leaving a dangerous electric field whenever it recedes. This will continue to happen until you have nothing left to stand on. Anyways…

2 Sets of 2 adds spawn (total of 4, for the confused). 1 Son of Imdugud and 1 Daughter of Imdugud for each tank. If a son gets close to another son, they will be tethered and become extremely beefy. Same applies for daughters. In a nutshell, keep them AWAY from each other. Both the son and daughter of Imdugud inherited his skills (Not much of a surprise there). All adds have the massive frontal clear and tailswipe. So you’re going to want to position them facing outwards (like their daddy).

As per their individual traits… Daughter of Imdugud hits hard, Son of Imdugud leaves an electric pool on the ground (takes a while to vanish). Killing Daughter first is always a smart move. You don’t want people maneuvering around an electric pool. Remember to move the son as close to the edge as possible before killing, to minimize the area affected by the pool.

Red happens during this phase, too. But it can now sometimes target two people. As far as I remember it cycles between 2-1-2-1 targets before phasing. Could be 2-1-1-2-1-1 (will check later). For this, the WhiteMage has to Stoneskin one, Scholar has to Adloq the other. To make sure we dont target the same guy we arrange our party the same way (Healers > Tanks > DPS). One healer goes from the top of the list, the other goes from the bottom. If both healers get the mark, shield themselves. (Once succor reaches 500 or 600 due to gear, you can just use that)

This phase is TIME BASED. So wether or not you beat the adds before time expires, he will continue on the to next phase. The good news is, if you beat up the adds quickly you get to DPS imdugud for FREE until the timer runs out! The phase is ending when he begins to channel Electric Burst. (Generic AoE skill that you shouldn’t worry about!) From here you’re off to Page 2: Adds II to Final Phase.

Follow us on Facebook for more FFXIV updates!

Navigation:
[PAGE 1: Phase 1: Pull to 85% – Phase 2: Adds]
[PAGE 2: Phase 3: Heat Lightning – Phase 4 Adds II – Final Phase]

FFXIV Turn 9: Nael Deus Darnus Guide

So, if you’re reading this, it probably means Nael bricked you from entering FCoB. It’s okay, cause we got your back! Turn 9 isn’t as daunting as you might think it is!

Navigation:
[Meteors] | [Golems to Megaflare] | [Heavensfall to Bahamuts Favor] | [Final Phase]

Turn 9 Phase 1: Meteors (Stardust)

This phase may seem very chaotic, but dont let it overwhelm you! In reality there are really only FOUR skills in this phase. This phase lasts from pull to Nael reaching 64% HP.

“The best thing you can do for your team in Phase 1 of T9 is to know the rotation”

Chunk 12345
StardustStardustRavensbeakRavensbeakStardust(?)
RavensbeakLunar DynamoStardustStardustDynamo (?)
Dive->ChariotDivebombDouble DivesDive->ChariotDivebomb(?)
ThermionicLAND ON MTLAND ON MTThermionicFORGOT
JUMP TO MTLAND ON MTFORGOT


Ravensbeak
is just like Twintanias Death Sentence. A massive hit which your healers should preempt with shields (Stoneskin, Adloquium). It leaves a debuff on the target which explodes after a time (we call this Beak Poison). This promotes a tank swap strategy (As for this guide we’re going looking at a 2 Tank 2 Healer 4 DPS lineup)

Dive -> Chariot -> Thermionic these three skills always come together. Dive makes Nael go to a random party member, Chariot is a circle AoE that pushes (easily avoided) and Thermionic beam deals shared damage to all partymembers stacked onto the target.

Divebomb (Meteor Stream) chooses 3 random party members and deals significant AoE damage to them, and all those around them. Having a single member eat 2 of these is likely death… therefore spreading out is needed.

If you think of it this way, like mentioned earlier, the phase only has FOUR SKILLS TO LOOK OUT FOR. The very first step to beating this phase consistently is KNOWING THE ROTATION BY HEART. It’s been half a year-ish since I’ve seen the 5th chunk, so let me get back to you on that…

Here are the MAIN PROBLEMS groups face when tackling this phase:

Knowledge of the Phase Rotation (Fixed by studying the above table)
Meteor (Stardust) Placement & Positioning
Unexpected Ravensbeaks Killing MT

Meteor (Stardust) Placement & Positioning
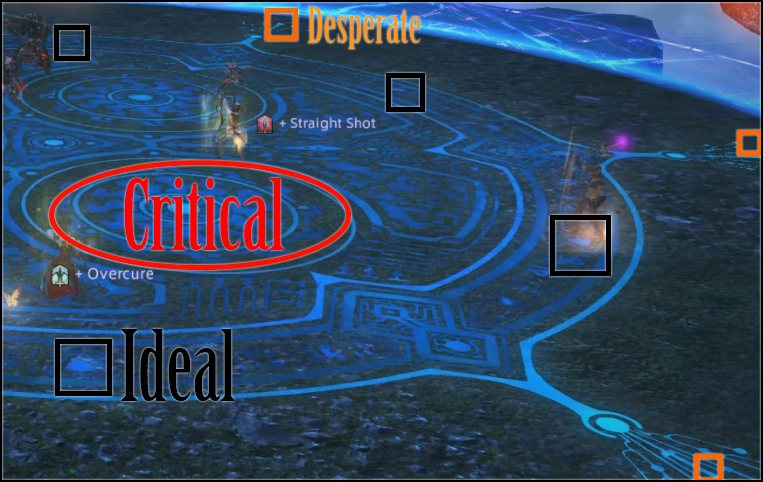
ffxiv turn 9 meteor stardust placements Okay so basically putting 2 meteors close to each other is a wipe. The image on the left is an isometric view of how meteors can be placed. The little triangles on the “rune” mark the ideal meteor placements.

Failsafe 1: If you’re caught unaware by Stardust (SHOULD NOT HAPPEN), and the 2 Ideals next to you have meteors on them (usually happens in the melee pile)… put it on a DESPERATE node (The tips of the tenatacles).

Failsafe 2: If you guys accidentally put a meteor in a critical zone, AND IT DIDN’T BLOW UP, you can still salvage the run… you just have to adjust your GOLEM METEORS in the later phase.

Again, being NOT CAUGHT unaware is your best defense against non-ideal meteor placements. Like I said… KNOWING THE ROTATION BY HEART.

The melee pile (+tanks) have the highest risk of having full ideals. If this is the case, simply have the MT reposition to the nearest tentacle with a free ideal spot.

Ranged guys should use up all ideal nodes opposite of the melee pile first, then the middle nodes.

Desperate nodes aren’t so bad as long as you guys are experienced with the later golem phase (Meteor eating can get a little sketchy if too many meteors are clumped up)… the best situation you want coming out of phase 1 is a good and even spread of meteors.

 Unexpected Ravensbeaks Killing MT

Your tanks should have mitigation up for every beak. If timed correctly (right at the start of beak cast), it mitigates the Beak Poison damage too. But for the most part, healers can remove a chunk of damage from these beaks by casting (primarily) Stoneskin and Adloquium. TIMING is important here, though. Like I said before… knowledge of the rotation!

  • Ravensbeak 1: Begin casting shields 1 or 2s AFTER Stardust castbar.
  • Ravensbeak 2: Begin casting shields after ONE HEAL upon Naels descent.
  • Ravensbeak 3: Begin casting shields after THREE HEALS upon Naels descent.
    (At least this is how I time it in my head, should suffice as a guideline)
  • Use Eye for an Eye each time the tanks swap after beak.
  • Virus can be used (but not on all of them) and Sacred Soil help a ton.

“6 Meteors!?” Means your group DPS is on the low side, and have a REAL DANGER of reaching enrage. Work on gear/rotation when not practicing T9.

At 64% HP, Nael disappears from the arena – and onwards to Phase 2!

Navigation:
[Meteors] | [Golems to Megaflare] | [Heavensfall to Bahamuts Favor] | [Final Phase]

Turn 9 Phase 2: Golems, Meteor Barrage, Megaflare

Here are your objectives for this phase:

  1. Land golem meteors safely
  2. Feed existing meteors to golems (with certain RESTRICTIONS)
  3. Kill golems (Leaving no meteor)
  4. Land all 6 Meteor Barrages safely
  5. Land second set of golem meteors safely
  6. Feed remaining meteors to golem set 2.
  7. Kill golems (Leaving no meteor)
  8. Prepare for MEGAFLARE.

Phase 2A: Golems (First Set)

Once Nael flies back into the arena, 3 green colored meteors spawn on random party members. The same rules apply for the previous stardusts! Ideally you want to land them at the center of each circle (conveniently, there are three in the middle of the rune). “Help! We landed a meteor in the critical area during phase 1!” Chill. Use up any empty Desperate or Ideal nodes. make sure to make small adjustments based on misplaced meteors. As time passes, you’ll be experienced enough to land these well.

Three golems spawn (random location). Blue, Green, Red. Tanks pull Red & Green. DPS and/or Healers pull Blue. After a set period of time, the Golems will “Shuffle colors”… which we will call Color Change. Lets talk about the golem skills.

Green Golem Hits like a truck. Upon spawning and upon color change he will do a supercombo of Thunderclap -> Headbutt. Make sure your tanks mitigate this. Demolish is your general AoE spell that also hits hard.

Blue Golem Does almost no damage thru basic attacks. Magnetism attracts all meteors and players to it. This is the first skill he does so positioning Blue Golem in between 2 meteors is the best bet. !!EARTHSHOCK!! is a RAID ENDING skill… it MUST be silenced (preferably by Bard) or else your entire group is paralyzed and will likely die to the following mechanics.

Red Golem is also weak. His PACMAN (skillname) is pretty easy to avoid. but his other skill… we call it THE WORST SKILL IN THE GAME hahaha. Earthen Heart shoots a deadly AoE on the ground which leaves a nasty DoT. It’s unavoidable under some circumstances (multiple yellow meteors eaten) and kills outright sometimes (multiple reds eaten). Althought this shouldn’t be too much of a problem, it can be annoying.

“FEEDING METEORS!?” Yep. Golems must be lead near meteors for them to “eat” them. The best timing to feed them is when they’re nearly dead. Why? Eating a meteor gives golems superpowers!! So by feeding them when they’re really low you avoid the brunt of these effects. Yellow Meteor = Speed Up, Red Meteor = Damage Up. As a general rule of thumb NO METEOR may remain before the next mini-phase.

The best order of killing golems should be Blue > Green > Red. After about a minute these guys HAVE to be done FEEDING and KILLING GOLEMS. If not? well, back to Phase 1 for you.


Phase 2B: Meteor Barrage

While there are many strategies used to get past this… we call ours THE PAIN TRAIN. While there are prettier strategies to get past this, Pain Train has the least friction. It’s also very easy to teach newer players in the group. How is it done? Simple!

The Pain Train (a guide)

  • Stack up tightly together. Wait for first meteor sign.
  • On Sprint.
  • Run clockwise (or counter if rebellious)
  • Pray to Nophica (Althyk if rebellious)
  • ???
  • Profit.

I wish there was more to it. During the early days we made complex diagrams on how to get past barrage… but the only diagram we needed was a circular one. Have your healers Swiftcast + MedicaII/Succor after the third meteor. “How do we know if it worked?” If you return to the spawnpoint, or Naels life resets to 100%, Pain Train failed. Step 4 of the Pain Train miniguide should not be ignored. Do some AoE heals after this process stops (6 Meteors) and get ready for the second set of golems!

Phase 2C: Golems (Second Set) -> Megaflare

If you guys can get to this point, killing golems should be your middle name. I need not repeat any instructions regarding this since it’s pretty much a repeat of Phase 2A. The only thing that makes this phase unique is MEGAFLAREAfter GREEN GOLEM dies, Stoneskin every non-tank partymember. Scholar should Succor + Sacred Soil when everyone is stacked on B and MT is on C. Same rules apply: All golems have to be dead, all meteors consumed.

If you’ve survived Megaflare.. you’re about to see Phase 3 of the fight! If things were rough up to this point for you, bust out the Allagan Lubricant – THIS AIN’T NOTHIN’ YET!

Navigation:
[Meteors] | [Golems to Megaflare] | [Heavensfall to Bahamuts Favor] | [Final Phase]

Turn 9 Phase 3: Heavensfall, Scourge

Ahh If it’s your first time here, Heavensfall will likely kill you purely by it’s power of over the top visual / audio effects. Or it will kill you because it is a ONE HIT KILL MECHANIC (as it descends). Nael lands on your MT and the aformentioned skill happens a few seconds later. Here are your objectives for this phase:

  1. Survive and position well for Heavensfall 1
  2. Kill the first Scourge (dragon)
  3. Cleanse any Garrote Twists
  4. Survive and position well for Heavensfall 2
  5. (HIGH DPS GROUPS PHASE HERE)(47%)
  6. Kill the second Scourge (dragon)
  7. Cleanse any Garrote Twists
  8. (NORMAL DPS GROUPS PHASE HERE)(47%)
  9. —-On to Final Phase—-
  10. Position for Heavensfall 3 (Preferably Optional from here on)
  11. Die
  12. Point fingers
  13. Harvest a smegma of pride by trying to be the last guy alive
  14. (CHUMPS PHASE HERE)(47%)

Reaching bullet point #10 means a failed run, in case you read that wrong. So let’s discuss what goes on here. Let’s begin with Heavensfall.

Heavensfall has a few effects. Getting caught near the middle will kill you or any pet standing in the immediate vicinity of Heavensfall. There are 3 Heavensfall patterns (yellow floor). We will not be discussing the third. Standing on any yellow lit up floor UPON ITS EXPIRY will result in damage and paralysis (not good).

  • The first pattern (“Hourglass”) is largely ignored with superior positioning. (Hopefully you followed the waymarks we provided)
  • the second patter (“Pizza”) is an alternating pattern that looks like a pizza.(Has 2 supernovas… will discuss this later)
  • The third? hehe.

Garrote / Garrote Twist is a debuff you’ll notice Nael throws out during this phase. The red one can pretty much be ignored (Garrote)… the PURPLE (Garrote Twist) one is a critical mechanic that HAS TO BE DEALT WITH. How? That comes in the next step…

Phase 3b: First Dragon

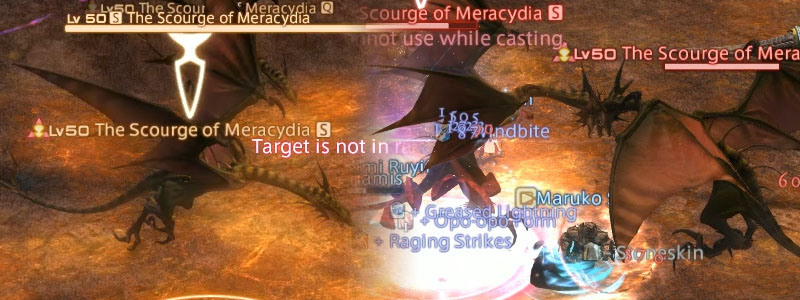
A dragon spawns randomly in the map. Watch out – he hits like a TRUCK. Pre-emptively shielding the off-tank is a good idea here. Both tanks mitigating when a dragon is present should be standard practice! These guys have a few skills

“Fire Breath” leaves a fire AoE on the ground. Obviously, avoid this.
“Death Sentence” is usually his very first attack once it spawns. Be ready for it!!
Binding Chains is the main mechanic here. If the add stays alive for too long, it will bind 2 random players (they are stunned). If the Binding Chains castbar finished – they die. How to avoid this? Kill them as fast as humanly possible. This would be a great time to use Magic Limit Break, hitting both Nael and Dragon.

Killing dragons cause them to drop “CANDY” which is the only way to cleanse GARROTE TWIST. These candies can expire, so make sure both victims of garrote twist are FAST at picking them up.

The first Garrote Twist should be cleansed ASAP. The second one can wait till after 2nd Heavensfall.

Phase 3c: Heavensfall #2, Possible 2nd Dragon

Heavensfall 2 happens and as advertised earlier: It really does look like a Pizza. Allagan Pizza. With Lasers. There is something new here, though! Supernova.

Supernova is basically a landmine. Nael puts them DIRECTLY ON TOP of 2 random raid members here. GTFO of these black circles. After a few seconds pass, these supernovas will be “armed” and being near one will suck you in, do massive damage, paralyze, and is all around a sucky thing to happen to you. What do we do here? Bait Supernova to hit the edges of the screen. Heavensfall -> Pushback -> (Dont reposition yet) -> Supernova 1-2 -> Reposition. This way, novas are clearly away from the group!

IT IS VERY POSSIBLE TO PHASE NAEL HERE (47%). If not, a repeat of phase 3b happens, which isn’t that bad anyway. If you do NOT phase after second dragon you will likely see Heavensfall 3. Don’t ask.

Navigation:
[Stardust, Ravensbeak][Golems to Megaflare][Heavensfall to Bahamuts Favor][Final Phase]

Turn 9 Phase 4: Ice, Fire, Lightning, Favor/Claw & Divebombs!!!

Well well well! Final phase of turn 9! You’re moving up in the world! It’s time to bust out the Allagan Speculum…

“It don’t matter if ya got 4 or 5 X-Potions, Claw and Divebombs are rough- hope you brought Allagan Lotion!”
-Mahiko MC, Turn 9 Rap.

Once Naels HP reaches 47% HP the final Phase of T9 begins. It’s marked by Nael casting “Bahamuts Fervor” which leads to “Bahamuts Claw” (More on this later) a quick summary of how the final phase goes…

Elements -> Thermionic -> Divebombs (R1) -> Free Phase -> Elements -> Thermionic -> Divebombs (R2) (REPEAT)

There’s really only 4.5 miniphases going on here. Namely: Elements, Thermionic, Divebombs (Rotation 1 and 2) and Free Phase.

Turn 9 Phase 4: Elements

The first thing youll notice are the debuffs Fire and Ice. 

  • Fire randomly targets a raidmember (signified by a red line). The target will explode and give the Fire debuff to all players nearby.
  • Ice targets the entire party 1 by 1, and continually cycles.
  • A player getting hit by fire twice leads to death.
  • A player getting hit by ice twice leads to death.
  • Fire and Ice debuff cancel each other.

While this may seem complicated, there is a popular pattern to handle this almost automatically. The “mantra” is as follows:

First fire out DYNAMO : Second fire in: Fire out CHARIOT : Prepare for thermionic. Again there are some small exceptions to this…
(Dynamo and Chariot are the skills you’re probably familiar with from P1)

  • If you were the target of any Fire out, be careful that you dont have the debuff in the next Fire in. (Happens more often than you think)
  • If you have Ice during any Fire out, CHASE THE FIRE (Not always necessary, but very very safe)

Lastly, after every fire comes a Lightning. Lightning targets a random raidmember. After a few seconds this party member explodes for massive damage and paralyzes all nearby allies. This does not affect the person who was initially targeted by lightning. This is easily solved by having the lightning member move BEHIND Nael, while your party stacks in front.

If no one panics, this subphase is a breeze. Next, thermionic

Turn 9 Final Phase: Thermionic / Supernova

Again some very familiar skills return here. Thermionic Beam from P1 and Supernova from Heavensfall phase. You will be entering this subphase from these previous skills of nael: Fire out CHARIOT -> Lightning.

The initial preparation for this is to have your Fire victim and Lightning victim hug the walls. That keeps the middle SAFE (where you’ll be stacking for thermionic, like P1)

Nael does these skills in order: Supernova, Supernova, Supernova, Thermionic Beam, Bahamuts Claw.

First of all, Sacred Soil in the middle once this pattern begins. Have everyone stay AWAY from the middle. DO NOT move in for thermionic until AFTER the 2nd Supernova. The timing here can be a little tight… right after 2nd Nova, get to middle to stack ASAP. This Thermionic Beam is much more painful that the one from Phase 1.

What kills most groups here is either FAILURE TO STACK QUICKLY ENOUGH, or TANK DYING TO CLAW right after beam. Healers and tanks, keep this in mind – after every thermionic is a claw.

What’s Bahamuts Claw? It’s a direct upgrade to Ravens Beak from P1. It’s a tank-buster that does extreme damage. Be sure to have Virus on, Stoneskin/Adloq, and tanks use a mitigation skill. It gets stronger and stronger each time it happens! Note that you can actually can provoke a few hits off it WHILE it’s happening! So offtank can soak one or two slashes.

Turn 9 Final Phase: Divebombs

Ahhh… the infamous divebomb yet again. As if we haven’t seen enough in t5? Divebombs happen twice each time it comes up in Naels rotation.

  • R1: Divebomb -> Meteor Stream -> Divebomb -> Meteor Stream -> Freephase. OR
  • R2: Divebomb -> Chariot -> Divebomb -> Lunar Dynamo -> Freephase.

For R1: Meteor Stream is the Divebomb from P1. DON’T STICK TO EACH OTHER! and as usual, healer does AoE heals in between Meteor Streams.

For R2: Much easier, avoid chariot as always. Lunar Dynamo might hit the guy who baited divebombs. How to dodge divebombs!?! I’ll be posting about that in the next update but for now Check out this image by Encore FC.

So you’ll be coming into this phase from:
Thermionic > Bahamuts Claw > (Ensure markings are set) > Divebombs > R1/ R2 > Divebombs > R1/R2 > Free Phase

Free Phase is exactly that: Nothing happens here except a Bahamuts Claw. After sometime, the rotation goes back to Elements and repeats until he is dead. The enrage is at 13 minutes: Nael casts megaflare and will instakill your party.

Follow us on Facebook for more FFXIV updates!

Navigation:
[Meteors] | [Golems to Megaflare] | [Heavensfall to Bahamuts Favor] | [Final Phase]

FFXIV Rafflesia (Turn 6) Strategy Guide

Thorns, bulbs, bees, honey & slugs! Don’t let Turn 6 get you down! Read our Gardeni… err… Rafflesia Guide!

Welcome to our Rafflesia (Turn 6) Guide! Hopefully we can share with you tips we learned to make this fight less stressful for you!

“Inside your eye sockets are things called eyes. I heard they are useful.” – Mahiko San, FFXIVGuild

Navigation:
[Page 1: Phase 1 & 2 ] [ Page 2: Phase 3 ]
P1 Abilities & Strategy | P2 Abilities & Strategy | Imporant Tips & Reminders

A useful link to have open is our: T6 First Kill Video.

Rafflesia Phase 1 (100%-70%)

Phase 1 Rotation
Thorn Whip – Bulbs – Thorn Whip – Devour/Spit – REPEAT.

Bloody Caress – A strong cleave that adds a stack of Vulnerability up on whoever is hit. Acts as a tank swap mechanic, and you should switch at 3~ stacks.

Thorn Whip – Links two or more people together with a visible tether. Targets will take damage as long as the tether is not broken. The “chain” is broken by moving AWAY from whoever you’re tethered to (a set distance).It’s much easier to break tethers if the initial chain is “short”. Meaning, the closer you guys are stacked for Thorn Whip, the easier it is to break (more on this later).

Dark Matter Bulb – Little plants that can spawn in one of eight possible locations (will never spawn in the same place twice in a row). These bulbs will create a continually growing briar patch until it has grown to max size, or killed (it stops growing, but existing briar will not vanish). Briar prevents movement effects, but also has a huge DoT. This is relevant because…

DEVOUR / SPIT – A Yellow marker appears above the target of “Floral Trap”, and this person will shortly be “Devoured”. Devour is a suction, cone AoE. Be careful – even if you are not the target of Devour, if you are BETWEEN the yellow marked guy and Rafflesia, you’re gonna get sucked in. If Rafflesia eats a guy, he gets a PERMANENT DAMAGE UP.

Blighted Bouquet – Haha, figuring this out the first time was pretty funny. If you take any action towards the end of its cast time – you will die. Simple as that!

Phase Notes
Overall this phase is a non-issue, and pretty much a tutorial for the torment to come. Anyone and their mother can get past Phase 1! Refinement of strategy will be discussed in the Tips & Reminders section.


Rafflesia Phase 2 (70%-40%)

Rafflesia Phase 2 Rotation
Bulbs – Thorn Whip – Devour/Spit – Honey – Thorn Whip – Blight – Bulb – Thorn Whip – Devour/Spit – Thorn Whip – Blight -REPEAT

The briar vanished!” – Everyone.

Thornwhip, Dark Matter Bulb, Devour/Spit and Blighted Bouquet still make an appearance here. In phase 2, though, it is UNSAFE to use old briars to prevent devour. You must always dodge towards newly spawned bulbs/briars.

Again, this is important enough to repeat: If you are targeted by Devour – you may only use briars left by the NEWEST set of bulbs (During Phase 2). Now for the next unique ability of this phase…

Honey / Dark Matter Bee – Rafflesia will target one person to be “Honey Glazed”. This person, well, will attract Bees. Bees do NOT have an aggro table, but luckily they do not hit too hard! They will continue to attack the honey glazed person until he or she dies. Some notes:

  • While in Phase 2, if honey glazed target dies, it will be immediately recast to someone else.
  • If a second bee spawns while the first is alive, the first will begin casting Final Sting. (Hint: It’s not good)
  • If a honeyed guy exists when Phase 3 happens, bees will continue to spawn, likely causing a wipe.

Getting rid of Honey is key to phase 2. How? The Honey Glazed target MUST be devoured. You’ve worked very hard to be not devoured, so getting devoured on purpose should be a no brainer.

Rafflesia Tips & Reminders

Thorn Whip is often underestimated. The mechanic is very simple, and will very likely never cause your death directly. It does, however, start certain chains of events that can lead to strain or failure. We gained considerable consistency and stability when we applied one simple rule: Stack up before Thorn Whip. The shorter the whip, the easier it is to break! Everyone takes less chain damage, everyone has more freedom of movement, less accidental devours, less briar damage…so on, so forth. This lasts throughout the WHOLE FIGHT so you might as well get used to it.

Thorn Whip -> Devour: How? Dodging devour is pretty easy if you’re the one who has the mark. What if you’re chained to someone? What if multiple people ran the same way you did? To prevent all this BS, we applied a simple rule: WAIT FOR DEVOUR UNTIL BREAKING CHAINS!! We would all rather take a bit more chain damage than to risk the entire raid.

Honey/Bee Problems? Well, ideally you only want 1 honey but this isnt always possible. If middle bulbs spawn – you can’t dps the boss! So instead we just applied a rule of “ALWAYS TWO BEES” and “STOP DPS IF NEEDED”. This way, we’re not stressed for time.

Phase Transition happened but a honey is still around!? This guy has to die. Have him stand in ACID RAIN.

——————————————————

80% of this fight is getting through Phase 2 in a “salvageable” state. 20% is the Phase transition, because Phase 3 is actually easier. More on that in Page 2 of this guide!

Follow us on Facebook for more FFXIV updates!

Navigation:
[Page 1: Phase 1 & 2 ] [ Page 2: Phase 3 ]
P1 Abilities & Strategy | P2 Abilities & Strategy | Imporant Tips & Reminders

FFXIV Twintania (Turn 5) Guide

How to beat Twintania! Learn all about Death Sentence, Divebombs, Twisters and Dreadknights in this super epic fight!

The infamous boss of the Binding Coils of Bahamut Turn 5: Twintania. The cause of many sleepless nights, and waking nightmares.

“What!? The DPS race doesn’t start once the snakes spawn. It starts the very second you pull Twintania.
That’s the BASAGULERO way.” -Kharas Dorian. FFXIVGuild.

Navigation

Twintania Phase 1: Adds (to 85%)

ffxiv-twintania-turn-5-guide-binding-coils-of-bahamut-ads

The fight begins with Twintania surrounded by 3 mini-dragons. The phase ends when Twintanias HP reaches 85%, wether or not the adds remain alive.

Abilities

Plummet – A frontal cleave with a huge cone, and huge damage. Comes around every 10s. *Continues throughout the fight.

Liquid Hell – A fire spit that randomly targets a raid member. It does medium initial damage, and an extremely heavy fire DoT when standing on it afterwards.

DEATH SENTENCE – Arguably one of the key mechanics of Twintania. Surviving Death Sentence is a grim reminder that you have to remain focused to beat T5, on around a 30-35 second cooldown. “DS” must be treated with respect, the earlier your raid drills it into their mind that “Every DS can potentially kill your tank in 1 hit”, the earlier you guys will adjust your strategy to reduce it’s damage. DS is notorious for having auto-attacks weaved into its damage, and have a Plummet come right after (most of the time, the Plummet comes before it). Here are the main Checkpoints

  • Virus – If Twintania isn’t immune – tag her with Virus.
  • Storms Path – Should always be up. If there’s a time it can be down – make sure it isn’t DS!
  • Defensive Cooldowns – Should ONLY be used by the MT on Death Sentences.
  • Stoneskin / Adloquium – A shield definitely helps with the more painful Death Sentences.
  • Sacred Soil – in a pinch, or to use up Aetherflow.

A note on mitigating Death Sentence: Virus and Defensive Cooldowns (from what I’ve noticed) need a time to “settle in” before DS hits. Casting virus extremely close to DS full cast timer will sometimes cause it not to take effect. The same goes for Defensive Cooldowns. It’s better and safer to do these things BEFORE DS. Doing so you can mitigate the hits leading up to it, and right after it, of course catching the huge nuke itself.

Stoneskin can land right before or right after DS hits. Adloquium should be cast before DS, as it loses much of it’s effect after. (But still not bad).

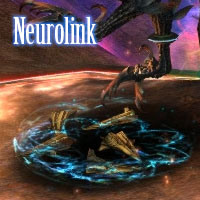
ffxiv-twintania-turn-5-guide-binding-coils-of-bahamut-neurolinkThe completion of this Phase (HP reaches 85%) is marked by her dropping the first “Neurolink“. Your positioning should already be “set” for the next phase by this point. Details discussed below.


Twintania Phase 2: Conflagration / Fireball (to 55%)

Death Sentence gains an additional effect: Infirmity (Reduces healing by a large amount). This additional effect modifies Death Sentence for the entirety of the fight.

Phase Specific Abilities

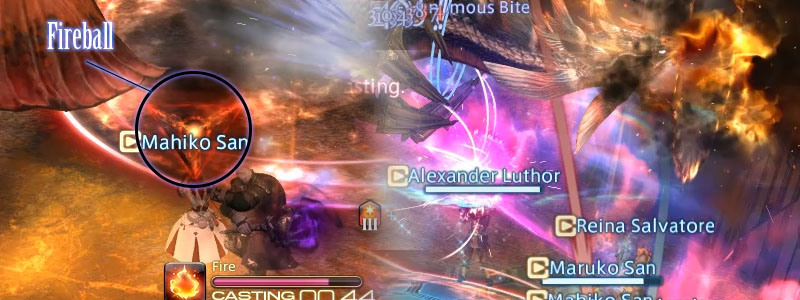
Fireball – Targets a random raid member (Red Triangle). After a short time, an AoE which does around 16k damage falls on the target. This damage is SHARED between all raid members in the AoE. You need (a safe number) 4 victims to survive fireball consistently.


ffxiv-twintania-turn-5-guide-binding-coils-of-bahamut-fireball

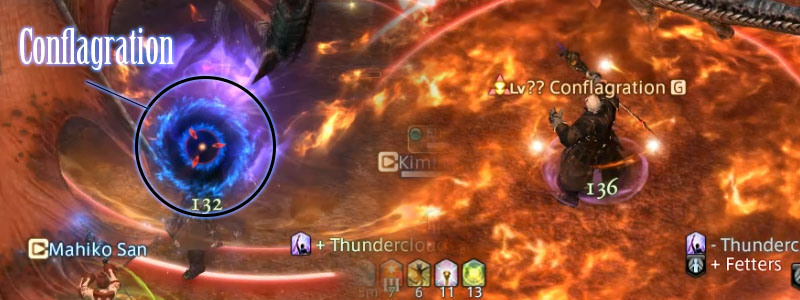
Conflagration – Targets a random raid member (Blue circle). After a short time, a “Conflagration” will spawn right on top of the target, rendering the target unable to do ANYTHING. Anyone caught for too long inside this “Conflag” will be “Stunned”. Anyone may enter a Conflagration, to willingly stun themselves (and be immune to all damage while inside).


ffxiv-twintania-turn-5-guide-binding-coils-of-bahamut-conflag

Fireball and Conflagration are linked. The more people hit by fireball, the faster the next conflag will be. If the tank has a good amount of HP, he can willingly enter conflags to ease the strain on healers. Death Sentence should ALWAYS be dodged in this way, if possible.

Positioning – There are two popular positioning strategies for this phase. 4×4 and Soak Team.

4×4 – Scholar, Pet, and 2 members on one side. Healer and 3 members on the other side. With MT up front, forming a triangle.

  • Pros: Little movement required, Less coordination required.
  • Cons: More Healing intensive, more heals interrupted.

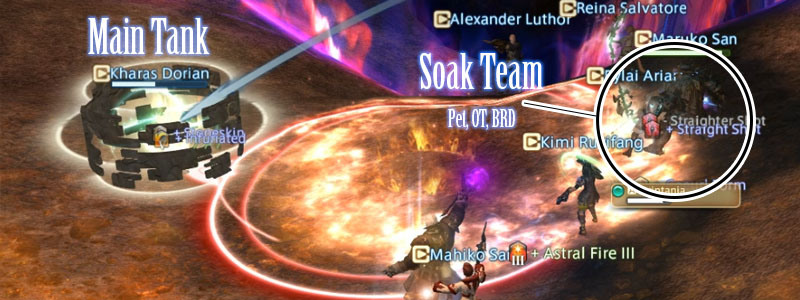
Soak Team – What we use, OT + Ranged DPS + Pet(or human) at south. This group is known as the Soak Team. Remaining members at either side. MT up front. Fireball target runs to Soak Team. If Soak Team is targetted, Designated “joiner” helps.

  • Pros: Minimal Healing needed. Saves a ton of mana, much safer.
  • Cons: Much more movement/coordination needed.

ffxiv-twintania-turn-5-guide-binding-coils-of-bahamut-soak

Conflag / Fireball Timers

  • First Conflag (Slow, easy to kill). Will have fireball – target enters conflag.
  • Second Conflag (Fast, DPS hard!).
  • Third Conflag (Slow, easy to kill) Will have fireball – target enters conflag.
  • Fourth Conflag (Fast, DPS hard!).
  •  – This is the ideal time for Twintania to switch Phases.
  • Fifth Conflag (Slow, easy to kill) Will have fireball – target enters conflag.
  • So on, so forth.

Dealing with 2nd and 4th (Fast Conflags)

DPS Use a short cooldown if needed. The MT can also stay outside the Conflag to help kill it. Off-GCD skills should be saved for these specific conflags!

  • Bard – Use Venomous Bite, instead of Windbite. Not both. Save Blootletter procs.
  • Summoner – A tough call… While Bane + Fester is most ideal, this is pretty harsh on Aetherflows. Bane + Ruins is okay.
  • Black Mage – Save firestarters / Thunderclouds for these! Don’t bother using Thunder.
  • Monk / Dragoon – Don’t bother with DoT’s.

The completion of this Phase (HP reaches 55%) is marked by her dropping the second “Neurolink“.

Why Not 3 man Conflags to increase the timer?

“If you don’t have the DPS for 4 man conflags, you shouldn’t even be here”Kimi Ruyifang, FFXIVGuild.

Follow us on Facebook for more FFXIV updates!

Navigation

FFXIV Turn 4 Strategy Guide (Elevator Gauntlet)

“I’m tired of these @#$% Robots, in this @#$% Elevator!” How to beat BCoB Turn 4!

ffxiv elevator gauntlet turn 4 guide binding coils of bahamut


Welcome to our T4 strategy guide! BcoB Turn 4 doesn’t exactly have a “boss”, but instead SIX phases of varying combinations of ADDS, each with their own abilities! The challenges in this turn is familiarizing yourself with each phase, and positioning properly!

“I’m tired of these @#$% Robots, in this @#$% Elevator!”
– FFXIVGuild raid team 1, prior to first down.

Phase 1 – Spiders

turn 4 - phase 1turn 4 - key

The first thing you encounter here is called “Clockwork Bug“, but we will be calling them Spiders from here on! 6 Spiders spawn and do nothing until you pull them. The “timer” starts from the second you aggro the spiders.

Spider Abilities – Spiders don’t have any abilities themselves, but when they are near a Dreadnought, they will be “eaten”, granting the Dreadnought extra healing and presumably damage.

Just stack them all up in the middle and AoE them to death.

Phase 2 – Knights & Soldiers

turn 4 - phase 2 turn 4 - keySay hello to your new friends, the Clockwork Knight and Clockwork Soldier. Main and off-tank need to pull 1 pair each.

Knight Abilities – Does Headspin (small PBAoE). MAGIC DPS against the knight damages it’s caster.

Soldier Abilities – Does Headspin (small PBAoE). Has STONESKIN that blocks only Physical damage. This Stoneskin refreshes itself after a set amount of time upon breaking. Don’t let this happen!

Given the abilities of these guys, Physical DPS should focus on Knights first. Magic DPS focus on Soldiers.

Here’s the strategy we use: Physical DPS goes for the Knight of Tank 1. Magic DPS goes for the Soldier of Tank 2, then switch. Why? It’s much easier to manage aggro this way.

Help, we have an imbalance of DPS classes (Too much Magic, or too much Physical)!

It’s okay, just keep doing the recommendation above. The only thing you guys should consider is having the MT Add-free for the next phase. For example, if you have 1 Physical, have him kill the MT’s knight first, then the MDPS kill the OT’s Soldier. The MT’s Soldier should be dead by the time the first Dread spawns.

Phase 3 – Dreadnought + Spiders

turn 4 - phase 3 turn 4 - keyFor lesser geared teams, it’s normal to have 1 add still alive from the previous phase entering this one. Spiders will spawn on the far side of the room, and must be fed to the Dreadnought.

Dreadnought Abilities – Seemingly cleaves on every attack. Does Rotoswipe, a massive cleaving attack. These guys hit hard! For each Spider a Dreadnought consumes, it gains a significant HP Regen + increased damage.

This is the first “significant” DPS race in the game. The Dreadnaught, having eaten 4 Spiders, is pretty strong and regenerates health quickly. For lesser geared teams, using Stat Potions would be a good idea here. The Dreadnought MUST DIE in 1 minute. Otherwise, the Spiders that will spawn next phase will heal it, likely resulting in a wipe.


Phase 4 – Rooks + Spiders

turn 4 - phase 4 turn 4 - keyA new type of baddie appears in this phase. The Spinner Rook. 2 of these guys appear, along with 4 spiders.

Rook Abilities – Does Pox, a nasty frontal cone AoE, which reduces max HP and does a DoT. Don’t get hit by this!

Stack all EVERYTHING in the middle, enemies and allies, with only the tanks outside, so Pox has no risk of hitting anyone else. Tanks must dodge Pox by moving inside with everyone else, then moving back out once Pox is done casting.

Focus down the rooks first, then AoE the spiders down. These spiders must die before the next phase, or else the Dread that will spawn next phase will be tougher.

Depending on gear/group, using AoE magic Limit Break here is an option, but better saved for later on.

Phase 5 – Dreadnought + Knight & Soldier

turn 4 - phase 5 turn 4 - keyHave DPS kill the Knight and Soldier as fast as possible. When they die, start beating up the Dreadnought (We will call this guy Dreadought A). This phase is kind of quiet, and a lot of extra time can be had in preparation for the final phase, which will probably kick your butt the first few (many) times you see it.

 Phase 6 – Double Dreadnought + Knight & Soldier + Rook + Spiders

turn 4 - phase 6 turn 4 - keyAlso known as “EVERYTHING”. Have your MT pick up another dread (yep). and OT picks up everything else, except the Rook. Here’s a summary of what you need to do in this phase.

  • Kill Rook
  • Kill Dreadnought A
  • Feed Spiders to Dreadnought B
  • Kill Knight/Soldier
  • Kill Dreadnought B
  • After some time, the enrage timer activates, doing AoE damage to the entire raid.

Your first goal in this phase is Killing the Spinner Rook. Have any DPS tank this guy and just to to town on it. Some groups use Melee Limit-break here.

This phase sounds ridiculous when first getting through t4. “TWO DREADNOUGHTS” is just nuts. Having the tank survive this onslaught is key in this phase. Here’s what we do.

  • Tank Limit-break helps greatly here.
  • Have all defensive cooldowns up for this point. Line them up, don’t stack them up.
  • Don’t forget about healer cooldowns! Rouse, Divine Seal, Presence of Mind…
  • Sacred Soil & Eye for an eye are champs here.

The off-tank also takes significant damage here. Eye for an Eye helps alot in that end. Once Dreadnought A dies, a lot of pressure goes away, and you’re pretty much home free. Feed spiders to the remaining dreadnought and have your DPS kill the Knight and Soldier.

Once the final Dreadnought is the only enemy remaining, stack behind it and kill it ASAP. For lesser geared groups, defeating it DURING the enrage timer is quite normal.

Here’s a compiled image with all the phases.

turn 4 big

Turn 4 Loot List

TankHealerCasterMNKDRGBRD
Weapon------
Off-Hand------
Head---Allagan Visor of StrikingAllagan Visor of Maiming-
Body-Allagan Tunic of Healing---Allagan Curias of Aiming
HandsHeavy Allagan Gauntlets-----
Waist-Allagan Rope Belt of HealingAllagan Rope Belt of CastingAllagan Tassets of Striking--
Legs--Allagan Breeches of Casting---
Boots-----Allagan Sollerets of Aiming
Neck-----Allagan Choker of Aiming
Earrings--Allagan Earrings of Casting---
BraceletsAllagan Bracelets of FendingAllagan Bracelet of Healing----
Ring-Allagan Ring of Healing-Allagan Ring of StrikingAllagan Ring of Maiming-

Well, that’s it and good luck killing deez robots!

Follow us on Facebook for more FFXIV updates!