Twintania Phase 3: Divebombs (part of Phase 4)
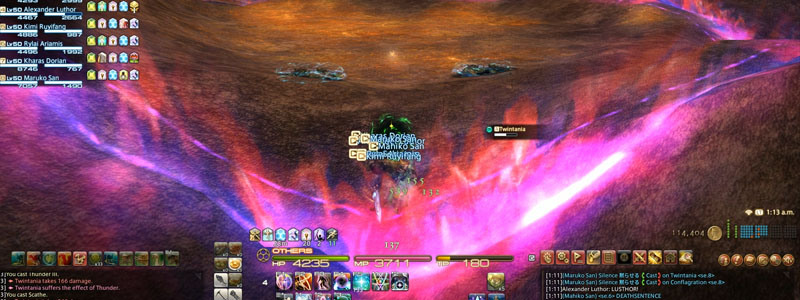
Twintania flies up, leaving the arena. She will then do one of her more annoying abilities “Divebomb“.
Divebombs initially target any random raid member (Green Icon). After a short delay he or she will be hit by a massive line AoE. It can be avoided. The AoE has no “red warning zone”. It’s extremely unforgiving with lag of any kind (Human brain or latency). While theoretically there are many ways to dodge divebomb the most practical is having the whole (or most) of the group stay in one place, and dodge together. This way, you can predict where DB is coming from every time!
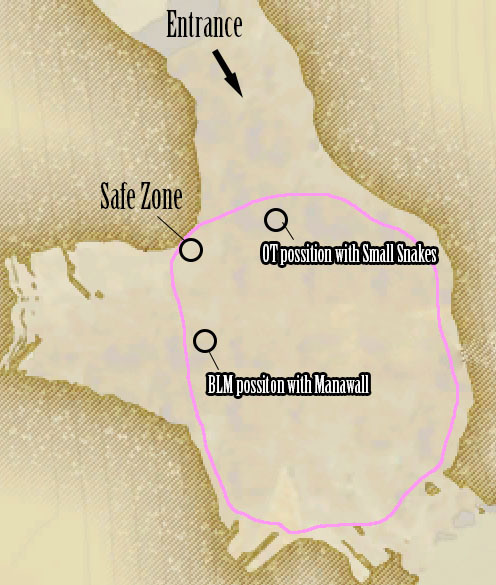
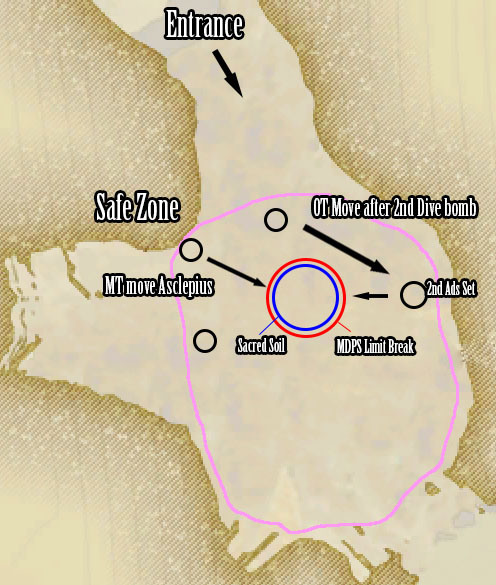
Here is the most popular divebomb “Safe zone” and the direction of where to dodge.

Some tips on Divebomb:
- Get as close to the pink wall as possible!
- Healers have time to cast a spell in between each DB. Stoneskin the tanks!
- If you get hit, get to the wall! Then rejoin the party after next divebomb.
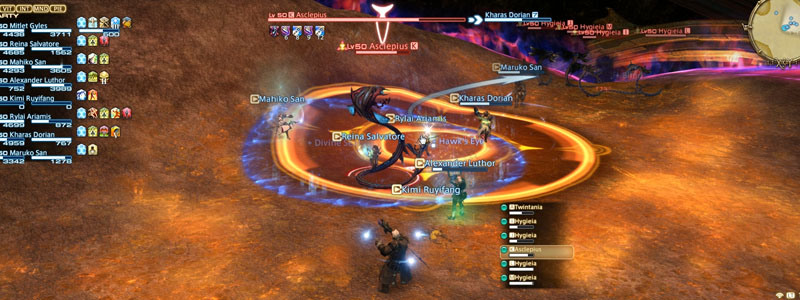
After 3 Divebombs, 3 adds (Snakes) will spawn. Asceplius and Hygiea. We will be discusing them more in detail in the next phase. For now you have only 4 objectives at this point.
- 1 Tank pick up Asceplius, 1 Tank pick up both Hygeia
- Damage (but do not kill) both Hygiea: around 50% is enough.
- Focus DPS on Asceplius after. (Do NOT use DPS Cooldowns)
- This sub-phase lasts 45 seconds. You must reposition for Divebomb again.
So here’s a summary of how this phase goes:
(3x Divebomb) – (Adds Spawn) – (45 seconds freetime) – (3x Divebomb) (Second set of adds Spawn)
Second set of Divebombs
The second set of DB’s might confuse most people at first since it’s kind of chaotic compared to the first. This happens WHILE you’re fighting the adds.
A popular strategy we like to call the “Split Stack” is often used at this point. The tank on both Hygiea will split away from the group, slightly above on the hill near the entrance. This is to prevent confusion and unnecessary damage on Hygiea, as well as having the “OT” closer to the second set of adds when they spawn.
After another 3 Divebombs, the second Set of adds spawn all the way opposite of the first. This time, it’s only 2 Hygiea.
Twintania Phase 4: Asceplius (part of Phase 3)
Hygiea (small snake) has a special on-death effect. It releases a debuff called “Disseminate” to all targets near the location of its death. Disseminate increases damage taken. This can stack up to 4 times (4 total Hygiea). The idea is to get all four stacks of Disseminate on to Asceplius and kill it. These guys hit exceptionally hard, and are capable of Critical Strikes. this is the perfect time for the tanks to use Awareness.
The objectives of this phase are as follows.
- A) “OT” pulls the second set of Hygiea.
- B) Position it so MT gets no stacks of Disseminate.
- C) Kill the original 2 Hygiea with Magic Limit-break.
- D) Kill the remaining 2 QUICKLY.
- E) Have 4 stacks of Disseminate of Asceplius.
- F) Kill Asceplius before Aetheric Profusion.
There are little things that can go wrong every step of the way. We will be discussing little tips to help you out!
“OT” pulls the second set of Hygiea: These guys have weird Aggro. Healers are very likely to pull the snakes even without interacting with them, or the tanks they’re targetting. (Even w/o regen). It doesn’t happen all the time, but it happens often enough that you should have plans to deal with it. Saints Shroud should be saved for this phase (Ideal scenario). Or just have the tanks take extra care in generating aggro on the new snakes.
Position it so MT gets no stacks of Disseminate
Other DPS should be refreshing DoT’s on asceplius at this point. Don’t bother hitting the other Hygiea before the LB hits.
Kill the original 2 Hygiea with Magic Limit-break: Sacred soil is a great tool to “mark” the area where your group will fight / LB. Also, of course, reduces damage taken. The LB should insta-kill the original set.
LB charges differently for each group. If you think you’ll only get LB2: 50%HP on the first set is enough. If you think you’ll reach LB3: 70% is enough. Do not DPS them any more than necesary – the “main” DPS race will begin shortly.
Kill the remaining 2 QUICKLY: AoE, single target, I don’t care. Make sure your DPS kills the remaining 2. If done correctly, they will have 2 stacks of Disseminate, making them melt quickly. Disseminate lasts 45 seconds… you DO NOT want a stack on a friendly character when Aetheric Profusion hits…
Have 4 stacks of Disseminate of Asceplius: Do you have 4 stacks of Disseminate on Asceplius? If not, feel free to commit suicide on the pink wall. If you do, great!
Kill Asceplius before Aetheric Profusion: This is the most intense DPS race in the game. Use everything you can do destroy it. What do I mean by “Everything”?EVERY THING.
- If your tank has zero stacks, consider having MDPS virus Ascep so one healer can DPS.
- DPS should save all cooldowns for this phase, and off-gcd abilities! (Tanks too!)
- EVERYONE use stat potions! (Tanks too!)
- Battle Voice your Foe Requiem!
- POTENT POISONING POTION IF NEEDED! (We used this back in the day)
roughly ONE MINUTE after the second set of adds spawn Twintania will cast Aetheric Profusion whether or not Asceplius is alive or dead.
**To survive Aetheric Profusion, everyone must be inside a Neurolink. MT should stay in one, the rest of the raid stays in the other. This is to prevent the party from getting hit by a Plummet.

Asceplius > Aetheric Profusion > Twister Transition
While not a phase, this is a really sensitive phase transition. Here are a couple things on your “checklist” (mainly as healers) to do so it’ll be easier. By order of importance. The more spare time you have after killing Asceplius, the better this transition will be.
- The entire raid is full?
- Arcanist Virus on Twintania?
- FOCUS TARGET on TWINTANIA
- Sacred Soil on main group?
- WHM Stoneskin on MT?
- Is Medica 2 Running?
- Succor shield on everyone?
- Eye for an Eye on tank?
- Regen on tank?
- Both healers time their AoE heals to land after Aetheric.
Why is this so important? Post Aetheric Profusion, the infamous Twister phase begins. The entire raid must quickly “settle in” to their position. During this time Twintania doesn’t give a damn if you guys are scuttling about. There are only TWO abilities she might do right after Aetheric. Twister or Death Sentence. Your tank must be VERY HEALTHY after profusion. Ideally with a Succor Shield, swiftcasted Stoneskin after Profusion. At this time DS has reached its FULL POTENCY and can easily destroy your tank.
Follow us on Facebook for more FFXIV updates!
Navigation
Seriously, what a stupid name for a Boss? Twintania? Twintails? Huh? Just stupid.
How about you add me. JohnnyTeamKill on PS4 and help me and my buddy beat this dungeon please! Lol
um… it’s Alagan pants of healing, you’ve got Alagan tunic of healing there lol
fixed