So, if you’re reading this, it probably means Nael bricked you from entering FCoB. It’s okay, cause we got your back! Turn 9 isn’t as daunting as you might think it is!
Navigation:
[Meteors] | [Golems to Megaflare] | [Heavensfall to Bahamuts Favor] | [Final Phase]
Turn 9 Phase 1: Meteors (Stardust)
This phase may seem very chaotic, but dont let it overwhelm you! In reality there are really only FOUR skills in this phase. This phase lasts from pull to Nael reaching 64% HP.
“The best thing you can do for your team in Phase 1 of T9 is to know the rotation”
| Chunk 1 | 2 | 3 | 4 | 5 |
| Stardust | Stardust | Ravensbeak | Ravensbeak | Stardust(?) |
| Ravensbeak | Lunar Dynamo | Stardust | Stardust | Dynamo (?) |
| Dive->Chariot | Divebomb | Double Dives | Dive->Chariot | Divebomb(?) |
| Thermionic | LAND ON MT | LAND ON MT | Thermionic | FORGOT |
| JUMP TO MT | LAND ON MT | FORGOT |
Ravensbeak is just like Twintanias Death Sentence. A massive hit which your healers should preempt with shields (Stoneskin, Adloquium). It leaves a debuff on the target which explodes after a time (we call this Beak Poison). This promotes a tank swap strategy (As for this guide we’re going looking at a 2 Tank 2 Healer 4 DPS lineup)
Dive -> Chariot -> Thermionic these three skills always come together. Dive makes Nael go to a random party member, Chariot is a circle AoE that pushes (easily avoided) and Thermionic beam deals shared damage to all partymembers stacked onto the target.
Divebomb (Meteor Stream) chooses 3 random party members and deals significant AoE damage to them, and all those around them. Having a single member eat 2 of these is likely death… therefore spreading out is needed.
If you think of it this way, like mentioned earlier, the phase only has FOUR SKILLS TO LOOK OUT FOR. The very first step to beating this phase consistently is KNOWING THE ROTATION BY HEART. It’s been half a year-ish since I’ve seen the 5th chunk, so let me get back to you on that…
Here are the MAIN PROBLEMS groups face when tackling this phase:
Knowledge of the Phase Rotation (Fixed by studying the above table)
Meteor (Stardust) Placement & Positioning
Unexpected Ravensbeaks Killing MT
Meteor (Stardust) Placement & Positioning
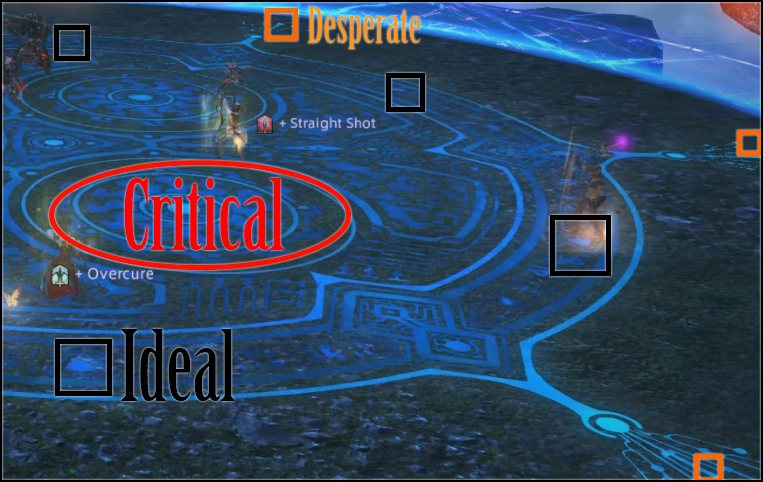 Okay so basically putting 2 meteors close to each other is a wipe. The image on the left is an isometric view of how meteors can be placed. The little triangles on the “rune” mark the ideal meteor placements.
Failsafe 1: If you’re caught unaware by Stardust (SHOULD NOT HAPPEN), and the 2 Ideals next to you have meteors on them (usually happens in the melee pile)… put it on a DESPERATE node (The tips of the tenatacles).
Failsafe 2: If you guys accidentally put a meteor in a critical zone, AND IT DIDN’T BLOW UP, you can still salvage the run… you just have to adjust your GOLEM METEORS in the later phase.
Again, being NOT CAUGHT unaware is your best defense against non-ideal meteor placements. Like I said… KNOWING THE ROTATION BY HEART.
The melee pile (+tanks) have the highest risk of having full ideals. If this is the case, simply have the MT reposition to the nearest tentacle with a free ideal spot.
Ranged guys should use up all ideal nodes opposite of the melee pile first, then the middle nodes.
Desperate nodes aren’t so bad as long as you guys are experienced with the later golem phase (Meteor eating can get a little sketchy if too many meteors are clumped up)… the best situation you want coming out of phase 1 is a good and even spread of meteors.
Unexpected Ravensbeaks Killing MT
Your tanks should have mitigation up for every beak. If timed correctly (right at the start of beak cast), it mitigates the Beak Poison damage too. But for the most part, healers can remove a chunk of damage from these beaks by casting (primarily) Stoneskin and Adloquium. TIMING is important here, though. Like I said before… knowledge of the rotation!
- Ravensbeak 1: Begin casting shields 1 or 2s AFTER Stardust castbar.
- Ravensbeak 2: Begin casting shields after ONE HEAL upon Naels descent.
- Ravensbeak 3: Begin casting shields after THREE HEALS upon Naels descent.
(At least this is how I time it in my head, should suffice as a guideline) - Use Eye for an Eye each time the tanks swap after beak.
- Virus can be used (but not on all of them) and Sacred Soil help a ton.
“6 Meteors!?” Means your group DPS is on the low side, and have a REAL DANGER of reaching enrage. Work on gear/rotation when not practicing T9.
At 64% HP, Nael disappears from the arena – and onwards to Phase 2!
Navigation:
[Meteors] | [Golems to Megaflare] | [Heavensfall to Bahamuts Favor] | [Final Phase]
Turn 9 Phase 2: Golems, Meteor Barrage, Megaflare
Here are your objectives for this phase:
- Land golem meteors safely
- Feed existing meteors to golems (with certain RESTRICTIONS)
- Kill golems (Leaving no meteor)
- Land all 6 Meteor Barrages safely
- Land second set of golem meteors safely
- Feed remaining meteors to golem set 2.
- Kill golems (Leaving no meteor)
- Prepare for MEGAFLARE.
Phase 2A: Golems (First Set)
Once Nael flies back into the arena, 3 green colored meteors spawn on random party members. The same rules apply for the previous stardusts! Ideally you want to land them at the center of each circle (conveniently, there are three in the middle of the rune). “Help! We landed a meteor in the critical area during phase 1!” Chill. Use up any empty Desperate or Ideal nodes. make sure to make small adjustments based on misplaced meteors. As time passes, you’ll be experienced enough to land these well.
Three golems spawn (random location). Blue, Green, Red. Tanks pull Red & Green. DPS and/or Healers pull Blue. After a set period of time, the Golems will “Shuffle colors”… which we will call Color Change. Lets talk about the golem skills.
Green Golem Hits like a truck. Upon spawning and upon color change he will do a supercombo of Thunderclap -> Headbutt. Make sure your tanks mitigate this. Demolish is your general AoE spell that also hits hard.
Blue Golem Does almost no damage thru basic attacks. Magnetism attracts all meteors and players to it. This is the first skill he does so positioning Blue Golem in between 2 meteors is the best bet. !!EARTHSHOCK!! is a RAID ENDING skill… it MUST be silenced (preferably by Bard) or else your entire group is paralyzed and will likely die to the following mechanics.
Red Golem is also weak. His PACMAN (skillname) is pretty easy to avoid. but his other skill… we call it THE WORST SKILL IN THE GAME hahaha. Earthen Heart shoots a deadly AoE on the ground which leaves a nasty DoT. It’s unavoidable under some circumstances (multiple yellow meteors eaten) and kills outright sometimes (multiple reds eaten). Althought this shouldn’t be too much of a problem, it can be annoying.
“FEEDING METEORS!?” Yep. Golems must be lead near meteors for them to “eat” them. The best timing to feed them is when they’re nearly dead. Why? Eating a meteor gives golems superpowers!! So by feeding them when they’re really low you avoid the brunt of these effects. Yellow Meteor = Speed Up, Red Meteor = Damage Up. As a general rule of thumb NO METEOR may remain before the next mini-phase.
The best order of killing golems should be Blue > Green > Red. After about a minute these guys HAVE to be done FEEDING and KILLING GOLEMS. If not? well, back to Phase 1 for you.
Phase 2B: Meteor Barrage
While there are many strategies used to get past this… we call ours THE PAIN TRAIN. While there are prettier strategies to get past this, Pain Train has the least friction. It’s also very easy to teach newer players in the group. How is it done? Simple!
The Pain Train (a guide)
- Stack up tightly together. Wait for first meteor sign.
- On Sprint.
- Run clockwise (or counter if rebellious)
- Pray to Nophica (Althyk if rebellious)
- ???
- Profit.
I wish there was more to it. During the early days we made complex diagrams on how to get past barrage… but the only diagram we needed was a circular one. Have your healers Swiftcast + MedicaII/Succor after the third meteor. “How do we know if it worked?” If you return to the spawnpoint, or Naels life resets to 100%, Pain Train failed. Step 4 of the Pain Train miniguide should not be ignored. Do some AoE heals after this process stops (6 Meteors) and get ready for the second set of golems!
Phase 2C: Golems (Second Set) -> Megaflare
If you guys can get to this point, killing golems should be your middle name. I need not repeat any instructions regarding this since it’s pretty much a repeat of Phase 2A. The only thing that makes this phase unique is MEGAFLARE. After GREEN GOLEM dies, Stoneskin every non-tank partymember. Scholar should Succor + Sacred Soil when everyone is stacked on B and MT is on C. Same rules apply: All golems have to be dead, all meteors consumed.
If you’ve survived Megaflare.. you’re about to see Phase 3 of the fight! If things were rough up to this point for you, bust out the Allagan Lubricant – THIS AIN’T NOTHIN’ YET!
Navigation:
[Meteors] | [Golems to Megaflare] | [Heavensfall to Bahamuts Favor] | [Final Phase]
Turn 9 Phase 3: Heavensfall, Scourge
Ahh If it’s your first time here, Heavensfall will likely kill you purely by it’s power of over the top visual / audio effects. Or it will kill you because it is a ONE HIT KILL MECHANIC (as it descends). Nael lands on your MT and the aformentioned skill happens a few seconds later. Here are your objectives for this phase:
- Survive and position well for Heavensfall 1
- Kill the first Scourge (dragon)
- Cleanse any Garrote Twists
- Survive and position well for Heavensfall 2
- (HIGH DPS GROUPS PHASE HERE)(47%)
- Kill the second Scourge (dragon)
- Cleanse any Garrote Twists
- (NORMAL DPS GROUPS PHASE HERE)(47%)
- —-On to Final Phase—-
- Position for Heavensfall 3 (Preferably Optional from here on)
- Die
- Point fingers
- Harvest a smegma of pride by trying to be the last guy alive
- (CHUMPS PHASE HERE)(47%)
Reaching bullet point #10 means a failed run, in case you read that wrong. So let’s discuss what goes on here. Let’s begin with Heavensfall.
Heavensfall has a few effects. Getting caught near the middle will kill you or any pet standing in the immediate vicinity of Heavensfall. There are 3 Heavensfall patterns (yellow floor). We will not be discussing the third. Standing on any yellow lit up floor UPON ITS EXPIRY will result in damage and paralysis (not good).
- The first pattern (“Hourglass”) is largely ignored with superior positioning. (Hopefully you followed the waymarks we provided)
- the second patter (“Pizza”) is an alternating pattern that looks like a pizza.(Has 2 supernovas… will discuss this later)
- The third? hehe.
Garrote / Garrote Twist is a debuff you’ll notice Nael throws out during this phase. The red one can pretty much be ignored (Garrote)… the PURPLE (Garrote Twist) one is a critical mechanic that HAS TO BE DEALT WITH. How? That comes in the next step…
Phase 3b: First Dragon
A dragon spawns randomly in the map. Watch out – he hits like a TRUCK. Pre-emptively shielding the off-tank is a good idea here. Both tanks mitigating when a dragon is present should be standard practice! These guys have a few skills
“Fire Breath” leaves a fire AoE on the ground. Obviously, avoid this.
“Death Sentence” is usually his very first attack once it spawns. Be ready for it!!
Binding Chains is the main mechanic here. If the add stays alive for too long, it will bind 2 random players (they are stunned). If the Binding Chains castbar finished – they die. How to avoid this? Kill them as fast as humanly possible. This would be a great time to use Magic Limit Break, hitting both Nael and Dragon.
Killing dragons cause them to drop “CANDY” which is the only way to cleanse GARROTE TWIST. These candies can expire, so make sure both victims of garrote twist are FAST at picking them up.
The first Garrote Twist should be cleansed ASAP. The second one can wait till after 2nd Heavensfall.
Phase 3c: Heavensfall #2, Possible 2nd Dragon
Heavensfall 2 happens and as advertised earlier: It really does look like a Pizza. Allagan Pizza. With Lasers. There is something new here, though! Supernova.
Supernova is basically a landmine. Nael puts them DIRECTLY ON TOP of 2 random raid members here. GTFO of these black circles. After a few seconds pass, these supernovas will be “armed” and being near one will suck you in, do massive damage, paralyze, and is all around a sucky thing to happen to you. What do we do here? Bait Supernova to hit the edges of the screen. Heavensfall -> Pushback -> (Dont reposition yet) -> Supernova 1-2 -> Reposition. This way, novas are clearly away from the group!
IT IS VERY POSSIBLE TO PHASE NAEL HERE (47%). If not, a repeat of phase 3b happens, which isn’t that bad anyway. If you do NOT phase after second dragon you will likely see Heavensfall 3. Don’t ask.
Navigation:
[Stardust, Ravensbeak][Golems to Megaflare][Heavensfall to Bahamuts Favor][Final Phase]
Turn 9 Phase 4: Ice, Fire, Lightning, Favor/Claw & Divebombs!!!
Well well well! Final phase of turn 9! You’re moving up in the world! It’s time to bust out the Allagan Speculum…
“It don’t matter if ya got 4 or 5 X-Potions, Claw and Divebombs are rough- hope you brought Allagan Lotion!”
-Mahiko MC, Turn 9 Rap.
Once Naels HP reaches 47% HP the final Phase of T9 begins. It’s marked by Nael casting “Bahamuts Fervor” which leads to “Bahamuts Claw” (More on this later) a quick summary of how the final phase goes…
Elements -> Thermionic -> Divebombs (R1) -> Free Phase -> Elements -> Thermionic -> Divebombs (R2) (REPEAT)
There’s really only 4.5 miniphases going on here. Namely: Elements, Thermionic, Divebombs (Rotation 1 and 2) and Free Phase.
Turn 9 Phase 4: Elements
The first thing youll notice are the debuffs Fire and Ice.
- Fire randomly targets a raidmember (signified by a red line). The target will explode and give the Fire debuff to all players nearby.
- Ice targets the entire party 1 by 1, and continually cycles.
- A player getting hit by fire twice leads to death.
- A player getting hit by ice twice leads to death.
- Fire and Ice debuff cancel each other.
While this may seem complicated, there is a popular pattern to handle this almost automatically. The “mantra” is as follows:
First fire out DYNAMO : Second fire in: Fire out CHARIOT : Prepare for thermionic. Again there are some small exceptions to this…
(Dynamo and Chariot are the skills you’re probably familiar with from P1)
- If you were the target of any Fire out, be careful that you dont have the debuff in the next Fire in. (Happens more often than you think)
- If you have Ice during any Fire out, CHASE THE FIRE (Not always necessary, but very very safe)
Lastly, after every fire comes a Lightning. Lightning targets a random raidmember. After a few seconds this party member explodes for massive damage and paralyzes all nearby allies. This does not affect the person who was initially targeted by lightning. This is easily solved by having the lightning member move BEHIND Nael, while your party stacks in front.
If no one panics, this subphase is a breeze. Next, thermionic
Turn 9 Final Phase: Thermionic / Supernova
Again some very familiar skills return here. Thermionic Beam from P1 and Supernova from Heavensfall phase. You will be entering this subphase from these previous skills of nael: Fire out CHARIOT -> Lightning.
The initial preparation for this is to have your Fire victim and Lightning victim hug the walls. That keeps the middle SAFE (where you’ll be stacking for thermionic, like P1)
Nael does these skills in order: Supernova, Supernova, Supernova, Thermionic Beam, Bahamuts Claw.
First of all, Sacred Soil in the middle once this pattern begins. Have everyone stay AWAY from the middle. DO NOT move in for thermionic until AFTER the 2nd Supernova. The timing here can be a little tight… right after 2nd Nova, get to middle to stack ASAP. This Thermionic Beam is much more painful that the one from Phase 1.
What kills most groups here is either FAILURE TO STACK QUICKLY ENOUGH, or TANK DYING TO CLAW right after beam. Healers and tanks, keep this in mind – after every thermionic is a claw.
What’s Bahamuts Claw? It’s a direct upgrade to Ravens Beak from P1. It’s a tank-buster that does extreme damage. Be sure to have Virus on, Stoneskin/Adloq, and tanks use a mitigation skill. It gets stronger and stronger each time it happens! Note that you can actually can provoke a few hits off it WHILE it’s happening! So offtank can soak one or two slashes.
Turn 9 Final Phase: Divebombs
Ahhh… the infamous divebomb yet again. As if we haven’t seen enough in t5? Divebombs happen twice each time it comes up in Naels rotation.
- R1: Divebomb -> Meteor Stream -> Divebomb -> Meteor Stream -> Freephase. OR
- R2: Divebomb -> Chariot -> Divebomb -> Lunar Dynamo -> Freephase.
For R1: Meteor Stream is the Divebomb from P1. DON’T STICK TO EACH OTHER! and as usual, healer does AoE heals in between Meteor Streams.
For R2: Much easier, avoid chariot as always. Lunar Dynamo might hit the guy who baited divebombs. How to dodge divebombs!?! I’ll be posting about that in the next update but for now Check out this image by Encore FC.
So you’ll be coming into this phase from:
Thermionic > Bahamuts Claw > (Ensure markings are set) > Divebombs > R1/ R2 > Divebombs > R1/R2 > Free Phase
Free Phase is exactly that: Nothing happens here except a Bahamuts Claw. After sometime, the rotation goes back to Elements and repeats until he is dead. The enrage is at 13 minutes: Nael casts megaflare and will instakill your party.
Follow us on Facebook for more FFXIV updates!
Navigation:
[Meteors] | [Golems to Megaflare] | [Heavensfall to Bahamuts Favor] | [Final Phase]
After first set of divebombs, Nael doesn’t do Thermionic beam anymore.
Hmm? On which phase? Maybe you just dont see therm due to speed of phasing (Echo/Gear levels)