So you’ve taken your first step into Final Coil! Good luck! The first boss you face is no pushover. I’d say the main points you need to maintain here are Focus and mechanics awareness! Our strategy guide for the boss of Turn 10 (Final Coil Turn 1) Imdugud!
“He’s too good.” – Everyone who stepped into T10
Navigation:
[PAGE 1: Phase 1: Pull to 85% – Phase 2: Adds]
[PAGE 2: Phase 3: Heat Lightning – Phase 4 Adds II – Final Phase]
Imdugud Phase 1: Full to 85%
Right off the bat we’re faced with 3 of his basic mechanics you’ll be seeing throughout the fight.
– Massive frontal cleave that does heavy damage to all guys. Naturally you want to face the boss away from the raid for this. I will reiterate that this cleaving mechanic is MASSIVE and the damage is no less BEEFY.
– Tailswipe that is easily avoidable. You can “bait” this to come out by going behind Imdugud. (He doesn’t do basic attacks during this time so it’s advisable to do so)
– Critical Rip is your usual tank-buster. A long wind up leading to a haymaker. It’s your tanks responsibility to use a mitigation skill for this. Healers should Stoneskin / Adloq this when possible.
— The above abilities will be used throughout the fight. The next two abilities will be, too, but I’d consider them special mechanics.
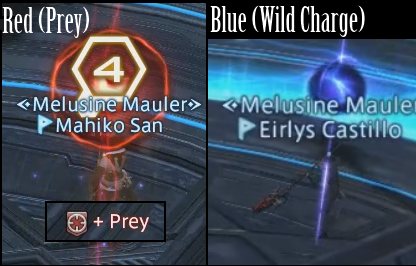 Wild Charge (Blue)
A two part mechanic. First a blue marker appears on top of a random, non-tank raidmember. There is no debuff icon for this. After a short delay, ALL PARTYMEMBERS NEARBY (and including) the marked person will be stunned and a Vulnerability UP debuff placed.
Next up Imdugud channels Wild Charge. He makes a beeline to the marked guy and will deal heavy damage to all guys in his path. However, this damage can be reduced by standing in front of Imdugud. The more people blocking, the less damage the victim takes. There is a caveat – the frontmost guy takes the most damage. Only a tank can survive this! So make sure the engine on your choochoo train is your offtank :D. Virusing charge is the largest value you can squeeze from Virus in this fight.
Prey (Red)
Another two part mechanic, albeit much simpler. First a red marker is placed on a random raidmember. Once the timer of this expires, it will deal MINOR damage to the afflicted person (500~). Easy to spot since there is a debuff icon. If this damage goes through (ANY of it), a new debuff is placed. Once this second debuff expires, it will deal a cripplingly huge amount of damage, coupled with a paralysis. Prevent all this BS by having your SCH Adloq or WHM SS after the initial red marker appears.. For SINGLE reds, it’s advisable for SCH to do it since Adloq has a significantly less cast time. For doubles, it’s discussed in P2.
For the remainder of this guide I will refer to them by (what our static uses) Blue & Red. Again these 5 attacks will be used for the ENTIRE DURATION OF THE FIGHT.
——————————————————————-
Before we discuss the second phase we will discuss a bit on Positioning and Markings
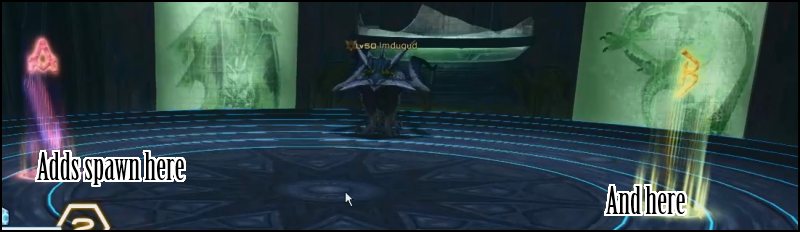
A & B are where the adds spawn in both add phases (more on this later) Mark these areas whenever you zone into T10 so you won’t get confused. Easy reminder: The first dot in the first ring direct East and West is A and B. There are two practical ways to position boss (and adds, too):
- Outwards Facing (less space efficient, safer for mechanics)
- Sideways Facing (more space for your team, slightly higher risk for cleave)
A basic cycle of Red, Blue, Rip will repeat until he’s at 85%. He will become invincible at this point then on to Phase 2. The skill “Electrocharge” means he’s phasing – have your tanks position accordingly.
Imdugud Phase 2: Adds (Sons and Daughters)
“Cream the daughter first!! R@P3 the son now!” – Normal T10 Conversations
So, in case you haven’t noticed by now, the stage gets smaller and smaller, leaving a dangerous electric field whenever it recedes. This will continue to happen until you have nothing left to stand on. Anyways…
2 Sets of 2 adds spawn (total of 4, for the confused). 1 Son of Imdugud and 1 Daughter of Imdugud for each tank. If a son gets close to another son, they will be tethered and become extremely beefy. Same applies for daughters. In a nutshell, keep them AWAY from each other. Both the son and daughter of Imdugud inherited his skills (Not much of a surprise there). All adds have the massive frontal clear and tailswipe. So you’re going to want to position them facing outwards (like their daddy).
As per their individual traits… Daughter of Imdugud hits hard, Son of Imdugud leaves an electric pool on the ground (takes a while to vanish). Killing Daughter first is always a smart move. You don’t want people maneuvering around an electric pool. Remember to move the son as close to the edge as possible before killing, to minimize the area affected by the pool.
Red happens during this phase, too. But it can now sometimes target two people. As far as I remember it cycles between 2-1-2-1 targets before phasing. Could be 2-1-1-2-1-1 (will check later). For this, the WhiteMage has to Stoneskin one, Scholar has to Adloq the other. To make sure we dont target the same guy we arrange our party the same way (Healers > Tanks > DPS). One healer goes from the top of the list, the other goes from the bottom. If both healers get the mark, shield themselves. (Once succor reaches 500 or 600 due to gear, you can just use that)
This phase is TIME BASED. So wether or not you beat the adds before time expires, he will continue on the to next phase. The good news is, if you beat up the adds quickly you get to DPS imdugud for FREE until the timer runs out! The phase is ending when he begins to channel Electric Burst. (Generic AoE skill that you shouldn’t worry about!) From here you’re off to Page 2: Adds II to Final Phase.
Follow us on Facebook for more FFXIV updates!
Navigation:
[PAGE 1: Phase 1: Pull to 85% – Phase 2: Adds]
[PAGE 2: Phase 3: Heat Lightning – Phase 4 Adds II – Final Phase]