Gathering: Where, How to?
To add a gathering class to your your list of classes, you must first pass level 10 in your story quest. After that, speaking to the Guild Receptionist will direct you to the respective Guild leader. Then that’s it! Equipping the main hand arms of the class will switch you to the corresponding class (Botanist: Hatchet, Miner: Pickaxe, Fishing: Fishing Rod)
The Botanists Guild is in Gridania
The Miners Guild is in Ul’dah
The Fishing Guild is in Limsa Lominsa
[City & Guild Locations]
What gathering class suits what crafting class?
Botany: Weaving, Carpentry, Culinarian, Leatherworking
Mining: Blacksmithing, Armorsmithing, Alchemy, Goldsmithing
Note that this is a very general breakdown. Each gathering class contributes to every crafting class in a small way – the above just represents the more commonly used items. In the end, we would recommend being a high level gatherer for all classes so you have the freedom to get whatever you need.
Gathering Skills & Traits
Mining and Botany have almost the exact same skills & traits, with a different name and icon. They only very slightly differ in three skills.
From what we’ve heard about Fishing, the system will be different. We can assume the skills and traits will be a bit different too.
How do I gather?
The first step to gather is to make sure your ‘triangulate’ (Botany) or ‘Prospect’ (Mining) skill is toggled on. These skills are learned at level 1, and allow you to see gathering nodes on the minimap. Note that at level 2, you get the trait “Auto-triangulate” or “Auto-prospect” which automatically toggles this on when you change to a gathering class. Below is a sample of what nodes look like on the minimap.
Approaching a node will give you information on what kind of node it is. example “Level 5 Mature Tree”. Note that not all of the same nodes are equal, different areas with different “level 5 Mature Trees” will have different gatherable materials within. Interacting with the node will bring up the gathering window, pictured below. You do not have to rush to gather nodes in fear of other people getting there first, each person has their own nodes.
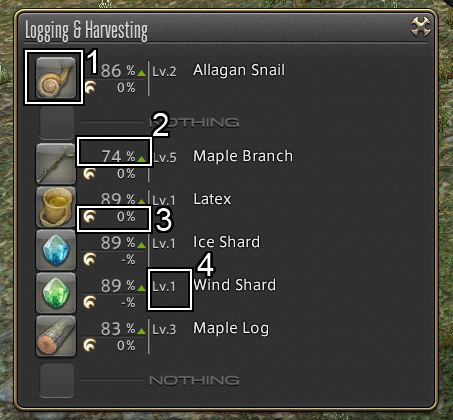
1. Item preview: Here is the item preview of what you’re trying to gather, along with its name on the far right. You can highlight the picture to see the tooltip.
2. Gathering Chance: The chance you will successfully gather a no quality version of the material. This is increased by level and the Gathering stat.
3. High-Quality Chance: The chance that you will succesfully gather a high quality version of the material. This is increased by level and the Perception stat. Note that there is never a minimum 1% chance, if your perception is lower than the item levels minimum perception needed, as pictured above, you will have zero chance to gather a high quality material.
4. Item Level: An materials level is an indicator of its difficulty to gather (both no or high quality). Naturally, the higher it is – the more difficult.
Each node naturally has a lifespan of 6 strikes. Meaning you can attempt to gather 6 times from any given node, whether you choose to gather 6 different items, or 6 of the same item – it doesn’t matter.
Finding New Nodes
New nodes are made available for you to see for each five levels. Note that there is no way around this. Even if you have godly gear or whatever, you simply cannot see nodes above your gathering level.
When first gathering a new node, you will see that the various materials are still “Unknown”. This is annoying because unknown materials have a base gather chance of 10%. So on average, you’re going to need 2 nodes to successfully discover 1 Unknown Material. Luckily you can increase this chance. The botanist skill [Field Mastery] and mining skill [Sharp Vision] increases the chance to successfully gather items. They also affect unknown materials!
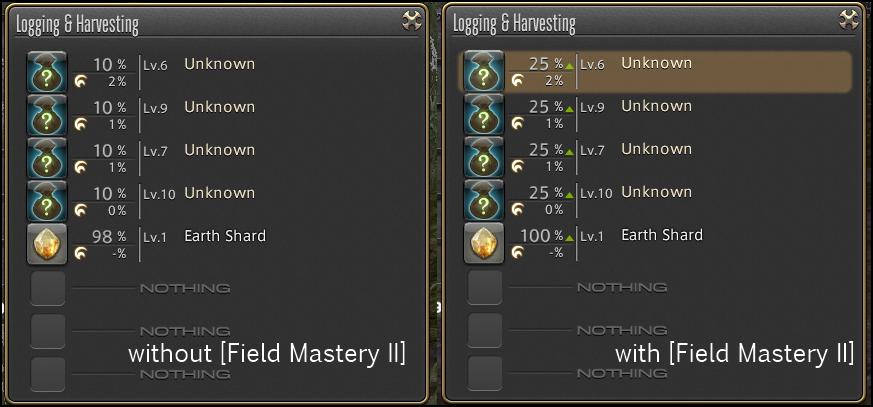
Once you’ve successfully gathered an unknown item, you do not have to go through this process again. So expect to go through each time you find a new cluster of nodes. Since new nodes are available every 5 levels, you might as well go to your guildmaster (They offer a new quest every 5 levels) to get a clue as to where they are, and free gear upgrades!
Another way to increase your chances at gathering unknown (and known) materials are discussed below –
Tree Whisperer / Stone Whisperer
Starting level 11 you will obtain the Tree Whisperer and Stone Whisperer trait (Botanist and Miner respectively). Some nodes have special requirements that, if met, give you a bonus to gathering or perception. Note that not all nodes have this. It’s pretty random, but it’s a nice boost when it comes around. Make sure to make the most out of it!
n the example below, we see this certain Lv.15 Lush Vegetation has this special requirement triggered. It’s pretty self explanatory – If you have a Gathering Stat of 77 or higher -> You get a 10% bonus to gathering success rate! Note that this differs between types of nodes.

Preparation: Gathering HQ Items
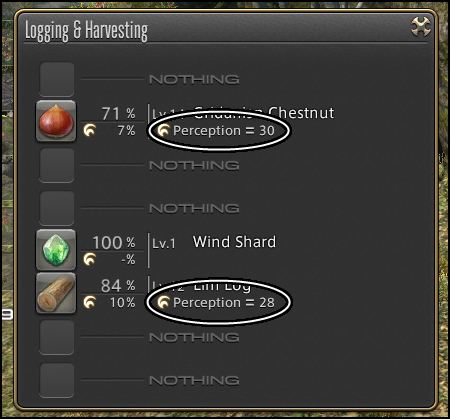
Starting level 12, you can passively see how much minimum perception you need to gather a high quality item. This is made possible by the passive skill [Preparation]. In the example below, you can now see how much minimum perception you need to gather an HQ item. In the case of Gridanian Chestnut, you need 30 perception for a 1% chance.
Gathering Stats & Gear
GP: Increases GP, which is used to cast gathering skills.
Gathering: Increases chance to gather an item successfully.
Perception: Increases chance to gather a high quality item.
These are mostly gained through better fieldcraft gear. More info on gathering gear coming soon!
Summary
- Mining & Botany are the main gathering classes, and you should try to max one of them (Whichever suits your crafting needs more)
- New nodes are made accessible every 5 levels, and new quests are handed out by your guildmaster every 5 levels.
For now, I guess that’s all we can write about in a general sense. Please subscribe so you’ll be the first to know about anything new we pick up! We are cooking up a HQ item gathering guide, class specific guides, gear guides and more!
Check out our other Gathering class guides:
Botany | Mining | Fishing
[ Gathering Starters Guide ] [ General Gathering Leveling & EXP Guide ]
 click on image to enlarge
 click on image to enlarge


 Sea Wolves
 Hellsguard
 Highlander
 Midlander
 Wildwood
 Duskwight
 Seekers of the Sun
 Keepers of the Moon
 Plainsfolk
 Dunesfolk
 Xaela
Xaela Raen
Raen


