Beastmen daily quests are repeatable quests which give decent rewards and an opportunity to get reputation with certain beast tribes. The higher reputation you have – the more rewards you can obtain from them.
How many can I do in a day?
You’re given 6 allowances every day. At Neutral reputation, you may only spend 3 allowances per tribe a day. You can spend all 6 on a tribe once you have reached Recognized or above.
What are the currently implemented beastmen i can gain reputation for?
Crystal Tower Loot list, Boss Strategy and General FAQ
Crystal Tower General Information
How to unlock Crystal Tower? You must complete the quest chain that starts with “A Legacy of Allag” from Mor Dhona.
“CT” is a the first 24-man instanced dungeon released in Patch 2.1. You may enter as an eight-man group in the Duty Finder, and be matched with 2 more random 8-man groups. You currently cannot queue as a 24 man group. You can chat to the other groups using Alliance Chat by pressing “alt+a” (default).
The items dropped from Crystal Tower are item level 80. Check our loot list below.
What is the Crystal Tower Loot System? You may only obtain 1 item per week from CT. Whether you got it from a need or greed roll doesn’t matter. After getting an item, you can still go to CT with your friends, but you will not be eligible to roll on items.
Crystal Tower Boss Strategy
Bone Dragon
As you may know by now, the raised platforms prevent you from getting hit by poison. Bone Dragon should be ideally tanked in the middle of the room.
The main mechanic in this fight are Skeletons called “Platinal”
Skeletons will spawn periodically during the fight. Skeletons do a bunch of nasty things, but make sure this is followed:
Drag each skeleton as far as possible from bone dragon, and kill it.
Make sure there are no skeletons alive when bone dragon dies.
When Bone Dragon “dies”, the skeletons will raise at the location of their death, then run towards the corpse of the Bone Dragon. If one reaches, a huge painful AoE will pulse, damaging everyone.
(Mini-boss) Atomos
The three alliances have to split up to take one hallway each. On each hallway there is a platform which activates when 4 people are standing on it. Standing on your platform makes the next alliances boss lose invulnerability. So in essence, you must have 4 people to kill Atomos, and 4 people standing on your platform at all times.
Adds periodically spawn during this time, and any tank should bring them close the the group in the platform. If 3 adds remain alive at one point, their stats become boosted, and will quickly result in a wipe.
Thanatos Strategy
Each Alliance has a “Magic Pot” that they must protect. Keep in mind they can be Healed, Stoneskinned, Regenned, or anything that hits a regular player pretty much. Adds will try to destroy your pot, so make sure to keep and eye on it!
Only people who are “Invisible” will be able to hit Thanatos. Invisibility is granted by the Pot, so it’s quite important they stay alive.
(Mini-boss) Vassago + Allagan Bomb
There will be 3 Vassago in the map, and an Allagan Bomb in the middle. Each alliance should tank and focus on killing their own Vassago, then helping others when theirs is dead. Some adds spawn during this fight:
Balloon – an basic add that doesn’t do much. Kill it anyway.
Napalm – Kill these ASAP, they slowly walk towards the middle Allagan Bomb and make it bigger.
The Allagan Bomb located in the middle is sort of a “time limit” to this fight. Once it reaches maximum size, it will burst – killing everyone. Two things charge the bomb.
The links of the Vassago continually charge it. The closer they are, the faster it charges.
A Napalm reaching it charges it by a large amount. Don’t let this happen!
After all Vassago die, the raid must focus down and kill Allagan Bomb before it blows. As long as minimal Napalms reached it – it wont be a problem.
King Behemoth Strategy
Entering King Behemoths map, everyone automatically gets a DoT. This cannot be avoided, however…
There are 4 towers on the map – you must interact with them each time they start glowing to “discharge” them. Failure to do so will result in AoE damage. Bomb-looking adds (Purophoros) will spawn and attempt to attack towers. If they destroy a tower, the passive DoT damage increases.
Iron Giant is an add that spawns and SHOULD be picked up by a tank and faced away from the raid. It does a huge painful cleave.
Comet – A Green marker on your head indicated you are going to get hit by Comet. Don’t worry this ability isn’t so strong. Make sure to get hit a medium distance away from Behemoth because the fallen rock will be used later on for…
Elliptic Meteor – Behemoths Ultimate move, a KO unless you’re hiding behind a fallen Comet! Keep in mind comets get destroyed if people continually hang around near them.
Acheron Strategy
Acheron, the Final Boss, has some very flashy looking AoE abilities! It’s pretty simple, just avoid the colorful spots on the ground and you should be fine. Except…
Ancient Flare – Each lit platform must have 4 players on it to “activate”. If 3 platforms are active, the shield goes up. Needless to say, without the shield the entire raid will wipe. During this shielded phase, an Iron Giant will spawn for each alliance. On the second shield phase, an Iron Giant + Claw will spawn. Once all adds are down, the shield will deactivate, and Acheron can be engaged again.
Claws act like Titans Granite Gaol, but continually damage the person trapped within. Break them out as soon as you can.
Ultima Weapon (“Hard/Extreme” Mode) Strategy Guide and Loot List
Ultima Weapon Teaser Video
*Still the teaser vid -> will be updating soon. *Guide still under refinement
Ultima Weapon has a bajillion abilites, and a very entertaining fight!
Ultima Weapon Phase 1 – Primal Phase
Garuda / Titan Phase
Two main abilities happen here:
Garuda appears on the screen then releases a HUGE AoE cone in the direction she’s facing. Don’t linger on the edges, or you might not make it to safety.
A Vortex appears in the middle, once it vanishes, move towards the edge of the stage in preparation for Titans “Geocrush”
Due to the nature of these abilities, it’s best not to stay too near the edges of the stage.
Ifrit / Titan Phase
In/Out Plumes – The usual outer ring / inner cluster plume formation. Keep the same positioning mentality as the Garuda phase.
Plumes + Crimson Cyclone – This is a pretty fun one. Radiant Plumes happens while a single Ifrit does his “Line Rush” skill.
Ultima Weapon Phase 2 – “Machines!”
Magitek Ray – Much like piercing laser from ADS. A thick randomly targetted line AoE.
Magitek Bit – Little adds that point and shoot lasers at random targets. The first pattern they spawn in is a circular group of.
Freefire – AKA Airship bombs. The glowing cross-air on the floor represents its epicenter, and the further you are from it, the less damage you take.
Ultima Weapon Loot List
Ultima Weapon drops Item Level 80 Chokers and Bracelets.
Some of the usual suspects return for extreme mode:
Slipstream: Avoidable cone stun that does extreme damage. Friction: The usual targetted AoE Wicked Wheel: Garuda does Wicked Wheel whenever the adds are alive. It’s extremely powerful and should be avoided.
Whenever Garuda disappeard from the map, a large spread of AoE’s will follow in her last location. They deal moderate damage, and cause Windburn (Wind DoT).
Adds (Suparna, Chirada) Abilities
Suparna (Red):
[Special] Wicked Wheel: Suparnas Wicked wheel is extremely powerful. For a non-tank, it’s a potential KO. It’s avoidable so GTFO. Slipstream – Channeled Frontal Cone stun. Friction: The usual targetted AoE Downburst: A medium strength cone attack.
Chirada (Green):
[Special] Downburst: Chiradas downburst is extremely powerful. It’s a cone attack. The target is marked by a crosshair. Slipstream – Channeled Frontal Cone stun. Friction: The usual targetted AoE
While either Chirada or Suparna are alive: Garuda cannot be damaged.
Razor Plumes: Like before, they target a stone pillar or guy, and will explode dealing damage after a set time.
Spiny Plumes: The “Key” add to this fight. Upon killing it, releases an AoE which causes Windburn (Wind DoT). A short time after it’s death – it will put up a “Safe Zone” wherein Garudas Reckoning will do significantly less damage to those inside. The initial target of Spiny Plume seems to be the second Highest Enmity (and in some rare cases – the MT).
Spiny Plumes give a stacking debuff to its target. If it reaches 3 stacks it will do “Super Cyclone” dealing tons of damage (Likely a KO) to everyone. Provoking the Spiny Plume before its target reaches 3 stacks is important, and is one of the main reasons many groups will wipe.
Garuda EX Phase 1 – Stone Pillars
Reminiscent of Garuda Story and Hard Mode. Nothing special here. The first sub-phase, every non-melee should be in dead-center of the pillars. Preserving the stones are your goal for this phase. It has 3 Sub-phases:
Starting Phase – All non melee stack dead center to avoid Friction hitting rocks. Once she vanishes, hide behind the rocks old-school style.
Razor Plumes – Razor Plumes show up and target random rocks. Kill them asap. Again try to stack in the middle as much as possible, with the exception of tank and melee. This mini-phase has the usual “Vortex” mechanic.
Initial Adds – The first time adds spawn. You should memorize what to do here, for the next time adds spawn:
MT picks up Suparna(Red) and Garuda.
OT picks up Chirada.
Chirada must be tanked ACROSS the map from the others. If they’re too near each other -> they gain immense defense.
Ranged DPS and healers should stay in a place where friction wont hit rocks.
There are things you have to note here:
Downburst will hit the OT for heavy damage, but shouldn’t be much of an issue.
On the MT side, WICKED WHEEL becomes a “one hit KO”. Make sure melee DPS and MT avoid this. Using virus on both Garuda and Suparna is a good “insurance” in case tank gets hit. All forms of damage reduction / mitigation should be used in preparation.
Chirada uses Downburst simultaneously with the Wicked Wheel on the other side. This always happens after Friction!
If you have enough rocks alive, Reckoning shoudn’t kill you! On to the next phase…
Garuda EX Phase 2 – Vortex
Wind surrounds the outer ring of the stage, and players should remain near the middle, or suffer a pushback + large damage.
Spiny Plume makes its first appearance here, along with a bunch of Razor Plumes. Your goals here are simple:
Kill all Razor Plumes
Leave Spiny Plume at a low HP%.
A rather simple phase, with no heavy incoming damage. A great time to use Mages Ballad, as you’ll be needing max DPS next phase.
Once Garuda disappears, destroy the Spiny Plume and seek refuge inside the safe-zone it generates. (Remember to avoid the initial death AoE of spiny plumes)
Garuda EX Phase 3 – Tornado
5 Tornados spawn in static locations on the map, forming a cross-like (T) formation. The safe spots are located near the brown markings on the map (Where the pillars used to be).
Chirada and Suparna show up during this phase. As usual, MT takes both Garuda and Suparna. Off-tank takes Chirada. And again, Suparna should be the first target. There are some things to note during this phase. The main difference in this phase is Tornadoes + Spiny Plumes.
The MT’s position should be loose enough that the melee dps and himself can get away from the “Double Wicked Wheels”.
Healers and Ranged DPS should stay at the very tip of the center tornado, to be in range of everyone.
Like last phase, leave Spiny Plume at a low HP%, and destroy it at phase transition.
There are four safe pockets – Ranged and healers should have a good spread.
Travelling between “safe-zones” through tornadoes can be done using the following:
Sprinting along the edges (Recommended for casters…)
Dragoon jumps
Monk Shoulder Tackle.
Remember not to kill the Spiny Plume too early, or too late!
If you pass this phase, You go back to the Vortex Phase -> Tornado Phase -> Vortex Phase, repeats until Garuda is dead!
Don’t waste time worrying about your Gathering Gear – and get that DoL class to 50!
Confused about when or what DoL / Gathering gear you should get? When and what are the best gathering gear upgrades, and why? Find out all about that here – and save money on your road to a level 50 gatherer!
Why upgrade your Gathering gear?
Moreso than crafting, better gathering gear = faster levelling. We all know how “exciting” it is levelling a gathering class, ey?
The importance of high Gathering Stat:
Striking at a node and not getting anything means ZERO exp, BROKEN CHAINS and ultimately, wasted time (and money! since you could have gotten the item!) So first and foremost you’re going to want as much gathering as possible.
Gathering is insanely useful in maximizing Levequest EXP. more on this later…
The importance of high Perception Stat:
If you’re doing a lot of grinding, Perception becomes very useful in boosting you EXP gains. Why? At max, you have a 15% chance to gather HQ items without a buff. Let’s compare a gatherer with 0% HQ chance versus 15% HQ chance: 100+[(2*100)*0.15] (HQ percent chance) = 30% Average EXP Bonus.
If you aren’t a level 50 calculator, then it’s fine. All you need to know is that being capped in perception gives you quite a sizeable exp bonus. 30% is not a joke, and it stacks with chains, food and rested EXP.
Perception however, isn’t useful if you’re planning to use levequests… why?
Gathering gear, Levequests and You:
Since getting HQ items is impossible during leves, Perception is useless during a leve attempts. Gathering becomes the single most useful stat, with GP as a supporting stat.
If you’re planning on grinding, both Perception and Gathering are important. However, Gathering is still your most important stat. Why? Again, ENSURING exp gains and ENSURING chains is your first goal. Then once that’s fulfilled, modify it with Perception for massive exp gains.
So we can conclude, during leveling up, Gathering is the most important stat, whether you choose to grind or use leves. And if you’re planning to do a bit of both, getting Perception is a great bonus to grinding. So what does this mean in terms of gearing up?
GP – How useful is it?
Going to level 50, GP isn’t exactly a sustainable resource to rely on. It’s a welcome boost, but not exactly necessary. At 50 though, that’s a completely different discussion…
Gathering gear upgrade strategy
Okay so you want Gathering, no matter how you level up. In terms of gear slots that would be the: Main Hand, Off-hand, Chest (coincidentally they also give huge perception, and are considered critical upgrades). So you want these no matter what you’re going to do. Upgrade as often as possible.
Two more pieces give Gathering: Gloves and Pants. These are less critical, and you should upgrade if you can afford it. Gloves are more powerful than pants! Around 50% more gathering is found on gloves compared to pants! Keep this in mind when buying upgrades.
Now for Perception… The most important pieces were already mentioned above (MH, OH, Chest). The rest are: Helmets, Boots and Belts. Again when thinking of bang for buck – Helmets are the best investment, which are usually 100% more powerful than boots. And belts are the worst investment, as they’re only half as powerful as boots typically!!!
Overall, a cost-efficient upgrade path will be discussed in the end of this post, before that – tables of what level you get upgrades…
Gathering Critical Upgrades – What Level?
The table below represents the levels you get a new DoL chest, Miner main and off-hands, Botanist main and off-hands, and fishing main hand. (All possible critical upgrades)
Level
Chest
MIN Main
MIN Off
BTN Main
BTN Off
FSH Main
1
x
x
x
x
x
x
2
3
4
5
6
x
7
8
x
x
x
9
x
10
11
x
x
x
12
x
x
x
13
14
x
15
x
x
x
x
x
16
17
18
x
19
x
x
x
20
x
x
21
x
22
x
x
23
x
24
x
x
25
x
x
x
26
x
27
x
28
x
x
29
x
x
x
30
x
31
x
x
32
x
x
33
x
34
x
x
35
x
x
36
37
x
38
x
x
x
39
x
x
40
x
41
x
42
43
x
x
x
x
x
44
x
45
46
x
47
x
x
48
x
x
x
x
49
50
x
x
x
x
x
x
Disciple of Land (DoL) Body pieces
The table is sorted by (at least in my opinion) importance. The left side being more important and more worth the investment, and gets less important as you go right. Gear marked (G) gives gathering, and (P) gives perception. So ignore the Perception pieces if you’re primarily thinking of getting to 50 using Fieldcraft Leves.
Level
Hands (G)
Head (P)
Legs (G)
Feet (P)
Waist (P)
1
x
x
x
x
x
2
3
4
5
x
x
x
6
x
7
8
9
x
10
x
x
11
x
x
12
x
13
x
14
15
x
x
x
16
x
17
x
18
19
x
x
20
x
x
21
22
x
23
x
24
25
x
x
x
26
27
x
x
x
28
29
30
x
x
x
31
x
32
33
34
35
x
x
x
x
x
36
37
x
38
x
39
x
40
x
x
x
x
41
42
x
43
x
x
x
x
44
x
45
x
x
46
x
47
x
48
x
x
x
x
49
50
x
x
x
x
Disciple of Land (DoL) GP pieces (Accessories)
While not super important while leveling up… you cant really be “sad” to have more MAX GP.
Level
Necklace
Earings
Bracelet
Ring
1
2
3
4
5
x
6
7
x
x
8
9
10
11
12
13
14
x
15
16
17
x
x
18
19
20
x
21
22
23
24
x
25
26
27
x
x
28
29
30
31
32
33
34
x
35
36
37
x
x
38
39
40
x
41
42
43
44
x
45
x
46
47
x
x
48
49
50
x
Summary: DoL Cost-efficient upgrade path
First of all – Everything below level 15~ is negligible. and you don’t need to really think about your gear before then.
Main Hand, Off-Hand and Chest should be upgraded when you can afford it.
As a side upgrade to Gathering: updating your Gloves are a good idea every now and then. Legs are less imporant. Here’s our suggestion for a cost-efficient upgrade path:
Legs: (15) (27) (40). The level 27 ones are from ANY Grand Company, and are pretty worth it.
If you need more Perception, Helmets are the best investment. Helmets generally come from weavers or armorsmiths. The weaver ones are typically more expensive. So here’s a pretty cost-efficient path:
Head: (13) (19) (31) (35) (42) (47). Want something in the 20’s? (27).
Boots are okay, and you probably wont need more than: (15) (30) and (40).
Waist is even less important. (17) and (37) should be fine.
Of course feel free to pick anything up you can afford, and check the Market Board when you reach the levels in the tables above.
Crafting gear: When to upgrade!? My inventory is ful!? Relax… find out best DoH gear on your road(s) to 50.
Hey guys! Here we will be discussing about DoH gear, why you should update your gear every so often, and when you should do it!
Why upgrade your crafting gear?
There are many many ways to level a crafting class…
Crafting your own levequest items.
Casually crafting your way to 50, completing logs etc…
Grinding (not so ideal, hehe).
Buying levequest items from the marketboard for you to submit.
Having someone else craft leve items for you to submit.
If you’re part of the “buying items” or “having someone else craft” group, this guide is largely useless to you. You guys should proceed to the Crafting End-Game Gear (+Max Melds) Guide.
Crafting your own levequest items is the most cost efficient method in leveling a Disciple of Hand class. But for that you’re going to need two things. A good sense of crafting technique, and some decent crafting gear. Of course, we will be discusing the latter here.
Getting better gear means being able to:
Prevent failure when crafting.
Obtain HQ items more reliably
(and in the best scenario) Obtain HQ items from No-Quality materials.
All of the above reasons, and more, make it ideal to get decent crafting gear. Your return on investment will be massive!
Should I buy every crafting gear upgrade I can find!?
Well, not really. If you have the money for it, or can craft it yourself – why not. But not all upgrades are as equal! Some pieces of gear are more important than others. The three key pieces you NEED to update are: Main Hand, Off-hand and Chest.
Following that are the CP granting accessory slots: Neck, Wrist, Rings, Ear. These are pretty important, but not as critical.
Then least important are the control only slots (Non-chest body pieces): Head, Hands, Waist, Legs, Boots.
I’m confused! There’s so much DoH gear! When do I upgrade?
We made tables of that. The first one represents all pieces worn on the body. Left is most important (chest). Followed by accessories, then non-chest body pieces. (Click the class to sort by it or enter your level in the search box!)
Level
Chest
Neck
Ear
Wrist
Rings
Head
Hands
Legs
Feet
Waist
1
x
x
x
x
x
x
x
2
3
4
5
x
x
x
6
x
x
7
8
9
x
x
10
x
x
x
x
x
11
12
x
13
14
15
x
x
x
x
x
x
16
x
17
18
x
x
x
19
x
x
20
x
x
x
x
21
x
22
23
x
24
x
x
x
25
x
x
x
x
26
x
x
27
x
x
x
28
x
x
x
x
29
x
x
x
30
x
31
x
x
32
x
33
x
x
x
34
x
35
x
x
x
x
36
x
37
x
x
x
38
x
x
x
x
x
x
39
x
x
40
x
41
x
x
x
x
x
42
x
43
x
x
x
x
x
44
x
x
x
45
x
x
46
x
x
x
x
x
x
47
x
48
x
x
x
x
x
x
49
x
50
x
x
x
x
x
x
x
Disciple of Hand (DoH) Main-Hand Weapons
We were surprised they weren’t uniform either… (Click the class to sort by it or enter your level in the search box!)
Level (Main Hand)
ALC
ARM
BSM
CUL
CRP
GSM
LTW
WVR
1
x
x
x
x
x
x
x
x
2
3
4
5
6
7
8
x
x
x
x
x
x
x
x
9
10
11
x
x
x
x
12
x
x
x
x
13
14
x
x
x
x
15
x
x
16
x
x
17
18
x
x
x
19
x
x
x
x
20
x
21
x
x
x
22
23
x
x
x
x
24
x
x
x
x
25
26
27
28
x
x
x
x
x
29
x
x
x
30
31
x
x
x
x
32
x
x
33
34
x
x
x
x
x
x
x
35
36
37
x
38
x
x
x
39
x
x
x
x
40
x
41
42
43
x
x
x
x
x
x
x
44
x
45
46
47
48
x
x
x
x
x
x
x
x
49
50
x
x
x
x
x
x
x
x
Disciple of Hand (DoH) Off-Hand Weapons
Non-uniform levels here as well… (Click the class to sort by it or enter your level in the search box!)
Level (Off-Hand)
ALC
ARM
BSM
CUL
CRP
GSM
LTW
WVR
1
2
3
4
5
x
x
x
x
x
x
x
x
6
7
8
9
10
11
x
x
x
x
x
x
x
x
12
13
14
15
x
x
x
x
16
x
x
x
x
17
18
19
x
x
20
x
x
x
21
x
x
x
22
23
x
x
24
x
x
x
25
x
x
x
26
27
x
28
x
x
x
x
29
x
x
x
30
31
x
x
x
x
32
x
33
x
x
x
34
35
x
x
x
x
36
x
37
38
x
x
x
39
x
x
x
x
40
x
41
42
43
x
x
x
x
x
x
x
44
45
x
46
47
x
x
x
x
x
x
x
48
49
50
x
x
x
x
x
x
x
x
Cost efficient Disciple of Hand Gearing strategy
Of course, if you can afford all pieces and you’re planning to get all crafting classes to 50, investing in good gear for every tier is going to pay off MASSIVELY. Do you NEED them? No, not really. So here we discuss how and when you should buy gear…
Main Hand, Off-Hand and Chest should be upgraded as often as you can. (As a very general rule, check every 4 levels. Look at the table above to be more specific). You can ditch the level 47 ones since you’re nearing 50 anyway.
Accessories are also very important. They aren’t that expensive, and CP really does alot for you. You can skip the copper tier, and begin your investment in brass (Level 15~19). You can live to 50 with this, but I prefer upgrading this all the time. Electrum Choker(49) and Red Coral Earrings(45) should be picked up ASAP since they are best in slot.
Non-chest body pieces are the least priority. You should get a complete HQ low-level set (15~) at least, as they’re inexpensive. You can comfortably get to 50 with this. If you want to upgrade, I would suggest skipping the Velveteen tier (expensive). Upgrading to the Linen tier (Level 32-38 for a complete set), since it’s much cheaper than Velveteen and Felt. And live with that until you’re 50. I wouldn’t really invest in Felt because you’ll be 50 soon after. Raptorskin Merchant Pouch (48) is an exception. It’s the best possible waist slot right now, and you might as well pick up an HQ as soon as you can.
Investing in gear getting to 50 is worth it, and becomes more so when you plan to get more than one class to 50. Using the guidelines above, and tables, you don’t need to be confused and check the MB every time you level up. Hopefully this helps you out!
Turn this fight from an epic mess of confusion into a breeze. Our guide to Caduceus – Binding Coils of Bahamut Turn 1 boss!
Ah, if you thought Titan Hard Mode was difficult, this guy will “WELCOME” you to coils! While the mechanics of Caduceus are very simple – positioning and overall strategy are the key to defeating him!
Caduceus Video Guide
Abilities
First, let’s discuss the abilities you’re going to see from caduceus. Note that he does not gain or lose abilities throughout the fight.
Basic Attack – Caduceus’ Basic attack is a (seemingly) 180 degree frontal cone. Only the tanks should ever be hit by this. Hood Swing – Extreme Damage Frontal Cone. Whip Back – (aka Tail Swipe) Exactly as it sounds. A devastating back facing cone AoE. Acid Slime Spit – Spits at random raid member and leaves a green floor effect that does DoT and Heavy.
The next three mechanics are the “core” to Caduceus’ fight.
Steelscales – Buff that increases damage but can be “cleaned” by feeding him a Dark Matter Slime. Feeding Caduceus a slime will heal him depending on the percent life remaining on the slime.
Glowing Floor Tiles – Spawns Dark Matter Slime (From here on referred to as “Slime”) on whoever is standing on one at the end of the glow duration.
Dark Matter Slimes – Will explode if they are too far from whoever spawned them. Instantly killing anyone in a huge AoE. They pack a surprising punch, and can be a problem when the spawner gets hit by a random acid spit.
General Strategy
Caduceus’s fight revolves around managing stacks of Steel Scales. He gains a stack roughly every 45 seconds. To remove stacks you must “feed” Caduceus a slime by first spawning one (Standing on a glowing tile), then bringing it near him. As mentioned above Caduceus heals himself whenever he eats a slime, so make sure the slime is at the smallest possible health before feeding it to him.
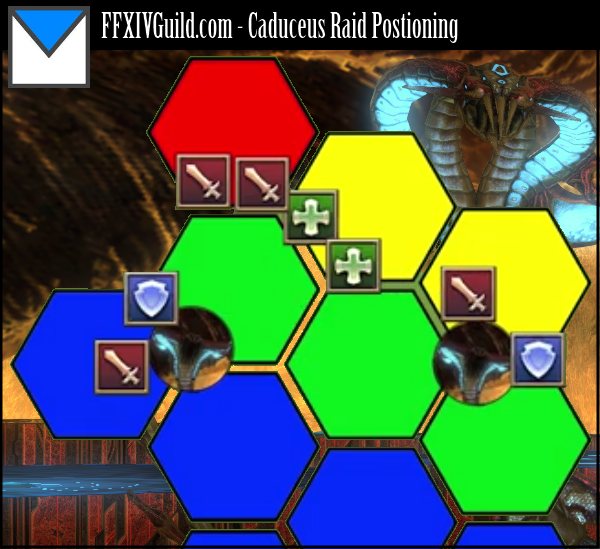
“These platforms seem random!? How can we predict which tiles glow? Relax – we have an image for that.
The colors represent the possible platforms that will light up at any given time. There are four possible patterns. Which pattern spawns between the four is completely random, and the same pattern may appear twice in a row.
Slime Feeding Tips
Caduceus frontal cone is HUGE. It can and will destroy you if you pass anywhere near his front. Approach him from the center as much as possible. Keep in mind Tailswipe exists, so the closer you are to his center, the better. While it seems safe to pass behind him, if you get slowed into a tailswipe, you’re going to regret it.
Caduceus Pre-fight Preparation
Organize yourselves into two teams of 1 Tank, 1 Healer and 2 DPS.
What position do you guys use!? We will discuss that at the bottom of the guide. There are many possible positions, each with their pro’s and con’s.
Caduceus Phase 1 (Pre-Split) Phase
Caduceus hits hard. There’s no way around that. It only gets worse for each stack he gains. So you must succeed at spawning and feeding each time the platforms light up. Each time you miss it, it means you have to get two slimes on the next glowing tiles. That can get messy quick, especially post-split phase.
Your primary goal in Phase 1 is to make sure Caduceus has no Stacks of Steel Scales shortly before he reaches 66% HP (when he splits in two)
How can you ensure that!?Our strategy here is to make him split shortly after the second slime. Save DPS cooldowns for after the second slime and melt him to 66% before he gains another stack. (At our current gear level it can be done after the first. So if your group lacks DPS, try to make him split after the third slime!)
Help! Our DPS is too fast/slow and he splits with a stack of Steel Scales! STOP DPS if you think he will split while he has stack. I’m not kidding. Stand and do nothing if you have to.
Got him to split without stacks? Good. Now on to arguably the most difficult part about Caduceus, the split phase.
Caduceus Split Phase (P1 – P2 Transition)
While not technically a phase, most wipes will come from “Messy splits”.
Your ONLY GOAL in the next 5-10 seconds in this phase is to reposition the clone a fair distance away from the original. What could go wrong? Well….
Basically you want to maximize the chances that your off-tank picks up and settles into his new position. Everyone can do their part during this phase.
Melee DPS – Disengage the boss for a few seconds. Don’t worry about lost DPS. Caduceus frontal cleave is insane, and will sometimes do it (or worse, Hoodswing / Whip Back) while splitting. It doesn’t happen always, but it’s best not to take chances. “But I’m losing DPS if i stop for a bit! I LIVE FOR THE PARSER!”. You do zero DPS when you’re dead, son. “He tailswiped while splitting! That Doesn’t always happen!!!”You can’t say we didn’t warn you.
Healers – Do not apply HoT (Regen, Whispering Dawn, Medica 2) shortly before splitting. Virus helps, too. Make sure Stoneskin is up on the off-tank BEFORE the split.
Main Tank – Use a damage mitigation skill during this time. If healers heal you too much while this phase is ongoing, they will pull aggro.
Off Tank – Yep, the most stressful part of the fight for you. If you’re in a PUG you’re going to get blamed alot. Smack the clone with your best aggro generating skill and make him stick until you settle into your designated spot. Provoke, Tomahawk/Shield Lob are your friends here.
Caduceus Phase 2 (Post-split)
Both copies of Caduceus retain all the abilities from the Phase 1 (Pre-split). The clone hit exactly as hard as the original one. Hooray! And did I mention slime spawning and feeding continues in this phase, only this time doubled? Great! Also expect to see two to three times more random acid spitting!
Your primary goal in this phase is to DPS both of them as equally as possible.
The only new mechanic is that when both copies of Caduceus are brought near each other, or when one dies, the fight progresses into the Final Phase.
Caduceus Final Phase (Two possibilities)
Caduceus will enter the final phase if one of these two things happen:
They are moved too close to each other.
One clone dies.
Scenario 1 (Unfavorable): Aggro messes up and one Caduceus moves towards the original one, they combine. This will likely result in a Wipe
Scenario 2 (Emergency): You guys were Soooo clooose, but one of your tanks die, and Caduceus found his buddy. They combine (Total life equals sum of both HP)
Scenario 2 still sucks, but it’s an “emergency plan” that happens more often than you think! We got our first kill on Caduceus in this circumstance. If this happens, you have to kill him quickly! This would be a good time to use DPS Limit Break. You have a limited time to kill him, as at any time he combines he will gain stacks extremely quickly, eventually one shotting your tank – and you.
Scenario 3 (Ideal) : One clone dies while the other is below 5%. All dps move to the remaining clone and kill him. You have a short grace period here before he starts going crazy with gaining stacks. Again, another good time to use DPS Limit Break, as there wont be any other chance to.
How to position in Caduceus
We haven’t really checked other guides, but we get alot of messages asking for this because of the extremely confusing (or vague) positioning mentioned in other places. Here’s our strategy…
We ignore the South of the map completely, forcusing our entire group in the north.
Pros of our positioning Strategy: – Healers can heal all members easily, and effectively assist each other. – AoE heals reach everyone. – All members have access to all pattern types.
Cons of our positioning Strategy: – Our tight position makes acid spit a problem. It can get out of hand easily. – More prone to AoE Damage. – Little to no room for unnecessary movement.
Getting tired of Titan? Are you stuck in Titan Hard Mode? Keep your hopes up and let us guide you through one of the most fulfilling fights in FFXIV ARR.
From deep within their mines, the kobolds have watched and waited for another opportunity to summon their Great Father and wreak havoc on Limsa Lominsa. With the destruction of Ultima Weapon, the final obstacle to their plans was removed, allowing the beastmen to summon their god without fear of imperial reprisal. Once more, it falls to you to ensure that the Lord of Crags never sees the light of day.
The first LEGIT Gear check in the game, and if you have lag issues, get ready to die in this fight! We had fun learning how to play Titan and beat him. We will show you two videos below, one is our first defeat of Titan and the second is where we helped a few of our FC members get past him.
Our very first Titan HM Kill:
One important thing to note is, all non-tank players must ideally have more than 3,500 life to survive this fight (specially important in the last phase where he does 6-8 Tumults straight). Lag and slow reaction time also play a major factor in beating Titan, you must be focused, know his rotation and position yourselves carefully in order to win.
Team Compositions:
PUG: 2 Tanks, 2 Healers, 4 DPS (The type of party you get from duty finder)
3 Healers: 1 Tank, 3 Healers, 4 DPS (Safest run, best for lesser geared groups)
5 DPS: 1 Tank, 2 Healers, 5 DPS (Ideal for more experienced groups)
Carry: 1 Tank, 2 Healers, 3-4 DPS, 1-2 Carry (when we want to get a guild member through)
Abilities
In hard mode, Titan has some a new rotation with new abilities also
Landslide (Pushback): Like in Titan Story mode, watch out for this frontal pushback ability, if you get hit chances are you will fall from the stage, and the moment one party member falls its practically a wipe.
Tumult (AoE): Back with a vengeance, in post heart phase, Titan can dish out 6-8 Tumults in succession.
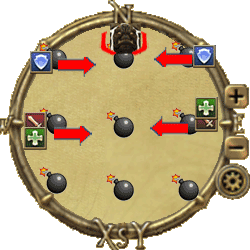
Weight of the Land (Plumes): Another skill from Titan Story mode, this time with a vengeance. It’s important the team positions themselves so that when he casts this they can move away to a safe position.
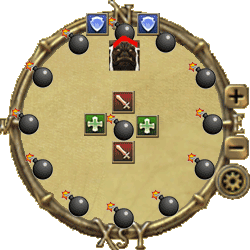
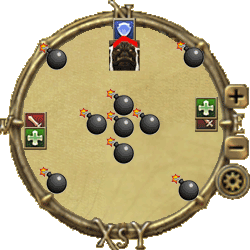
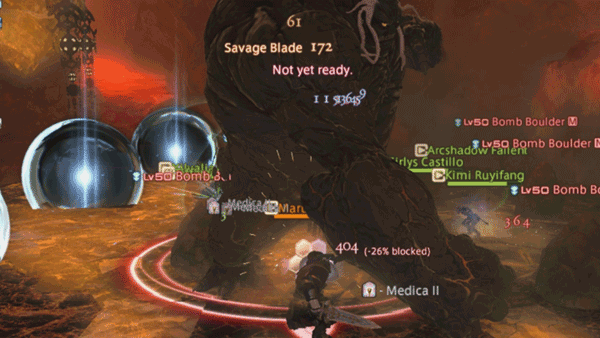
Bomb Boulders: A new mechanic, Titan calls down bombs that explode in a certain pattern, there are 3 types to watch out for but the rule of thumb is, the first bomb to light up is the first bomb to go
Type 1: Clockwise detonation, tanks will either take one bomb damage or hide between two bombs so they do not get hit (takes practice to hide believe me!)
Type 2: We call this the easy bombs, just find a safespot in either the N,S,W or E areas of the map
Type 3 (Post heart only) : This is where it gets tricky, 3 bombs get dropped parallel to each other. In this set the middle group of bombs always blow up first. So you want to stay where the last set will blow and immediately move to the middle once it blows up. (Titan usually casts Landslide right after these bombs show up, the moment he lets go of Landslide is when we move to the center)
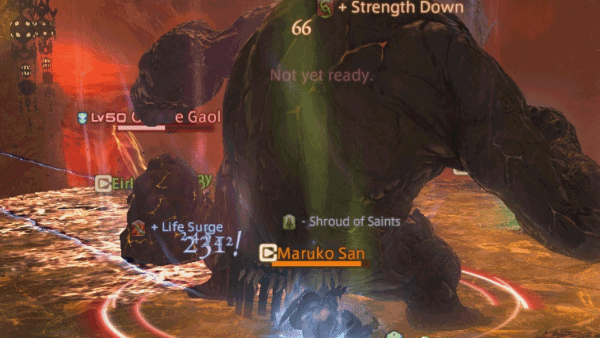
Gaol: Much like the Story Mode mechanic, a random party member will get imprisoned and will be tagged with a determination down debuff (it’s important that the healers strip this debuff after the party member gets freed from the Gaol). Also, Titan sometimes casts Landslide on an imprisoned member of the team, make sure you wait till after he casts Landslide to free your team member.
Geocrush (Jump): Just like in Story Mode, Titan Jumps up and after each jump the stage gets smaller, key position here is to group up so that healers can cast their AoE heals before going back into position
Earthen Fury (Ultimate): Same mechanic in story mode, if you do not defeat his heart in enough time Earthen Fury will destroy you! This is a DPS check and you will need to your whatever limit break you have to kill the heart. We usually time this right after the last Weight of the Land in the heart phase.
Mountain Buster: Heavy hitting frontal cone attack (never stay near the tank in this phase or you will fall. Tanks need to time their mitigation for this skill if they are not topped up.
General Strategy for roles:
Tank: Positioning is important, mitigation should be timed. You want to position Titan as close to the edge as possible to give your party enough space behind to move around and dodge ‘Weight of the Land’. Positioning is also important during the ‘Bomb Boulder‘ phases. In our FC, it is the tanks job to memorize Titan’s rotation and call out ‘Weight of the Land‘ and ‘Mountain Buster‘
Healer: Healers are the key to this fight, if one falls you are in for a ride! Positioning is important for healers to make use of their AoE abilities, after each Geocrush, Healers need to pre-cast their heals so the party gets topped up and during the post heart phase the healers need to ensure they top-up the tank before ‘Mountain Buster’ and also pre-cast AoE heals before he does ‘Tumult‘
DPS: All the DPS need to be careful of is avoiding Landslide, Weight of the Land and getting to know positioning during the bomb phases. They must also be conscious of their position so that the healers can have a place to run to when weight of the land hits.
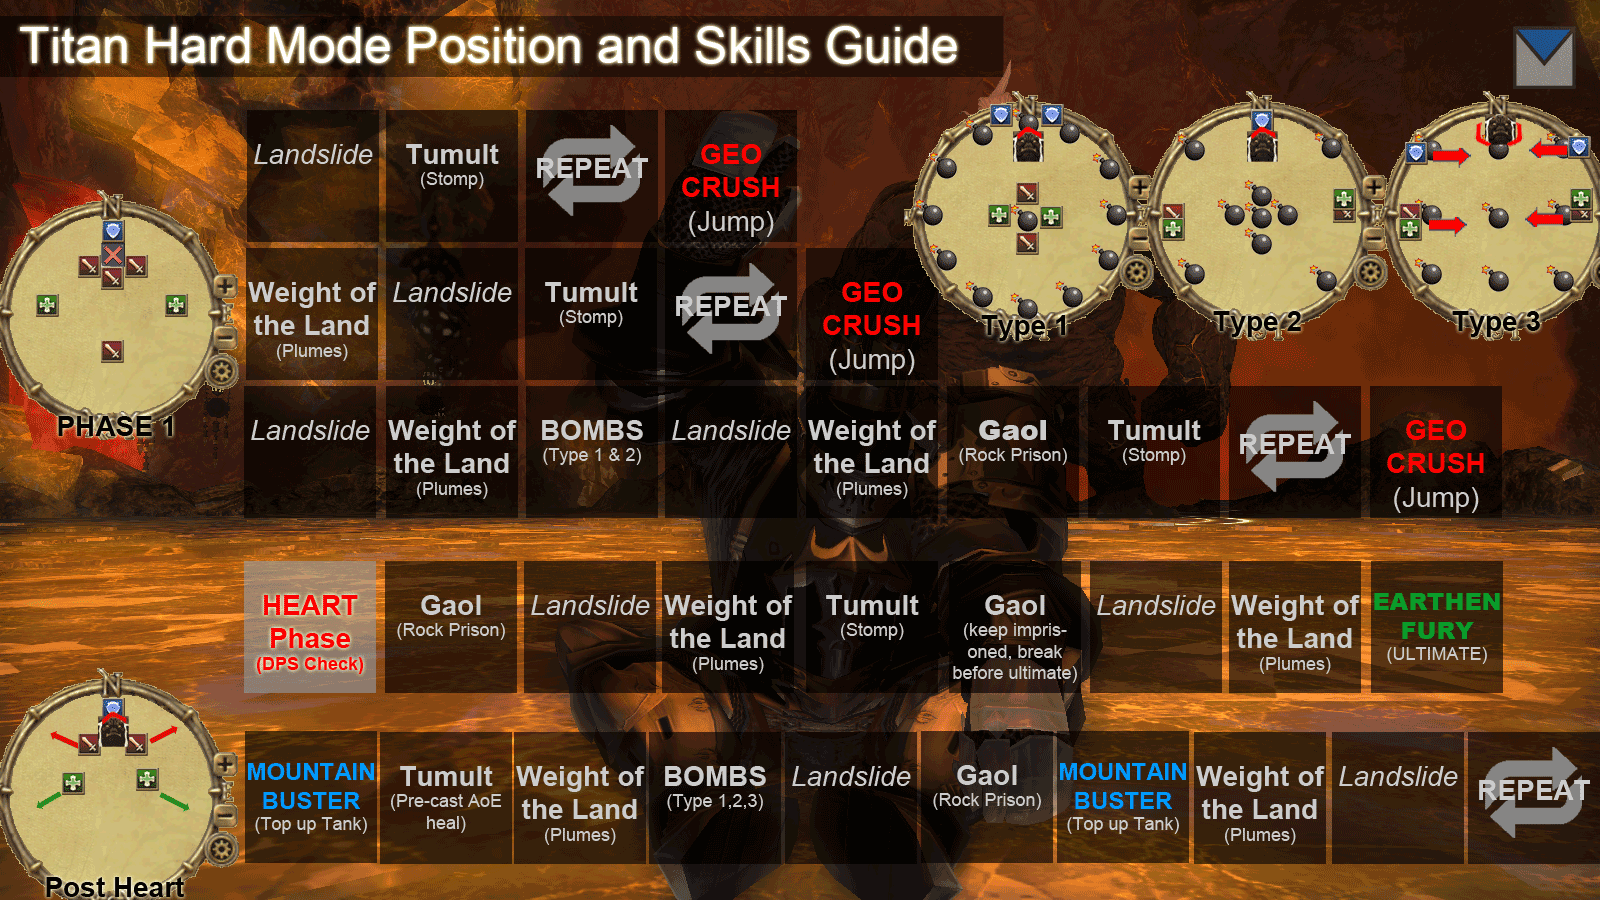
Titan Hardmode Infographic
1st Phase (Pre-heart)
Skill rotation: Landslide, Tumult, GEOCRUSH (Jump), REPEAT > Weight of the Land, Landslide, Tumult, GEOCRUSH (Jump), REPEAT > Landslide, Weight of the Land, Bombs, Landslide, Weight of the Land, Gaol, Tumult, GEOCRUSH (Jump)
In the first phase we see Titan showcase some of his new abilities namely the Bomb Bomb rotations. This phase will test how well the group can dodge Landslide and Weight of the Land. You will also be able to get a feel for how much DPS your group can do. Remember to save DPS cooldowns for when he reaches the heart phase
2nd Phase (Heart) 50% life
Skill rotation: Gaol, Landslide, Weight of the Land, Tumult, Gaol, Landslide, Weight of the Land, EARTHEN FURY
One the heart pops out, pop all DPS cooldowns and make sure to free whoever is in a Gaol. Note that when he casts Gaol the second time, the party should ignore the Gaol and focus on defeating the heart. We suggest to use your limit break, whether level 1 or 2 right after he casts the last Landslide or Weight of the Land. Once the heart is defeated immediately focus your attention on the imprisoned party member, if they are not freed from the Gaol before he casts Earthen Fury, the party member will fall.
3rd Phase (Post-heart)
Skill rotation: Mountain Buster, Tumult, Weight of the Land, Bombs, Landslide, Gaol, Mountain Buster, Weight of the Land, Landslide
The scary phase here are the first 3, most specially for the healers who will need to ensure the tank is topped up just before Mountain Buster and immediately focus on healing the group in time for Tumult. Swiftcast for healers is an awesome and almost critical mitigating skill in this part of the fight.
The Bomb phase always takes first timers by surprise. The key to dodging the bombs in this phase is not to PANIC. in the Bombs Type 3, always remember that the middle bombs will explode first, simply find where the last exploding set of bombs are and stay in that area (dont be afraid to stand next to a bomb! you will need to move because he casts landslide) just remember to move to the center right after he lets go of landslide.
One more thing to note is that when he reaches about 25% life he increases the amount of Tumults he does from 6 to 8 times, this is where AoE healing and positioning is key.
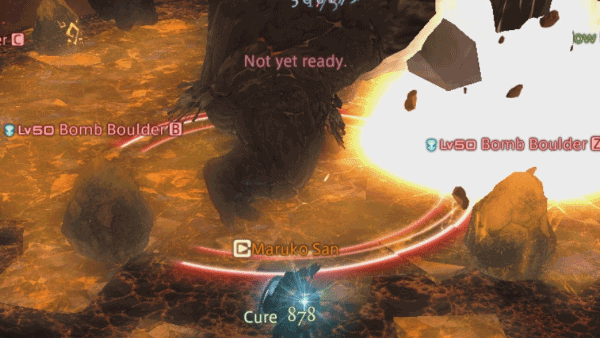
Visual Notes on the Titan Hard Mode Fight
Dont Release your Party Members from the Gaol until after he casts landslide on them like so:
This is an example of Type 3 Bombs, in this case I move with the party to my left, and wait for Titan to cast landslide and then move to the middle
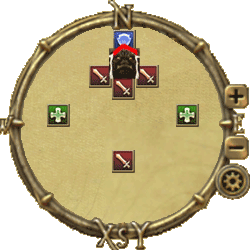
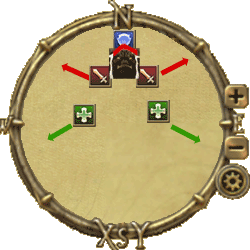
Sample Positioning for Weight of the Land
The three main reasons people die at Titan hard:
Weight of the land: Your dps and healers should already look for where to run BEFORE weight of the land hits. Because of this, unnecessary movements should be avoided. If you know WHEN the next weight hits, and WHERE to run beforehand, you will dodge it 100% of the time, believe me.
Type 3 Bombs: The triple line bomb formation is the reason most people die. To be honest, it’s largely because they panic. All non-tank players should simply move to the middle-bomb of the last set that spawned. Once titan punches the ground, move towards the center. Simple as that!
Mountain Buster: Both the tank and the healers should be aware of when the next “table flip” occurs. Tanks can pop a cool-down, and healers can pre-cast shields and heals. Note that every random damage that happens to the raid makes it harder for healers to keep the tank up to 100%. As a DPS, you got one job: Avoid damage.
Where is that Mature Tree? I can’t find that Lush Vegetation!! NO MORE!
Remember on the upper right of the table you can use the Search/Filter box. For example you can search for Specific Materials, Areas, Node Levels or a combination of all (Ex. 15 shroud).
Mature Tree & Lush Vegetation Materials & Locations
So we’ve been getting a lot of request for listing a cross class table that is up to date. Here it is, we have also listed separate cross class tables per Job/Class which we will update in this page in the next few days.
Let us know if you have any feedback in the comments.
Few things to note:
Hover over a skill name to see their entry in XIVDB (note that not all skills are up to date in XIVDB)
All skill tooltips from XIVDB seem to be TRAITED. The actual skills useable as cross-class are UNTRAITED.
All descriptions are up to date as of 12-Oct-2014.