FFXIV Relic / Zodiac Weapon COMPLETE Guide

Have no relic? Need advice on ANY step on your relic? This relic weapon guide will help you. START to FINISH!

CLICK HERE for 3.0+ RELIC!
This page is a ‘legacy’ guide for 2.0 Relics

So you wanna get your very first relic? Or you need help in any step of the relic weapon? You’ve come to the right place. In this Relic Weapon Guide, we try to give you any tips we’ve learned to make any step of the relic quest a LITTLE LESS PAINFUL. A fair waning, to complete a Zodiac weapon will take part of your soul. Small navigation links are provided right below so you can skip to where you are in your relic quest. please FEEL FREE to comment on any suggestions! Try to start your comment with the tag ((ANIMUS)) if you’re giving a tip for Animus, ((NEXUS)) for Nexus and so on.

**I made this guide as an “eternal” version of our older relic guides found here(Pre-relic to zenith), and here (Atma onwards – compiled here). The page you’re currently on is the ‘final’ and most updated version. Goin forward in 3.0 and beyond, we will be using a unified relic post that adds a new page for each step.

Jump to most recent step: Zodiac Zeta
Navigation
:
(No Relic) || (Base Relic -> Zenith)
(Zenith -> Atma) || (Atma -> Animus)
(Animus -> Novus) || (Novus -> Nexus)
(Nexus -> Zodiac) || (Zodiac -> Zeta)

Getting your first Relic Weapon!

“Follow and read your quest log. Seriously.”

First of all, you must be level 50, have all class and job quests done for your job, and completed the story quest. The quest to start your Relic Weapon is “The Weaponsmith of Legend”, located in Vesper Bay (Northern Thanalan). You will end up going to Rowena (who you’re familiar with by now…) and eventually Gerolt (who you’ll come to hate, haha). He will ask you to complete step 1: Broken Weapon. Which is just a fetch quest. On to the next step!


Step 2: Pre-relic weapon / materia table

ClassPre-relicMateriaMelded & Crafted by
PLDAeolian Scimitar2x Battledance IIIBSM (Blacksmith)
WARBarbarians Bardiche2x Battledance IIIBSM (Blacksmith)
WHMMadmans Whispering Rod2x Quicktongue IIICRP (Carpenter)
SCHErudites Picatrix of Healing2x Quicktongue IIIALC (Alchemist)
BLMSanguine Scepter2x Savage Might IIIGSM (Goldsmith)
SMNErudites Picatrix of Casting2x Savage Might IIIALC (Alchemist)
MNKWildlings Cesti2x Savage Aim IIIGSM (Goldsmith)
NINVampers Knives2x Heavens Eye IIIALC (Alchemist)
DRGChampions Lance2x Savage Aim IIICRP (Carpenter)
BRDLongarms Composite Bow2x Heavens Eye IIICRP (Carpenter)

Step 3: Alumina Salts: is basically defeating Dhorme Chimera.  This can be unlocked via Coerthas Central Highlands (X-32, Y-6) (Upper right cave). If you’re reading this in 2015 or more – this guys a chump. WITH YOUR “RELIC” EQUIPPED

Step 4: running Amdapor Keep for an Amdapor Glyph. WITH YOUR “RELIC” EQUIPPED.

Step 5: killing 24 beastmen. Keep following the quest log… WITH YOUR “RELIC” EQUIPPED

Step 6: defeat Hydra. This can be unlocked via Eastern Thanalan (x14,y30) (Next to Halatali entrance). WITH YOUR “RELIC” EQUIPPED.

Step 7: Kill the Hardmode Primals (Ifrit -> Garuda -> Titan). Running these on Duty Finder (even if you’re a brand new player), will probably clear no matter what. The exception to this is Titan HM, which you might want to learn a bit. There was a time that “Obtain Hyperfused ore” was stuck in peoples quest logs for quite some time… Again, WITH YOUR “RELIC” EQUIPPED.

Step 8: Buying Radz-at-han Quenching Oil, costs some lesser tomestones, and voila you have a relic! (This is not the end, please look forward to it. TM). You should have your first Relic!

JobRelic Weapon (hover over link to view)
Black MageStardust Rod
BardArtemis Bow
DragoonGae Bolg
MonkSphairai
PaladinCurtana
Holy Shield
ScholarOmnilex
SummonerThe Veil of Wiyu
WarriorBravura
White MageThyrus

Upgrading your Base Relic to Zenith

This is by far the simplest step. Obtain 3x Thavnarian mist which are purchased using lesser tomestones.

Good luck getting your very first relic! I assume you’re going to be checking the Zenith step next. Any tips or info to share? feel free to comment below!

Follow us on Facebook for more FFXIV updates!

Navigation:
(No Relic) || (Base Relic -> Zenith)
(Zenith -> Atma) || (Atma -> Animus)
(Animus -> Novus) || (Novus -> Nexus)
(Nexus -> Zodiac)  || (Zodiac -> Zeta)

FFXIV Amdapor Keep (AK HARD) Speedrun & Guide

FFXIV Amdapor Keep (AK HARD) Speedrun & Guide – notes to make your speedrun faster, and general dungeon strategy for FIRST TIMERS to AK hard!

Unlocks via Quest: Not Easy Being Green (Mor Dhona)
Item level requirement: 90
Item level of dropped gear: 100
Also drops 3-star crafting materials (Saurian Skin, Cashmere Fleece etc tier)

Navigation:
General Info (Top) || Speedrun/Map || Boss Guides

AK Hard: General enemy tips
Tentacles:
Give a VULNERABILITY UP debuff to YOU and YOUR ENEMIES – use them to your advantage!
Knotted Treant: They spawn weak adds, generally they can be ignored unless you pile them up with your SR pull.
Vulnerability Up on tank? No problem – esuna it!

Amdapor Keep (AK) Hard Speedrun

ampdapor keep hard mode akhm speedrun map ffxiv

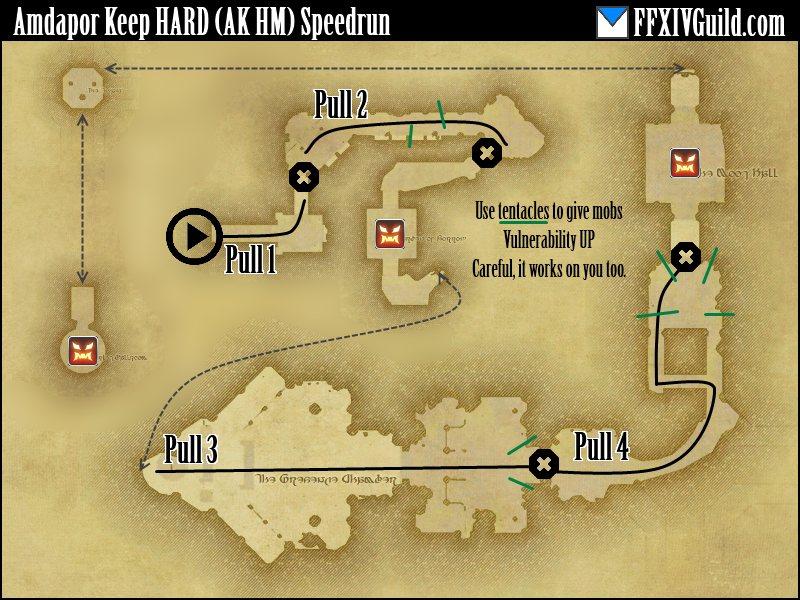
AK HM can be completed in a minimum of THREE BIG PULLS. Five or four if you’re being safe. And the forced “gauntlet” before the final boss. Special thanks to Claes Henrietta and Rylai Ariamis for the help with notes/map!! The above map says 4 pulls, but Pull 1 and 2 can be combined by killing the Ochu and proceeding (a bit on the risky side).

Pull 1: The first pack + the ochu, Don’t blow any CD’s here, It’s a small pull. Can be combined with pull 2.

Pull 2: This is the only “debatable” pull, and is stragely difficult. there are three ways to do this:
Pull 2 MAX: Drag EVERYTHING to the treant.
Pull 2 using tentacle: Drag all non treant mobs back to the tentacle. potentially dangerous.
Pull 2 split: Drag whatever you can to the pre-treant tentacle, then the remaining chumps+tree.

The general consensus is Pull 2 MAX is the “best”, but can be a backbreaker. Pull 2 tentacle depends too much on mob movement, and Pull 2 split is best for iffy groups. You want to use all your cooldowns for this.

(boss 1)->Pull 3: A short pull, gather them up and use the tentacle to give the mobs vuln up. Kill tree after.
Pull 3 VALUE: Tag the mobs with tentacle vul up, then move to the tree.

Pull 4: This is a LONG WALK. Sprinting could be an option. As always sprint pulls are gonna be a little easier for paladins. Use the tentacle of heavenly value. ALWAYS
Pull 4 VALUE: Tag them with vuln up, then move to the tree. This can be very risky.

(boss 2), Gauntlet, then (boss3): And you’re done! Potentially the fastest SR in this tier of dungeons.

We will be recording a vid of the “minimum possible (3) pulls” for both warrior and paladin – stay tuned.

((Back to Top))


Boss 1: Anchag (“Odin”)

  • Charge is unavoidable. Walking nearer to him does significantly reduced damage. Instakills statues – careful.
  • Lasers: Targetted ally must move behind statues. Extremely strong damage otherwise.
  • Hiding behind higher health statues is preferred. (Statues may die WHILE lasering)
  • All his attacks, even his basic DAMAGES statues: Tanking in middle is safest.
  • Laser affects tank (rare, but it killed me once lol)

Not many special mechanics behind this guy. Just burn him as fast as possible. TIP: Tank reposition to new statue after each laser. No joke, lasers are fatal and you should avoid them.

((Back to Top))

Boss 2: Boogeyman

  • Boogeyman periodically goes Invisible. He cannot be damaged/targetted during this time – but you can still “see” him.
  • When you kill Luminescence(add) stand in the AoE it leaves upon death. It gives you a buff.
  • Going near the boss while buffed reveals him. (Buff signified by pulsing light)
  • “DODGE” the massive cone by facing AWAY from him ala Melusine.
  • Kill the big fat add with a long channeled skill: causes a raidwide bleed.

TIP: The dead bodies on the ground signify the adds spawnpoints. The first set is the two chumps, second set is two chumps + fat.

((Back to Top))

Boss 3 (Final): Ferdiad

  • Kill adds tethered to boss. (Stops “wild card” from expanding)
  • Slime adds bind the target. Slimed people can free themselves by helping DPS.
  • In the 2 slime 1 fat tether setup: just dps the fat tether guy.

The final boss isn’t very notable, pretty much common sense mechanics. TIP: Don’t clump up, the blades left by Black Wind can be annoying if you’re clumped up with friends.

((Back to Top))

Other dungeons released in this tier (2.5):
Amdapor Keep (Hard) || Wanderers Palace (Hard) || Keeper of the Lake

I hope our Ampdapor Keep Hard guide was useful to you! As always, careful speedrunning and be good to first timers!

Follow us on Facebook for more FFXIV updates!

FFXIV Wanderers Palace (WP HARD) Speedrun & Guide

FFXIV Wanderers Palace (HARD) Speedrun & Guide – notes to make your speedrun faster, and general dungeon strategy for first timers to WP hard!

Unlocks via Quest: Not Easy Being Green (Mor Dhona)
Item level requirement: 90
Item level of dropped gear: 100
Also drops 3-star crafting materials (Saurian Skin, Cashmere Fleece etc tier)

Navigation:
General Info (Top) || Speedrun/Map || Boss Guides

WP Hard: General enemy tips
Ignore Banners/Flags/Standards: 
Drag enemies out instead

Wanderers Palace (WP) Hard Speedrun

wanderers palace hard mode wphm speedrun map ffxiv

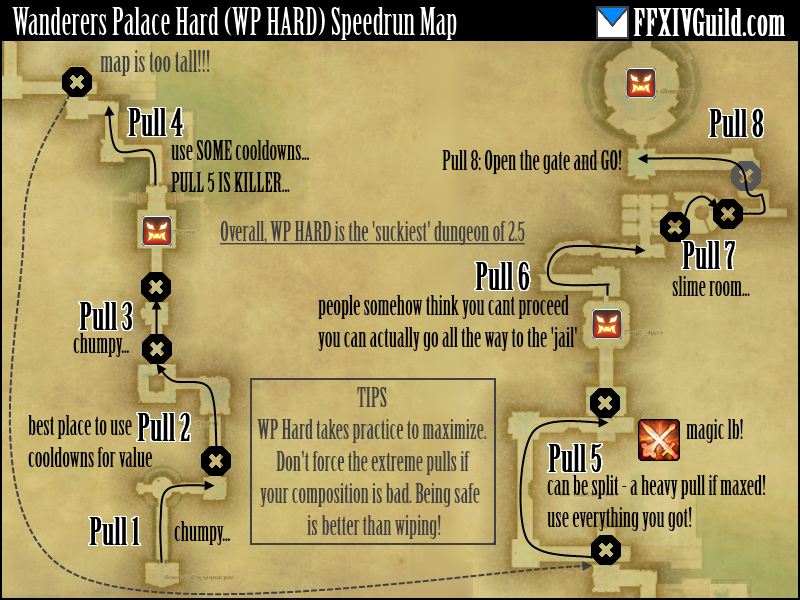
WP HARD is the longest dungeon in this bunch – it can be completed in a minimum of EIGHT PULLS. Although, for many groups, 9 or 10 seems to be the average! Special thanks to Claes Henrietta and Rylai Ariamis for the help with notes/map!

Pull 1: Small pull with 4 mobs, don’t waste anything here.
Pull 2: While not the beefiest of pulls, use your CD’s here since the next pull is chumpy, then boss follows
Pull 3: Small, time extending pull (boss 1 follows)

Pull 4: Can be a tricky pull due to camera angle, LOS the first pile behind the first corner, and get the rest of the chunk. Use SOME cooldowns here – it’s a bit heavy.
Pull 5: This pull is usually split, for good reason. It’s an insane pull that maxes out at 10 or 11 mobs. This, PLUS the fact the previous pull was heavy. Going all the way is NOT recommended for groups that AoE slowly. (boss 2 follows)

Pull  6: A lot of people think you have to stop at the 3 mobs.. you can actually pull allllll the way to the locked up tonberrys. It’s an easy pull of 5 mobs.
Pull 7: is a forced time waster. This is the “slime room”.
Pull 8: People usually split this but you can actually open the door and drag the pudding all the way to the end!!! This is value. (final boss follows)

((Back to Top))

Pull 5 is killer, you might need to chill out if you think your group isn’t up to snuff. We will be recording a vid of the “minimum possible pulls” for both warrior and paladin – stay tuned.


Boss 1: Frumious Koheel Ja

  • Spawns these fireball adds that CANNOT be ignored.

Overall a nondescript boss which doesn’t do anything special. To be honest, I want to type more here – but I just cant.

((Back to Top))

Boss 2: Slithy Zolool Ja

  • Randomly spawns a bunch of flags. You must get (walk into) them to survive. Each flag corresponds to an effect.
  • 3 Negative totem types exist: Heavy, Frog, Fire RES down.
  • One positive type exists: Damage dealt UP – DPS pick these up! BOSS MUST NOT ABSORB THIS.
  • Other totems MAY BE ignored (Except, frog totem cancels out your frog status)
  • Colors are random each time – just remember the DPS+, and healer get everything else!

Key reminders: DPS+ is massive value if picked up by DPS, and massive non-value if picked up by the boss. Frog totem cancelling DPS frog status will greatly reduce the encounter time.

((Back to Top))

Boss 3 (Final): Manxome Molaa Jaja

  • Does a random slash which leaves a debuff: YOU CANNOT GET HIT BY HIS PBAOE if you have this debuff.
  • Leaves flags (standard), just drag him away from the buffing AoE and continue killing.
  • SACRED IDOL must be killed. Looks like the flags, so be aware.
  • Healers: the Doom icon is similar to PS Sire: Healing to full cancels the doom.

TIPS: Don’t stay too far from the boss. he has a MASSIVE cone attack that you might not get out of. Don’t tunnel – kill Sacred Idol ASAP.

((Back to Top))

Other dungeons released in this tier (2.5):
Amdapor Keep (Hard) || Wanderers Palace (Hard) || Keeper of the Lake

Hopefully our Wanderers Palace Hard guide helped you out! Remember, careful speedrunning and accommodate first timers!

Follow us on Facebook for more FFXIV updates!

FFXIV Keeper of The Lake Guide & Speedrun

UPDATED! Keeper of the Lake dungeon strategy guide! Having trouble killing the last boss? Beat up those dragons – get in here and find out how!

Unlocks via Story Quest Requirement. (Dungeon located in Mor Dhona)
Item level requirement: 90
Item level of dropped gear: 100
Also drops 3-star crafting materials (Saurian Skin, Cashmere Fleece etc tier)

Navigation:
General Info (Top) || Speedrun/Map || Boss Guides

Keeper of the Lake: Speedrun

KOTL: General enemy tips
Pre last boss pulls: 
the random helicopter bombs can damage enemies!

keeper of the lake kotl speedrun map ffxiv

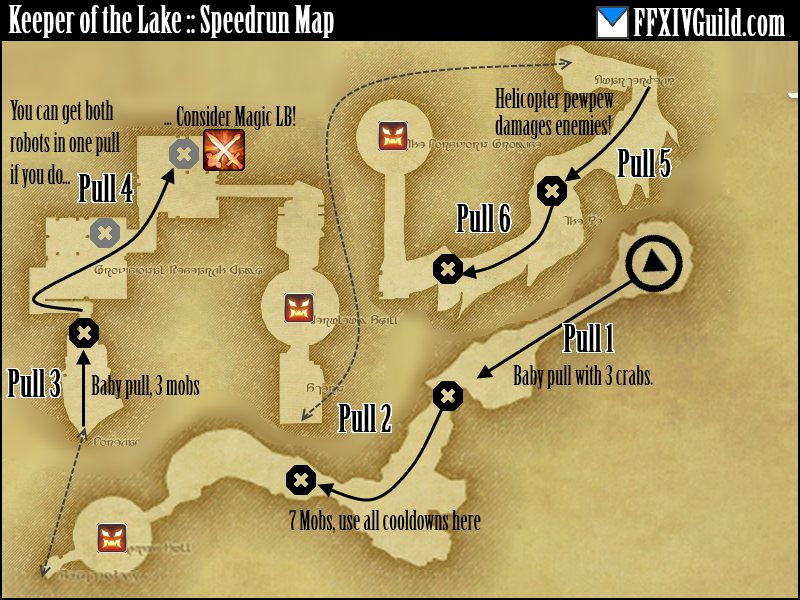
KOTL can be completed in a minimum of SIX PULLS. Seven should be the absolute max! Special thanks to Claes Henrietta and Rylai Ariamis for the help with notes/map!

Pull 1: Useless pull… 3 crabs. Don’t blow any CD’s here.
Pull 2: A bit of a beefy pull. Get all 7 mobs and don’t spare any cooldowns. (boss 1 follows)

Pull 3: Another time extending useless pull. Kill them and get the key to proceed.

Pull 4: THIS CAN (and USUALLY is) split into two. Aggro the chumps, kill the computer, aggro the robot then AoE them down. Do not kill the dudes, then robot… You can pull the whole family but this can be RISKY! This is by far the best use of LB if you do try to pull this off! (boss 2 follows)

Pull 5 and 6: The flying machine AoE’s AFFECT THE ENEMIES. Lure the AoE to the pile by having everyone loosely stack around the mobs, as it targets a random party member.

((Back to Top))


First boss: Einhander

Spawns tanks of fuel at certain intervals. His frontal cleave (and presumably other skills) destroy it and deal damage to nearby allies. Face the boss away from all times and move away from tanks if needed. Sucks all tanks and party members towards him, so move a bit away and face him outside. In a nutshell

  • Spawns fuel tanks you should be far away from. His skills damage these objects – don’t let them die.
  • Small (auxiliary) tanks do around 1-2k… large (main) tanks explode for a TON.  Tanks can set off other tanks… be careful!
  • Pulls all party members and spawned fuel tanks towards it.
  • Reposition away from the fuel tanks and face away from party as usual.
  • Tanks can be knocked around just like Brayflox HM bombs.

Having your MT make small efficient movements to prevent explosion clusterf*cks is key to reducing encounter time here. Pure tunneling, while possible, can cause some unexpected chain explosions.

((Back to Top))

Second Boss: Magitek Gunship

A big mechanical middle finger to melee classes, this guy is just annoying.

  • Spawns adds: 4 chumps, (interval) Magitek Vanguard. The vanguard is chunky.
  • When he moves randomly, he’s setting up his flame skill.
  • He moves in a random direction leaving behind an extremely painful fire DoT. Stay away from these. Especially sucky for melee.
  • If you didn’t use Magic LB earlier: consider using it on Vanguard+Boss. BETTER YET: Ignore the Magitek Vanguard and focus down the boss – he vanishes when it’s over!

((Back to Top))

Final Boss: Midgardsormr

After pulling the boss, a short time passes until first dragon (yellow) resurrrects:

  • Boss is invulnerable during this time.
  • Has a frontal cleave.
  • Wait for a smaller add to spawn – kill this ASAP and get inside the shield it spawns (Similar to Halatali HM)

Boss does a raidwide kill unless you are inside the shield. Kill yellow before the second (blue) dragon spawns:

  • Boss is invulnerable during this time.
  • Has frontal cleave.
  • Must be NEAR BOSS to be damaged.
  • Same mechanic here… small add spawns > kill it > get inside barrier.

Again, your party is dead if you fail to get into the shield. Kill the blue dragon before focusing on boss and killing it. Aside from the above, just avoid all the colorful AoE and you’ll be fine.

((Back to Top))

Other dungeons released in this tier (2.5):
Amdapor Keep (Hard) || Wanderers Palace (Hard) || Keeper of the Lake

Well, I hope you found our Keeper of the Lake guide helpful! GL to you Speedrunners and new players alike!

Follow us on Facebook for more FFXIV updates!

FFXIV Novus Stats Melding (Recommendations)

A nice guide to help you find out what stats and materia SUITS YOU for your Novus Relic Weapon!

So you’re done with the hellish Animus Grind – Welcome to the grindy world of Novus! But wait – What stats should you meld on your Novus!? If that’s what you’re wondering you’ve come to the right place. Let us guide you through the different ways you can meld your Novus Relic!!! Good luck! Each weapon recommendation has My FC Mates Mainclass recommendations. and My preference.

Navigation

TankCurtana / Holy Shield Novus (PLD) || Bravura Novus Stats (WAR)
Healer: Thyrus Novus Stats (WHM) || Omnilex Novus Stats (SCH)
Melee: Sphairai Novus Stats (MNK) || Yoshimitsu Novus Stats (NIN)|| Gae Bolg Novus Stats (DRG)
Caster: Stardust Rod Novus Stats (BLM) || Veil of Wiyu Novus Stats (SMN)

Novus Stats FAQ

Novus to Nexus stat bonus? Huh? for each 22 of a stat, you get a small bonus when upgrading to Nexus. Each weapon can have 3 of these bonuses and we aim to capitalize on it (44 on a stat makes this bonus twice). Sadly, PLD Curtana/Holy Shield can only cap out on 2 of these bonuses.

Accuracy on DPS Novus!?!? Yes. Each DPS class (and tank class) has Accuracy on my “practical” melding recommendation. WHY? For added flexibility choosing the best gear. What happens if you dip below accuracy and are forced to use Skill Speed gear (I’m looking at you, Bard) – oooo I bet you wished you had ACC on your Novus now! Besides RELIC will almost always be filler to final boss weapons.

I MADE A MISTAKE MELDING MY NOVUS!? HELP!? Chill. You can fix that once your Novus is complete. You just need 1 Alexandrite and 1 Materia for each mismeld you did.

If you had one – what melds would you use!? MY (Subjective) preference is underlined and bolded.

I’m poor! Help! The lessen cost melds contain no IV’s AFAIK – and are sometimes even better.

Curtana (Holy Shield) Novus Stats Melding

Defensive: 31 Parry, 22 ACC
+Holy Shield: 11 Parry 11 ACC

A full defense, full flexibility meld that helps you switch gear around for maximizing other stats. Overall, a GREAT choice for any PLD.

Defensive (lessen costs): 22 Parry 22 Accuracy 9 DET
+Holy Shield: 8 Parry 8 ACC 6 DET

Sacrifice a little flexibility for some balance (and money saving) DET on your Curtana/Holy Shield is still pretty damn good.

No Parry: 22 Accuracy 22 DET 9 CRIT
+Holy Shield: 9 DET, 13 CRIT

For the above meld, freely adjust your CRIT and ACC numbers. Max out on DET if you can.

No Parry (lessen costs): 14 ACC 16 DET  23 CRIT
+Holy Shield: 8 ACC, 6 DET, 8 CRIT

This meld is a little weird… you don’t get any stat bonus but save a couple million gil :D.

A note on curtana: It’s hard to save money WHILE shooting for stat bonuses since curtana reaches the Materia IV tier much faster. It’s a bit annoying how the stats are split between the two weapons, but what can we do…

Waiting for FC input!

Mahiko San’s preference: Defensive (Lessen costs) – Since this is a tank class – removing ACC from your relic is folly. A good mix of Parry/ACC/DET is a solid build while saving money – what’s not to like!?

((Back to Top))


Bravura Novus Stats Melding

Practical: 31 DET 22 ACC 22 CRIT
Practical (lessen costs): 22 ACC 23 DET 30 CRIT

I have to say this is a bit influenced by our groups playstyle. We try to make our Warrior OT as much as possible. IN MY OPINION, WAR OT is super effective due to debuff placements, this matters more since we run with a NIN. The melds above also serves as the “No Parry” Bravura melds.

Defensive: 44 Parry 22 ACC 9 DET
Defensive (lessen costs): 31 Parry 22 ACC 22 DET

Basic full defensive meld and a more balanced (IMO Superior) build that saves money and gives a great balance of stats.

Waiting for FC input!

Mahiko San’s preference: Defensive (lessen costs) –  The more I look at that spread of stats, the better it seems. Since the benefit of CRIT isn’t that huge, 22 DET and 31 Parry seem like a great spread between offense and defense! HOWEVER since my group favors WAR OT HEAVILY, I’d personally meld Practical(lessen costs) for MY team.

((Back to Top))

Thyrus Novus Stats Melding

Balanced: 31 Piety, 22 DET, 22 Spell Speed
A good balance of stats – everything your WHM needs!

Balanced (lessen costs): 24 Piety, 23 DET, 28 Spell Speed

Accuracy: 31 Accuracy, 22 Piety 22 DET (Not as good compared to Accuracy on SCH Omnilex)

Just like the Omnilex, the “best stats” for Thyrus will never be universal. Each healer prefers this or that, and depends on playstyle/group. The above are solid recommendations none the less.

Mahiko San‘s (Official FC White Mage!) Novus: (Balanced)

First of all, let’s start with the 22 DET and 22 Spell Speed: I chose this because I don’t want too much DET or too much SS. My playstyle and speed of progression, however, cannot permit me to ELIMINATE Spell Speed (clutch heals and handling mechanics favors SS, not DET). Also, having at least 22 on a Novus stat gives you a +1 stat bonus when it upgrades. So why not, right?

Alot of WHM’s really like DET and don’t like SS. If that’s the case then simply meld 31 into DET, but I personally would not recommend it. The main reason people hate on SS is that bosses are “scripted” and precasting heals + perfect play leads to not needing it. People forget that actual human beings (not robots) pilot characters, and while PROGRESSING FAST thru raids, perfect play isn’t always there since knowledge of the encounter isn’t “ingrained in memory” yet. I like SS a little more than DET, and I stick to that. But I wouldn’t want to live without either.

Rest in Piety (31): I really like Piety. The max is 33 but if you choose to max it out you miss on a stat bonus from another stat (supporting stats cannot reach 22). This seems to be a no brainer. The very minimum Piety I’d meld on a Thyrus is 22. But since it’s the stat I FAVOR MOST – I put as much of it as I can.

No Crit? Yes, no crit. I DO NOT LIKE CRIT on White Mages – plain and simple. If you like crit – by all means… But I personally cannot and would not recommend it.

Lastly, Accuracy on Thyrus? isn’t bad if your group knows how to use it. I wanted to, but ultimately would rather meld Accuracy into body pieces/accessories if needed.

Mahiko San’s preference: Balanced –  Well, for the sake of continuity I had to put this section. If it isn’t obvious by now I chose the Balanced strat. 31 Piety, 22 DET and 22 SS.

((Back to Top))

Omnilex Novus Stats Melding

CRIT Heavy: SCH: 44 CRIT +(31 DET or 31 Piety)
CRIT Heavy(lessen costs): 31 CRIT 22 DET 22 Piety

The obvious crit focused builds. I prefer the lessen costs one here since you may drop too much piety depending on itemization.

Accuracy*: 31 Accuracy, 22 CRIT 22 DET

Don’t laugh. I’d meld my Omnilex this way if I had one.

Like the Thyrus – healing stats really vary from person to person. Adjust as you see fit depending on your statics needs and your own play. Adjust accordingly!

Waiting for FC input!

Mahiko San’s preference: CRIT Heavy(lessen costs) OR Accuracy –  Depending on your groups need/speed, either of these two builds would work wonderfully. If you don’t DPS often, stick to the CRIT Heavy (lessen costs).

((Back to Top))

Artemis Bow Novus Stats Melding

Practical: 44 CRIT 22 ACC 9 DET
Practical (Lessen Costs): 31 CRIT 22 ACC 22 DET

Heavy crit for more Bloodletters – no explanation needed here.

Brainless DPS: 44 CRIT 31 DET
Brainless DPS (lessen costs): Doesn’t exist

Well, trying to get as much CRIT as you can is a no-brainer. DET as a supporting stat is always good for any DPS class.

Waiting for FC input!

Mahiko San’s preference: Practical – I would NEVER meld an Artemis Bow without Accuracy, but that’s just me. If you’re really poor, the “lessen costs” variant is still EXTREMELY SOLID. Again, the accuracy on Artemis Bow helps you make sure you don’t get gimped by your own gear drops (like in FCoB tier).

((Back to Top))

Sphairai Novus Stats Melding

Practical: 31 DET 22 ACC 22 CRIT
Practical (Lessen costs): 30 CRIT 23 DET 22 ACC

Brainless DPS: 31 DET 44 CRIT
Brainless DPS (Lessen costs): 23 DET 31 CRIT 22 Skill Speed

DET ACC CRIT is a common theme amongst DPS relic weapons which you’ll see alot coming up.

Tiffany Faye ‘s (Official FC Monk!) Novus: (Practical)

I recommend the 31-22-22 (DET ACC CRIT) meld because the relic is your comfort weapon. Having accuracy on your main weapon will give you the best flexibility when itemizing your character.
Although the current BiS list for monk already has sufficient accuracy even with the Crit/Det Dreadwyrm weapon, new equipment with better stats might come out on other slots (for example, a Crit/Det rings to replace the Ironworks Str Ring). The Accuracy zodiac would allow you to use the new ring without dropping below the accuracy cap.

Another reason I prefer the 31-22-22 meld because it is MUCH cheaper (potentially save millions of gil by skipping Crit IVs)

Mahiko San’s preference: Practical – 31 DET on MNK is insane if you can afford it. There’s really not much else to say with these straightforward DPS relics like Sphairai.

((Back to Top))

Yoshimitsu Novus Stats Melding

Practical: 31 DET 22 ACC 22 CRIT
Practical (Lessen costs): 31 CRIT 23 DET 22 ACC

Brainless DPS: 31 DET 44 CRIT
Brainless DPS (lessen costs): Doesn’t exist

Yoshimitsu Novus melds are part of the no-brainer relic pile.

Waiting for FC input!

Mahiko San’s preference: Practical – SS is a junk stat on NIN as well. There’s not much else to say. If you’ve got the gil – this is the meld for your Yoshimitsu.

((Back to Top))

Gae Bolg Novus Stats Melding

Practical: 31 DET 22 ACC 22 CRIT
Practical (Lessen costs): 30 CRIT 23 DET 22 ACC

Brainless DPS: 31 DET 44 CRIT
Brainless DPS (lessen costs): Doesn’t exist

Gae Bolg Novus melds are part of the no-brainer relic pile.

Eirlys Castillo ‘s (Official FC Dragoon!) Novus: (Practical)

Explanation for 31-22-22 Gae Bolg melding

(1) Reasons for maxing Det: Det is the most crucial substat for most classes. While crit is nice, an increase in det is a 100% increase in DPS, no matter how minor. Therefore maxing the Det component is something most would consider wise to do.

(2) Reasons for 22-22: The most important reason someone would want to meld 22-22 for the remaining 44 allowances is because 22 is the key number you want the substat to be at. For every 22 points into a substat, each upgrade will increase said substat by 1 point. Anything below 22 will remain that at that value through upgrades. Going 22-22 also means you don’t have to meld IV materias, which means there’s no chance of wasting copious amounts of gil.

(3) Reasons crit-acc: Crit is the next most important substat, some might argue it equally as important or even more so, but personally I think its Det>Crit for the reason stated in (1).

Accuracy is probably the most important substat for any non-healer class. Without sufficient accuracy, you risk missing which results in a massiva DPS loss, especially if it’s one of the big hits (Full thrust, Jump, etc.). While the i130 BiS list already has sufficient accuracy for T13 flanks, having spare accuracy on your weapon means more flexibility for BiS lists in the event of new equipment, especially accessories, being released (e.g. A crit-det ring)

Skill speed is definitely out of the question as it does nothing but help clip your DoTs, which means it’s actually a DPS loss.

Mahiko San’s preference: Practical – Since SS is a junk stat on Gae Bolg most of the time, this is the most feasible build. As always, if low on gil, do the lessen cost one.

((Back to Top))

Stardust Rod Novus Stats Melding

Practical: 44 Spell Speed 22 ACC 9 DET
Practical (lessen costs): 31 Spell Speed, 22 ACC, 22 DET

Brainless DPS: 44 Spell Speed 31 DET
Brainless DPS (lessen costs): 31 Spell Speed 22 DET 22 CRIT

There’s almost NO WAY you can mess up a Stardust Rod Novus melding – all stats CAN be used by BLM.

Waiting for FC input!

Mahiko San’s preference: Practical – The sheer power of Spell Speed when stacked cannot be ignored on BLM’s. 44 SS is extremely potent! The lessen costs variant is still very good for your Stardust Rod.

((Back to Top))

Veil of Wiyu Novus Stats Melding

Practical: 31 DET, 22 ACC 22 CRIT
Practical (lessen costs): 30 CRIT, 23 DET 22 ACC

As long as there’s no Spell Speed – we’re happy.

Brainless DPS: 44 CRIT 31 DET
Brainless DPS (lessen costs): Doesn’t exist.

I’ll say it once, I’ll say it again… Say no to Spell Speed on SMN. These melds look very similar to the Melee Relics, ey? Again since Summoners are severely limited by mana AND Spell Speed scales horribly on them – it should NEVER appear on your Veil of Wiyu.

Waiting for FC input!

Mahiko San’s preference: Practical – Veil of Wiyu should never had Spell Speed melded… If gil isn’t a factor this should be your relic stats. The lessen cost alternative is always there if you’re a little low on gil.

((Back to Top))

Remember, these are just recommendations and you can meld however you want or tweak these builds to your liking! Good luck farming Alex, and finishing your Novus Relic! Hurry up and get to Nexus and get depressed farming lights!

Follow us on Facebook for more FFXIV updates!

FFXIV Turn 13: Bahamut Prime Strategy Guide

Turn 13: Bahamut Prime Strategy Guide! EARN your Final Witness title! Enter Heavensward as a KING and not a CHUMP! Let our T13 Guide help YOU!

   SO! You’re finally here! Turn 13 – the final boss of 2.0… Bahamut Prime! Let our turn 13 guide help you get past this unbelievably epic trial! Like Samuel L Jackson always says, “Hold on to yer butts!”. After thirteen turns of struggle – and an endless grind for tomestones… Bahamut Prime stands as your final challenge. Begin your journey into Heavensward as a Final Witness.

Navigation:
Page 1: Pull to 52% (First Divebomb) | Page 2: “Zoo”, Akh Morn

Bahamut Prime: Phase 1

Megaflare: Megaflare is a multi-part skill. Lets see what happens step by step:
1) a random number of people in your party get tagged by Megaflare initial damage. This is AoE (Spread out, don’t hug your partymembers)
2) Those not hit by the initial AoE become “Friends“. Friends are marked by a ring around them.
3) 3 random people get a large circular ground effect under them. This explodes after some time – GTFO (dont put many these in the melee/stack zones)
4) ALL FRIENDS MUST UNITE (stack on top of each other), or else bad things happen. IE, Death.

As a general reminder: Succor > Split > No Hugs > Friends Unite > Medica II > Prepare for a Flame Breath

Flatten: Flatten is the early T13 tank buster. It deals HEAVY damage. Tank must mitigate this, to be safe. Healers must always shield this. To make matters worse, flatten is always followed by FOUR FLAME BREATH in phase 1.

Flame Breath: Massive elemental damage cleave. Happens many, many times during the fight and is something you should get used to ASAP. Your healers shouldn’t “be surprised” by this as you progress with learning the fight.

So here’s what happens: Megaflare > Flamebreath > Flatten > Flamebreath x4. Your MT must be healthy because the Flamebreath before Flatten CAN be lethal if you slacked on regens and got some unlucky hits. Make sure you guys prepare for that first of all. After that first one, the long flatten channel time begins. Stoneskin and Adloquium should be cast on tank. Once flatten completes, precast cures and physics to prepare for the next 4 Flame Breaths. Don’t just spam Cure II and Adlo here… save some mana by adjusting the cure needed depending on how heavy the damage is.

Tanks should ALWAYS spend a mitigation skill here if available.

Earthshaker: Chooses two random people between all DPS and Offtank. After a short delay Bahamut will fire lasers that damage everyone in its path, towards each selected person. Upon each impact, a pool of sludge remains – this happens 3 times. Standing on sludge will WRECK you for 3k a second so it’s not a good idea. Maximize efficiency by having each guy line up the sludge in opposite corners. Healing? This does physical damage. Healing this can easily go sour if you time it incorrectly. Channeling your heal right after the marker disappears is generally a safe timing. The safest rotation would be WHM: Cure II, Cure I, Regen. SCH: Adlo, Physick, Physick. Each healer should choose which “side” they’re going to heal. The afflicted guys, of course, have to travel to opposite sides quickly.

at 75% Gigaflare signals the phase change. This does an extreme amount of damage. Arcanist Virus should be SAVED for this and make sure there is no antibody. Get everyone up to full, Cure 3 if needed. Succor and Soil – hope for the best. Casting Succor at 76% prevents alot of BS. He may cancel his Flatten Combo just to phase – be wary of this combo. Make sure your Scholars Virus finger is fast.

A Note on Gigaflare: Gigaflare has a notoriously late check in our experience. a really late virus doesn’t actually reduce the damage. Same with succor shields… often times Giga goes off with our Galvanize intact. Counter this by pre-empting it more than you’re used to.

Bahamut Prime Phase 1 Rotation:
Megaflare, Flatten Combo, Earthshaker, (Repeat until 75%), Gigaflare -> Phase 2

Rotation Prime Phase 1 Rotation with Flamebreath:
Megaflare, Flamebreath, Flatten, Flamebreath x4, Earthshaker, Flamebreath (Repeat until 75%), Gigaflare -> Phase 2

All of these skills happen in different occasions in the fight. Get used to them ASAP cause you’ll be seeing them for a loooooooong time. On to phase 2: Balls.


Bahamut Prime: Phase 2 Balls

Adds (Shadow Of Meracydia): Hard hitting, each add should be virused (pref BLM or WHM). Two sources of Virus can tag all 3 dragons (You’ll be seeing 3 of these before phasing btw). These adds should be dragged all the way across from Bahamut, otherwise a tether forms between them and gives DEF+ and DMG+ to both of ’em. Do not want. These guys spawn around 1 minute apart from each other. Rouse and Divine Seal line up perfectly with this so keep it in mind.

Before we go any further, you WANT to use up your limit break sometime during this phase. Melee LB on bahamut is recommended. Use your judgment on this one. The idea is to wipe your LB bar sometime in the middle of P2. Melee LB1 or 2, either or – the reason is you need LB3 for Last Bastion later on, and don’t wanna waste excess LB. Using Eye for an Eye on Bahamut when each add spawns is a good practice, too.

Flare Star: spawns 1-3 “balls” that have to be picked up by raidmemers. These balls are tethered to somewhen upon spawning, and will slowly travel towards them. After a short period of time the balls rush. They can spawn randomly in sets of 1,2,3 or 4 – but will always total to 7 per total rotation. Each ball gives a stack of STACKNAME, increasing damage dealt by a skill later on – Bahamuts Rage. Taking 3 balls is pretty much lethal for a non-tank. 2 balls is still risky – and extra attention will be needed to survive Bahamuts Rage. (more on this later)

Megaflare upgrade – Tower: Each Megaflare now comes with a tower. This tower spawns on a random raidmember before friends explode. The tower must be absorbed by somebody, taking moderate damage. If you fail to do so, massive AoE damage and partywide Bleeding debuff WILL CAUSE A WIPE. Note that you have to stay in the tower until you HEAR the explosion and SEE the visual effect. Just standing there as it disappears won’t cut it – better safe than sorry. It is unadvisable for friends to absorb towers – this can be fatal depending on composition and HP. (TIP) Healers shielding themselves before mega can have massive value. If healer is a friend, and tower spawns under you – you might have to move out and cancel your own cast (which is integral at this point). If you’re shielded, you can safely survive Friends + Tower combo – and fire your heal off.

Bahamuts Rage: This skills damage goes up for each Flare Star ball you ate. 1 is pretty standard, and you shouldn’t really worry about it. TWO is pretty heavy. BLM Apocatastasis is the best way to ensure someone with a 2-stack lives. Otherwise, full HP and shields would be good. Sacred Soil is some value here, since it happens right after megaflare. The main reason Rage is lethal is because your party will likely be damaged from the previous Megaflare. Stacking up for Cure III is the most value you’re gonna get from MP (ratio wise)

Think of this phase as 3 rotations. Each rotation will have an add, 7 total flarestar balls (3 times cast), megaflare and rage! Just survive this rotation thrice and you’re good!

at 52% Gigaflare signals the phase change. Mitigate it the same way as P1 Giga. Virus is essential, full HP, Succor/Shield. If it’s your first time past this phase – you will wipe to divebombs in about 10 seconds. There is a sucky way to phase which you should avoid. Having him phase with the combination of “Mega, Rage, Giga” is extremely painful. DPS harder to avoid this – Potions, Melee LB, etc…

Bahamut Prime Phase 2 Rotation:
Add, Flare Star, Flare Star, Flatten, Flare Star, Megaflare, Bahamuts Rage (Repeat until 52%), Gigaflare -> Phase 3

Bahamut Prime Phase 2 Rotation (With Flamebreath):
Add, Flare Star, Flame Breath, Flare Star, Flatten, Flame Breath, Flare Star, Megaflare, Flame Breath, Bahamuts Rage (Repeat until 52%), Gigaflare -> Phase 3

Follow us on Facebook for more FFXIV updates!

Navigation:
Page 1: Pull to 52% (First Divebomb) | Page 2: “Zoo”, Akh Morn

FFXIV T12: Phoenix Strategy Guide (FCoB T3)

How to beat Turn 12’s boss: Phoenix. Beat the birds and bennys using our anti-avian strategy guide!

So you’ve beaten Kaliya, huh. Well get ready for Turn 12’s boss: Phoenix! I hope you channel your own revival powers – this may take more than a few wipes! Let our Phoenix guide help you out reducing that!
Navigation: [Page 1: Pull to 52%] [Page 2: Bennyland, Fountains]

Phoenix Phase 1: Benny, Blackfire & Whitefire

Bennu spawns every minute starting around 5s~ in. Don’t underestimate this little dude, he hits like a truck. Any free Virus should be used on benny (SMN, but BLM or WHM preferably). While killing Bennies isn’t too hard, Bennys must not die too close to each other (From here on we will call them Benny). Kill them fast or else Phoenix gets a stack of (forgotname). YOU DONT WANT THIS. Each time a raidmember dies, he also gets a stack.

Revelation is Phoenix’s tank buster. It’s a massive elemental damage nuke that cleaves. A tank CANNOT eat 2 straight revelations or he will die (it gives a debuff that increases the next revelations damage… to around 40k). This is why SMN and SCH Virus should be saved for Revs, and untraited Virus for Benny.

Blackfire & Whitefire: These two mechanics are right next to each other. Blackfire targets ONE DPS, ONE HEALER and OFFTANK always (considering all people are alive). It leaves an add (Blackfire is the name of skill and the add). You must not have 2 blackfires too close to each other. and never walk into a blackfires hitbox. Failing to do these things will result in a damaging pulse and a vulnerability up debuff.


Whitefire also targets ONE DPS, ONE HEALER and OFFTANK. A large white circular AoE spawns on the targets. They will take heavy damage. Remember not to get “venn diagrammed” by two whitefires – you will likely die. Whitefires AoE must hit Blackfires. Successfully tagging them gives then a HUGE HP DOWN debuff. Once the debuff is applied, kill the Blackfires.

How do we deal with this? Have all DPS pile up… both healers pile up… and offtank go off somewhere on his own (haha). This prevents blackfires from spawning too close to each other. For the following Whitefire, DPS tags the DPS Blackfire… Healer tags healer Blackfire… and tank on tank. Prevent alot of BS and reduces the needed communication when taking care of this mechanic.

Help! Blackfire timing is a little weird!! Yeah… its just something you have to get used to. After the castbar finishes, theres a short delay, then Blackfire spawns. The instant it spawns you HAVE to get out. Again, a few attempts at this and you should be okay.

We got three Benny?! Okay, theres no HARD CODED penalty to having alot of Bennys. However, practically speaking, having 3 Benny in Phase 1 means you’re sorely lacking DPS. A total of 5 Benny during Phase 1 + Phase 2 is the “practical maximum”. Bennys spawn around 1 minute after the last – so the first phase should last no longer than ~3 minutes.

Phoenix’s phase 1 rotation:
Benny – Revelation – Blackfire – Whitefire (Repeat)

Again, this is a really short phase. Here’s what your Phase 1 should look like ideally:
Benny – Revelation – Blackfire – Whitefire – Benny – Revelation – Blackfire – Whitefire (79%). Below 80%, Phoenix enters Phase 2.

Phoenix Phase 2: Brands, Blue + Red

Brand of Purgatory is the first skill you’ll encounter in this phase. It leaves a green (or sometimes purple) mark on a random (likely ranged or healer) party member. This skill has a few mechanics.
1) When phoenix casts Flames of Unforgiveness, if the debuff wasn’t passed… the current owner dies.
2) Passing the debuff is done by simply sticking together.
3) Damage is done to BOTH parties upon switching. A short delay later another chunky damage is done to the original owner.
4) Reminder is: Unforgiveness? Pass – Damage on both – Damage on Initial.

How do we deal with this? We pass it between both healers. Everyone else should be mindful to avoid their little area. Stoneskin and Adloq on the original holder, and a small shield on the recipient should be okay. We have the CLEAN healer approach the DIRTY healer when flames is being cast. The dirty one casts a large heal on him or herself while the recipient is travelling (to survive the second hit). Passing happens shortly after bluefire – so keep it in the mind of your healers “Bluefire? Shields up“.

Help! Brand went to a non-healer! It’s okay. Shield him and have the healer take it on Unforgiveness.

Next up in this phase Bluefire and Redfire. Bluefire is similar to T9 stardust. Once the blue marker expires a freeze field will spawn where the person was. Being in this field shortly after it spawns gives you a slow, heavy and DoT… it generally sucks. Once the field goes away it leaves a little pool of ice. Standing in this pool gives you a bebuff (Buff?) – It’s used for Redfire. Redfire spawns a slow moving fireball. It gets tethered to a random person in your raid. Have 1 guy (Healer or Bard, preferably) take the ice buff and stand in the redfire tether – this cancels it out. Failing to cancel out redfire tether will result in massive raidwide damage and a huge DoT.

Benny continues to spawn in this phase. Remember what was earlier mentioned, they have to die far from each other, a good formation is a huge X, with each point on the sides and middle becoming a benny death spot.

Phoenix’s phase 2 rotation:
Brand (only phase change) – Blue – Unforgiveness – Red – Revelation (Every ODD red) – Repeat (Benny every 1 minute)

This keeps repeating until Phoenix reaches 52% – then onto Phase 3 “Bennyland”. Again, remember to kill Bennies fast, and keep deaths to a minimum – you DO NOT want any stacks if possible. When it phases GTFO of the nearby area surrounding Phoenix. An autokill field spawns and you don’t want to be there. Getting to Phase 3 with 5 or less Bennys and having your party in good shape is the first hurdle you face in Phoenix – so remember to DPS hard and NO DEATHS!

CONSIDER USING MELEE LIMIT BREAK to Phase before a third Benny spawns in Phase 2. Having a total of 4 Bennys is a massive stress reliever for the next phase.

Follow us on Facebook for more FFXIV updates!
Navigation: [Page 1: Pull to 52%] [Page 2: Bennyland, Fountains]

FFXIV Bahamuts Coil Guide Directory

Final Coil of Bahamut

Turn 13 (FCoB T4): Bahamut Prime 

Turn 12 (FCoB T3): Phoenix 

Turn 11 (FCoB T2): Kaliya

Turn 10 (FCoB T1): Imdugud

See: Endgame loot list and accuracy caps

-Currently refining some of the current bosses. Finishing text before adding more images / other refinements.
-Any older boss guides may be different currently due to Echo Buffs and Overgearing. The original guides are preserved for posterity.


Second Coil of Bahamut

Turn 9 (FCoB T4): Nael

Turn 8 (FCoB T3): Avatar (never got around to this)

Turn 7 (FCoB T2): Melusine (never got around to this)

Turn 6 (FCoB T1): Rafflesia

See: Endgame loot list and accuracy caps

Binding Coil of Bahamut

Turn 5 (FCoB T5): Twintania

Turn 4 (FCoB T4): Elevator Gauntlet

Turn 2 (FCoB T2): ADS

Turn 1 (FCoB T1): Caduceus

See: Endgame loot list and accuracy caps

Follow us on Facebook for more FFXIV updates!

FFXIV T11: Kaliya Strategy Guide (FCoB T2)

How to beat Kaliya! Our strategy guide to beating the boss of Turn 11 (FCoB T2)! Don’t let this chumpy hydra tear you up!

So you’ve beaten Imdugud and well on your way to becoming a Final Witness! Don’t take a rest yet, chump – If you’re reading this, then that means you’re only 25% of the way!!!  Get off your butt and get your free kill on this MFing Hydra! How to beat the T11 boss: Kaliya!!! Luckily Kaliya doesn’t have a ton of mechanics but the fight culminates in a rather stressful final phase.

Navigation

T11 Kaliya Phase 1: Pull to adds (60%)

“Okay I’ll MT” – Lisie Quiloud, last words (from our first pull)

Lets discuss some mechanics that happen thru most of the fight (except the P2 Adds phase).

Double frontal cleave – Kaliya does a two-hit wombo combo frontal cleave. This is deadly to non-tanks, if it isn’t obvious by now. This damage is shared by both tanks. While you can solo tank this, it’s recommended to double tank for 99% of groups. We gave this skill(s) a nickname: “HHHAAAAAUNK“.

Nerve Gas – covers 1/3rd of the map with a nasty ground effect. Do not be here when the cast ends. You will take heavy damage and a Vulnerability Down debuff. Nerve Gas always happens in sets of 3. A good reminder for your raid is to keep in mind that “After third, HHHAUNKing”. Drill that into your mind, people dying to haunk after cloud is more common than you think.

Secondary Head – a rather unexciting tank buster.

At 90% Kaliya casts Barofield. This remains up until Kaliya is dead. Barofield just meant you cannot pass THROUGH Kaliya during Nerve Gas. A dangerous field that does heavy damage, a slow and VULN UP if you enter it. Yeah, it’s a bad idea. So get used to dodging Nerve Gas WITHOUT passing inside Kaliya.

After Barofield goes up Kaliya gains two new abilities. They’re some kind of “missile” that Kaliya shoots in the air. We call them “Stack and Split” (sometimes Blue for Stack, Red for Split). After each Nerve Gas rotation Kaliya fires BOTH of these missles – the only question is which one lands first. Stack (as the name implies) means you have to stack to share the damage – 3 guys is enough, 4 recommended. Split (You guessed it) means you have to stay far from each other so you dont get tagged by two. Tips on surviving this:

  1. You can easily hear the sound effect of these missles. Be aware of it!
  2. If you DO NOT see a marking after the sound effect, it’s SPLIT first then STACK.
  3. Inversely if there is a marking after the sound effect, it’s STACK first then SPLIT.
  4. For the sake of consistency, make your splits look the same each time or at least assign a general area to prevent hugs.

Phase 1 is basically a tutorial for the basic mechanics of Kaliya. Phase 3 is pretty much a mirror of phase 1 (with 2 additional mechanics). This goes on until Kaliya reaches 60%. Once Kaliya reaches 60, she finishes whatever skill is happening and then proceeds to walk to the middle. GTFO of the middle because an insta-kill field will come up a few seconds later. Onto Phase 2!!!


Kaliya Phase 2: Kindergarten Shapes (Ball, Egg, Cube)

“Animation locked… haha, I wonder how strong this laser is?” – Eirlys Castillo, last words.

At 60% three adds spawn. The Cube, Ball and Egg (Not their in-game names). This phase is time-based, regardless if you complete what you need to do – Kaliya will phase after around 2 minutes 30 seconds (double checking). First of all lets summarize your objectives during this phase:

  1. Kill Ball & Cube at roughly the same time.
  2. Kill egg before phasing (roughly 2:30 duration)
  3. DO NOT have any 2 shapes come near each other.
  4. Prepare for massive AoE during phase transition (Nerve Cloud)

Sounds simple enough, ey? LOLNO! There’s tons of things that can go wrong here! But lets go through it one by one to maximize your chances. The Egg keeps moving around in a circle – again, they ANY ADD MUST NOT BE NEAR EACH OTHER. The main challenge is dealing with the ball.

Ball has a chunky amount of HP. It also greatly reduces magic damage taken. So it’s ideal that you use physical DPS to kill it. It has a strong cleave and good old Repelling Cannons, which is shared damage to all partymembers near the ball. Have all your physical DPS and 1 healer stay near the ball at all times. If thunder happens to go to this pile, simply have the victim move backwards. Most of the fatal damage comes from the Ball, so it’s recommended to throw a random virus on it when you can, and cycle Eye for an Eye on the ball tank. Also, we use WAR to tank the ball so he can be Storms Path’d. It does all magic damage so Halones STR Debuff doesn’t work on it.

Cube greatly reduces physical damage taken. So obviously have your MDPS beat it up. Aside from this, it’s not really special. Again, you should aim to kill ball and cube within 5 seconds of one another. If not, Egg will absorb the other – turning into Voltron and will wipe the floor with your face. Keep in mind the Cube has considerably less HP than the Ball.

Egg doesn’t have many special properties. It can only take damage when you’re near it. Aside from this, it’s main purpose is to punish parties that kill the cube or ball sooner than the other. If you’re struggling with DPS, consider Melee Limit Break on egg after both the Cube and Ball die.

One healer (preferably WHM) should walk around the inner circle following the ball group. This is so Medica II can heal the entire party – theres alot of random damage so keeping it up every 30s is a good idea.

Lastly there’s a few environmental effects while all of this is going on. Triple lasers which are insanely deadly on a long cast time. A periodic random Thunder Debuff(very similar to T9’s Thunderstruck). Also, touching the inner circle results in instant death. Get used to calling out thunder in your VOIP, it’s a common mess-up.

Egg is dead! Now what!? Prepare to resume your position from Phase 1. Nerve Cloud is coming right up. Make sure to soften the damage from Nerve Cloud by: Arcanist Virus, Succor and Sacred Soil. Warrior Storms Path, Monk Dragon Kick. Also, you may want to Stoneskin, Adloq or Apocatastasis those who may have weakness. This nuke is rather strong!!!

This phase may be confusing so lets summarize yet again what you need to do:

  1. Call out Thunders, Avoid Lasers
  2. Reduce damage of ball (Eye for Eye, Storms Path, Virus, Dragon Kick)
  3. Coordinate kill speed of ball and cube.
  4. Kill Egg (consider Melee LB)
  5. Prepare for Nerve Cloud (into Final Phase)

If you’ve survived, it’s on to Kaliyas Final Phase!

Kaliya Phase 3 (Final): Tethers (Nanospore Jet)

“Where does blue stack again?” – Mahiko San, last words.

Welcome to T11 final phase! The most annoying and stressful mechanic rears its ugly head here almost instantly: Nanospore Jet (commonly refered to as Tethers). Before we get into that – Kaliya RETAINS ALL SKILLS from Phase 1. By now, I hope you guys can avoid them well! Because tethers are effin’ annoying.

Nanospore Jet targets 2 sets of 2 people. One couple will be the “Green” tethers and the other will be the “Blue” tethers. From here on we will distinguish the two by calling it Green and Blue. First of all there is no difference between colors – they have the exact same effects. Here are the rules for each tether:

  • You can see the color of your tether from the status bar, or a visual effect.
  • They take some time to “settle in” – position during this settling time.
  • Once tethered you CANNOT GO TOO FAR from your partner.
  • ANY GREEN may not be near ANY BLUE; vice versa.
  • Failing the above results in heavy damage + Vulnerability Up.
  • Any tethered person who dies, instantly kills their partner.
  • Tank + Non-tank is never a tether combination. If one tank is tethered, the other tank will always be it’s partner.

You got that!?!? Drill it into your head! Nanospore Jet doesn’t F around and punishes slackers. As easy as Kaliya is; FOCUS is ultimately important in the final phase. So you’ve survived your first set of tethers? Good job! Now welcome to the real stress – Tethers + Nerve Gas.

How to deal with Tethers + Nerve Gas!? This basically sums up Final Phase. If you can do this well, this is gonna be a walk in the park. Otherwise, it’s gonna be a walk in the shart. Luckily we’ve devised a barbaric way to deal with this, or at least a way with the smallest amount of thought applied. For this we have 2 rulesets to follow: Positioning Rules and Movement Rules.

Positioning Rules determine where green or blue will initially stay (to prevent killing each other due to proximity). If you follow these by order, you shouldn’t have a problem!

  • If Tanks are tethered, other couple must be in complete opposite side.
  • If Melee is tethered, partner must approach melee.
  • No melee or tank tether? (Worst) Blue left, Green right.
  • All non-tethers people stack~ on any tethered couple (for baiting nerve gas, explained below)

These three simple rules will get you past the first hurdle of simply dying once tethers settle in. Once you’ve gotten used to this, here we have the Movement Rules.

  • Dodge to path of least resistance (wherever the clean floor is nearer)
  • Head on nerve gas? Dodge left (Clockwise). Opposite pile adjusts accordingly.
  • Keep in mind – after third Nerve, haunk.

Easy as that. If you followed the positioning rules and movement rules – tethers play out themselves. Of course, this may take a few wipes to get used to! I cannot stress the above mentioned POSITIONING RULES and MOVEMENT RULES. If your group refuses to organize or at least have a set behavioral pattern for tethers – Kaliya will best you 99 times out of 100. If you’re struggling with pugs, feel free to suggest the rules above! It’s better than winging it!

Turn 11 Kaliya Loot List

I really don’t know how to present by-turn loot list nicely so check this out for now: Bahamuts Coil Loot List.

Well, that’s about it! Feel free to comment with any other advice or (hopefully nonviolent) reactions! Best of luck killing Kaliya and getting past Turn 11!!!

Follow us on Facebook for more FFXIV updates!
FFXIV T10: Imdugud Strategy Guide (FCoB T1)

Strategy guide on beating Imdugud! Charges, Prey! All you need to know about this SHOCKING fight!

So you’ve taken your first step into Final Coil! Good luck! The first boss you face is no pushover. I’d say the main points you need to maintain here are Focus and mechanics awareness! Our strategy guide for the boss of Turn 10 (Final Coil Turn 1) Imdugud!

“He’s too good.” – Everyone who stepped into T10

Navigation:
[PAGE 1: Phase 1: Pull to 85% – Phase 2: Adds]
[PAGE 2: Phase 3: Heat Lightning – Phase 4 Adds II – Final Phase]

Imdugud Phase 1: Full to 85%

Right off the bat we’re faced with 3 of his basic mechanics you’ll be seeing throughout the fight.

– Massive frontal cleave that does heavy damage to all guys. Naturally you want to face the boss away from the raid for this. I will reiterate that this cleaving mechanic is MASSIVE and the damage is no less BEEFY.
– Tailswipe that is easily avoidable. You can “bait” this to come out by going behind Imdugud. (He doesn’t do basic attacks during this time so it’s advisable to do so)
– Critical Rip is your usual tank-buster. A long wind up leading to a haymaker. It’s your tanks responsibility to use a mitigation skill for this. Healers should Stoneskin / Adloq this when possible.
— The above abilities will be used throughout the fight. The next two abilities will be, too, but I’d consider them special mechanics.

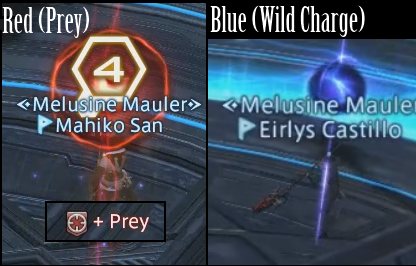
prey wild charge imdugud t10 ffxivWild Charge (Blue)
A two part mechanic. First a blue marker appears on top of a random, non-tank raidmember. There is no debuff icon for this. After a short delay, ALL PARTYMEMBERS NEARBY (and including) the marked person will be stunned and a Vulnerability UP debuff placed.

Next up Imdugud channels Wild Charge. He makes a beeline to the marked guy and will deal heavy damage to all guys in his path. However, this damage can be reduced by standing in front of Imdugud. The more people blocking, the less damage the victim takes. There is a caveat – the frontmost guy takes the most damage. Only a tank can survive this! So make sure the engine on your choochoo train is your offtank :D. Virusing charge is the largest value you can squeeze from Virus in this fight.

Prey (Red)
Another two part mechanic, albeit much simpler. First a red marker is placed on a random raidmember. Once the timer of this expires, it will deal MINOR damage to the afflicted person (500~). Easy to spot since there is a debuff icon. If this damage goes through (ANY of it), a new debuff is placed. Once this second debuff expires, it will deal a cripplingly huge amount of damage, coupled with a paralysis. Prevent all this BS by having your SCH Adloq or WHM SS after the initial red marker appears.. For SINGLE reds, it’s advisable for SCH to do it since Adloq has a significantly less cast time. For doubles, it’s discussed in P2.

For the remainder of this guide I will refer to them by (what our static uses) Blue & Red. Again these 5 attacks will be used for the ENTIRE DURATION OF THE FIGHT.

——————————————————————-

Before we discuss the second phase we will discuss a bit on Positioning and Markings

adds spawn points imdugud t10 ffxiv

A & B are where the adds spawn in both add phases (more on this later) Mark these areas whenever you zone into T10 so you won’t get confused. Easy reminder: The first dot in the first ring direct East and West is A and B. There are two practical ways to position boss (and adds, too):

  • Outwards Facing (less space efficient, safer for mechanics)
  • Sideways Facing (more space for your team, slightly higher risk for cleave)

A basic cycle of Red, Blue, Rip will repeat until he’s at 85%. He will become invincible at this point then on to Phase 2. The skill “Electrocharge” means he’s phasing – have your tanks position accordingly.


Imdugud Phase 2: Adds (Sons and Daughters)

“Cream the daughter first!! R@P3 the son now!” – Normal T10 Conversations

So, in case you haven’t noticed by now, the stage gets smaller and smaller, leaving a dangerous electric field whenever it recedes. This will continue to happen until you have nothing left to stand on. Anyways…

2 Sets of 2 adds spawn (total of 4, for the confused). 1 Son of Imdugud and 1 Daughter of Imdugud for each tank. If a son gets close to another son, they will be tethered and become extremely beefy. Same applies for daughters. In a nutshell, keep them AWAY from each other. Both the son and daughter of Imdugud inherited his skills (Not much of a surprise there). All adds have the massive frontal clear and tailswipe. So you’re going to want to position them facing outwards (like their daddy).

As per their individual traits… Daughter of Imdugud hits hard, Son of Imdugud leaves an electric pool on the ground (takes a while to vanish). Killing Daughter first is always a smart move. You don’t want people maneuvering around an electric pool. Remember to move the son as close to the edge as possible before killing, to minimize the area affected by the pool.

Red happens during this phase, too. But it can now sometimes target two people. As far as I remember it cycles between 2-1-2-1 targets before phasing. Could be 2-1-1-2-1-1 (will check later). For this, the WhiteMage has to Stoneskin one, Scholar has to Adloq the other. To make sure we dont target the same guy we arrange our party the same way (Healers > Tanks > DPS). One healer goes from the top of the list, the other goes from the bottom. If both healers get the mark, shield themselves. (Once succor reaches 500 or 600 due to gear, you can just use that)

This phase is TIME BASED. So wether or not you beat the adds before time expires, he will continue on the to next phase. The good news is, if you beat up the adds quickly you get to DPS imdugud for FREE until the timer runs out! The phase is ending when he begins to channel Electric Burst. (Generic AoE skill that you shouldn’t worry about!) From here you’re off to Page 2: Adds II to Final Phase.

Follow us on Facebook for more FFXIV updates!

Navigation:
[PAGE 1: Phase 1: Pull to 85% – Phase 2: Adds]
[PAGE 2: Phase 3: Heat Lightning – Phase 4 Adds II – Final Phase]