FFXIV Heavensward Preparation: What to do?

How to prepare your character before 3.0 hits so you can come bursting out of the gates! Powerlevel and get ahead of the mass!

If you’re asking yourself “What can I do to prepare my character for Heavensward?” you’ve come to the right place. Here, we discuss what you can to BEFORE 3.0 hits so you can gain a slight, but meaningful advantage.

Feel free to comment/suggest more ideas for Heavensward preparation!

General Preparation (All character types~)

Finish your STORY QUEST: I’ll mention this again near the end of the guide – but this is pretty damn important! Make sure you’ve completed the VERY LAST STORY QUEST in 2.x questline.

Rested EXP: MAX OUT your rested EXP, as this will help you out immensely. AFAIK 72 hours in a sanctuary is the maximum (Anyone else know the exact amount?)

Prepare Food: We’re not really after the stats, so don’t worry about not having a stack of Flint Caviar, haha. The 3% EXP Bonus is what you’re after.

  • Gathering food for gatherers (perception isn’t important when leveling up)
  • CP/Craftsmanship food for crafters (Basic stuff, control is so-so leveling up)

Heat of Battle I / II: I’m talking about the Free Company Actions – A flat bonus to EXP gained from killing enemies. This USED TO STACK, although I/we haven’t done this in a while. Remind your FC leader/officers to buy a few of these.

99 Gyashl Greens: Take your chocobo out of the stable and stock up on Gyashl Greens, self-explanatory. Leveling up with a choco sure beats leveling up without one.

Find a group to play with: Goes without saying. Doing dungeons and other things without a group sucks compared to with.

Stocking up on Currency: We cannot know truly how useful they will be come 3.0, but might as well if you have nothing else to do…

  • Gil: of course, never a bad thing. Used for crafted gear, materia and other things.
  • Allied Seals: from hunting – you never know if it will be relevent!
  • GC Seals: surely will be relevant… cap it out before 3.0 comes!
  • Ventures: never a bad thing to stock up on. Remember, these guys will level up, too!


Disciple of War / Magic

For the love of god, AGAIN, please check that you’ve completed your story quest, first and foremost. Under your Quest Log > Complete > Main Scenario Quest > TBA should be the last entry.

10 Maximum Completed Levequests: You can get a chunky boost of EXP by completing a total of 10 relevant Levequests for DoW/DoM classes.

  • 4 Levequests from St. Coinachs Find (Battlecraft)
  • 6 GC Levequests from St. Coinachs Find
    • 2 From each GC (Maelstrom, Adder, Flames): You can do them even if you’re not part of that GC.

Note that level 40 Leves incur a penalty (Bluefog/Whitebrim), so I don’t recommend these. You also have a max of 16 active leves between all types. If you have no plans of leveling a crafter or gatherer, by all means repeat the same process in Whitebrim.

6 Maximum Beastman Quests: Complete any (preferably max reputation) Beastman Quest from any NON-IXAL Beast Tribe to get another 6 quests of bonus EXP. You can also do the highest 3 and second-highest 3 from the same tribe so you dont have to travel around. Note that you can only have a maximum of 6 Beast Tribe quests active.

Any random quest you have unfinished: Impractical, but if you have some high level quests lying around submit them before 3.0

Disciple of Hand

6 Maximum Completed Levequests: There are a total of 6 total relevant leves you can pre-complete to gain EXP in 3.0 – 3 from your crafter Hometown, 3 from local levemete (Mor Dhona).

  • From your crafters hometown: 1 Single-submits, 1 Courier, 1 Triple.
  • From St. Coinachs find: 2 Single-submits, 1 Triple.

Items needed for these leves: 4 from single/courier and 18 from repeatables,

What’s my crafters ‘hometown’? ALC, GSM, WVR: Ul’dah. CRP,LTW: Gridania. ARM, BSM, CUL: Limsa.

6 Maximum Beastman (IXAL ONLY) Quests: Complete any (preferably max reputation) IXAL quest to get another 3-6 quests of bonus EXP. Naturally, take the 3 highest rep quest first, then go downwards.  Note that you can only have a maximum of 6 Beast Tribe quests active.

GC Supply Missions: The moment you login, craft/buy the required items for the GC submission. This is a free leve, and if its a star-item, submitting HQ will chunk your EXP up a huge amount.

Disciple of Land

4 Maximum Completed Levequests: A decent chunk of EXP can be gained by doing this, make sure you have at least 1 of each “evaluation” levequest (since they give the highest exp).

  • 4 Levequests from St. Coinachs Find (Fieldcraft)

A decent gear set: While BiS is something most hard-core gatherers have, newer players might not have the time or gil to build this up. Remember, when leveling Gathering is far more important that Perception. So just buying i55 greens and capping Gathering is a good idea if you’re short on gil.

GC Provisioning Missions: The very second you login, farm/buy the required materials for the GC submission. This is a free leve, and if its a star-item, submitting HQ will chunk your EXP up a huge amount.

Spreading it between all classes?

So all these preparations have a combined limitation: 16 total active levequests & 6 total active beastmen quests. Here’s what I’ll be doing:

  • 4 Battlecraft Leves & 6 GC Leves completed on Main Character.
  • 6 Leves for Goldsmith
  • 6 Beastmen Quests for Goldsmith

There’s a bunch of ways to squeeze value here… for example:

  • 2x Triples & Courier for CRAFTER 1.
  • 2x Triples & Courier for CRAFTER 2.
  • 2x Evaluation for Miner.
  • 2x Evaluation for Botanist.
  • 2x Triples for Fisher.
  • 6x Leves (GC?) for Main Combat Class.
  • 6x Ixal quests split between 2 Crafters

In the end, it all depends on what you want to get up first. Since I’ll be raiding ASAP when 3.0 hits, I will be spending a lot of these resourced on my White Mage.

What to do before Heavensward?

I guess this is part of Heavensward preparation as well.. here are some things you might think about

Cross-class skill classes to 50: If you’re really bored, I suggest leveling up your base-classes to 50 – Why? For example, you main a BLM (50), so you got your ACN to 34 for Eye for an Eye, and Archer to 34 for Quelling Strikes. What if Heavensward releases a level 50+ cross-class skill from Archer or Arcanist? This idea dawned on me quite some time ago, so I decided to level up my mains cross-class classes to 50 (WHM: ACN, THM). You better do the same – it’s better to be safe than sorry. (DONT LET THIS BE SOMETHING YOU REGRET)

Level up some gathering? A luxury for most content… I mean, as of right now you aren’t missing much. This is a brainless source of gil for anyone who bothers themselves with it. Gathering classes are insanely easy to level up with rested EXP. (Related resources: Mining leveling, Botany leveling, Fishing leveling) It’s always better to HAVE the option to gather, rather than rely on others.

Level up some crafting? Again, another luxury, but if you’re out of things to do, might as well start! Max DoH classes might seem troublesome, but the ability to repair your own gear in duty is cool. And for most people, you’ll be able to make a constant stream of gil from any crafting endeavor. I’ve never been sad to be a Builder of the Realm since 2.0, and I think everyone should work up to it. Crafting is fun!

Related Resources:
ALC Leveling, ARM Leveling, BSM Leveling, CRP Leveling, CUL Leveling, GSM Leveling, LTW Leveling, WVR Leveling

Well, good luck preparing for Heavensward! To be honest, these are the ones I thought up of on the top of my head. Again, the most important part of this whole document may just be the bit about cross-class skills. If you have suggestions PLEASE COMMENT!

Follow us on Facebook for more FFXIV updates!

FFXIV Relic / Zodiac Weapon COMPLETE Guide

Have no relic? Need advice on ANY step on your relic? This relic weapon guide will help you. START to FINISH!

CLICK HERE for 3.0+ RELIC!
This page is a ‘legacy’ guide for 2.0 Relics

So you wanna get your very first relic? Or you need help in any step of the relic weapon? You’ve come to the right place. In this Relic Weapon Guide, we try to give you any tips we’ve learned to make any step of the relic quest a LITTLE LESS PAINFUL. A fair waning, to complete a Zodiac weapon will take part of your soul. Small navigation links are provided right below so you can skip to where you are in your relic quest. please FEEL FREE to comment on any suggestions! Try to start your comment with the tag ((ANIMUS)) if you’re giving a tip for Animus, ((NEXUS)) for Nexus and so on.

**I made this guide as an “eternal” version of our older relic guides found here(Pre-relic to zenith), and here (Atma onwards – compiled here). The page you’re currently on is the ‘final’ and most updated version. Goin forward in 3.0 and beyond, we will be using a unified relic post that adds a new page for each step.

Jump to most recent step: Zodiac Zeta
Navigation
:
(No Relic) || (Base Relic -> Zenith)
(Zenith -> Atma) || (Atma -> Animus)
(Animus -> Novus) || (Novus -> Nexus)
(Nexus -> Zodiac) || (Zodiac -> Zeta)

Getting your first Relic Weapon!

“Follow and read your quest log. Seriously.”

First of all, you must be level 50, have all class and job quests done for your job, and completed the story quest. The quest to start your Relic Weapon is “The Weaponsmith of Legend”, located in Vesper Bay (Northern Thanalan). You will end up going to Rowena (who you’re familiar with by now…) and eventually Gerolt (who you’ll come to hate, haha). He will ask you to complete step 1: Broken Weapon. Which is just a fetch quest. On to the next step!


Step 2: Pre-relic weapon / materia table

ClassPre-relicMateriaMelded & Crafted by
PLDAeolian Scimitar2x Battledance IIIBSM (Blacksmith)
WARBarbarians Bardiche2x Battledance IIIBSM (Blacksmith)
WHMMadmans Whispering Rod2x Quicktongue IIICRP (Carpenter)
SCHErudites Picatrix of Healing2x Quicktongue IIIALC (Alchemist)
BLMSanguine Scepter2x Savage Might IIIGSM (Goldsmith)
SMNErudites Picatrix of Casting2x Savage Might IIIALC (Alchemist)
MNKWildlings Cesti2x Savage Aim IIIGSM (Goldsmith)
NINVampers Knives2x Heavens Eye IIIALC (Alchemist)
DRGChampions Lance2x Savage Aim IIICRP (Carpenter)
BRDLongarms Composite Bow2x Heavens Eye IIICRP (Carpenter)

Step 3: Alumina Salts: is basically defeating Dhorme Chimera.  This can be unlocked via Coerthas Central Highlands (X-32, Y-6) (Upper right cave). If you’re reading this in 2015 or more – this guys a chump. WITH YOUR “RELIC” EQUIPPED

Step 4: running Amdapor Keep for an Amdapor Glyph. WITH YOUR “RELIC” EQUIPPED.

Step 5: killing 24 beastmen. Keep following the quest log… WITH YOUR “RELIC” EQUIPPED

Step 6: defeat Hydra. This can be unlocked via Eastern Thanalan (x14,y30) (Next to Halatali entrance). WITH YOUR “RELIC” EQUIPPED.

Step 7: Kill the Hardmode Primals (Ifrit -> Garuda -> Titan). Running these on Duty Finder (even if you’re a brand new player), will probably clear no matter what. The exception to this is Titan HM, which you might want to learn a bit. There was a time that “Obtain Hyperfused ore” was stuck in peoples quest logs for quite some time… Again, WITH YOUR “RELIC” EQUIPPED.

Step 8: Buying Radz-at-han Quenching Oil, costs some lesser tomestones, and voila you have a relic! (This is not the end, please look forward to it. TM). You should have your first Relic!

JobRelic Weapon (hover over link to view)
Black MageStardust Rod
BardArtemis Bow
DragoonGae Bolg
MonkSphairai
PaladinCurtana
Holy Shield
ScholarOmnilex
SummonerThe Veil of Wiyu
WarriorBravura
White MageThyrus

Upgrading your Base Relic to Zenith

This is by far the simplest step. Obtain 3x Thavnarian mist which are purchased using lesser tomestones.

Good luck getting your very first relic! I assume you’re going to be checking the Zenith step next. Any tips or info to share? feel free to comment below!

Follow us on Facebook for more FFXIV updates!

Navigation:
(No Relic) || (Base Relic -> Zenith)
(Zenith -> Atma) || (Atma -> Animus)
(Animus -> Novus) || (Novus -> Nexus)
(Nexus -> Zodiac)  || (Zodiac -> Zeta)

FFXIV Amdapor Keep (AK HARD) Speedrun & Guide

FFXIV Amdapor Keep (AK HARD) Speedrun & Guide – notes to make your speedrun faster, and general dungeon strategy for FIRST TIMERS to AK hard!

Unlocks via Quest: Not Easy Being Green (Mor Dhona)
Item level requirement: 90
Item level of dropped gear: 100
Also drops 3-star crafting materials (Saurian Skin, Cashmere Fleece etc tier)

Navigation:
General Info (Top) || Speedrun/Map || Boss Guides

AK Hard: General enemy tips
Tentacles:
Give a VULNERABILITY UP debuff to YOU and YOUR ENEMIES – use them to your advantage!
Knotted Treant: They spawn weak adds, generally they can be ignored unless you pile them up with your SR pull.
Vulnerability Up on tank? No problem – esuna it!

Amdapor Keep (AK) Hard Speedrun

ampdapor keep hard mode akhm speedrun map ffxiv

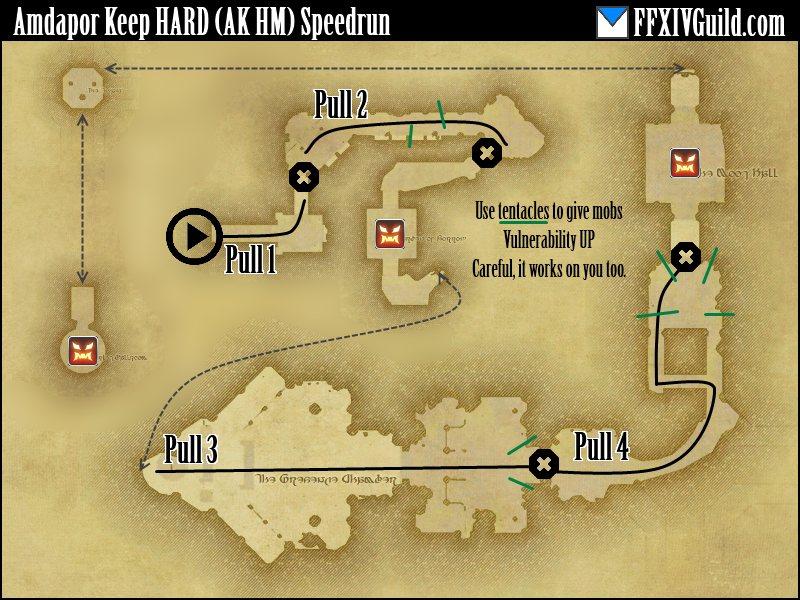
AK HM can be completed in a minimum of THREE BIG PULLS. Five or four if you’re being safe. And the forced “gauntlet” before the final boss. Special thanks to Claes Henrietta and Rylai Ariamis for the help with notes/map!! The above map says 4 pulls, but Pull 1 and 2 can be combined by killing the Ochu and proceeding (a bit on the risky side).

Pull 1: The first pack + the ochu, Don’t blow any CD’s here, It’s a small pull. Can be combined with pull 2.

Pull 2: This is the only “debatable” pull, and is stragely difficult. there are three ways to do this:
Pull 2 MAX: Drag EVERYTHING to the treant.
Pull 2 using tentacle: Drag all non treant mobs back to the tentacle. potentially dangerous.
Pull 2 split: Drag whatever you can to the pre-treant tentacle, then the remaining chumps+tree.

The general consensus is Pull 2 MAX is the “best”, but can be a backbreaker. Pull 2 tentacle depends too much on mob movement, and Pull 2 split is best for iffy groups. You want to use all your cooldowns for this.

(boss 1)->Pull 3: A short pull, gather them up and use the tentacle to give the mobs vuln up. Kill tree after.
Pull 3 VALUE: Tag the mobs with tentacle vul up, then move to the tree.

Pull 4: This is a LONG WALK. Sprinting could be an option. As always sprint pulls are gonna be a little easier for paladins. Use the tentacle of heavenly value. ALWAYS
Pull 4 VALUE: Tag them with vuln up, then move to the tree. This can be very risky.

(boss 2), Gauntlet, then (boss3): And you’re done! Potentially the fastest SR in this tier of dungeons.

We will be recording a vid of the “minimum possible (3) pulls” for both warrior and paladin – stay tuned.

((Back to Top))


Boss 1: Anchag (“Odin”)

  • Charge is unavoidable. Walking nearer to him does significantly reduced damage. Instakills statues – careful.
  • Lasers: Targetted ally must move behind statues. Extremely strong damage otherwise.
  • Hiding behind higher health statues is preferred. (Statues may die WHILE lasering)
  • All his attacks, even his basic DAMAGES statues: Tanking in middle is safest.
  • Laser affects tank (rare, but it killed me once lol)

Not many special mechanics behind this guy. Just burn him as fast as possible. TIP: Tank reposition to new statue after each laser. No joke, lasers are fatal and you should avoid them.

((Back to Top))

Boss 2: Boogeyman

  • Boogeyman periodically goes Invisible. He cannot be damaged/targetted during this time – but you can still “see” him.
  • When you kill Luminescence(add) stand in the AoE it leaves upon death. It gives you a buff.
  • Going near the boss while buffed reveals him. (Buff signified by pulsing light)
  • “DODGE” the massive cone by facing AWAY from him ala Melusine.
  • Kill the big fat add with a long channeled skill: causes a raidwide bleed.

TIP: The dead bodies on the ground signify the adds spawnpoints. The first set is the two chumps, second set is two chumps + fat.

((Back to Top))

Boss 3 (Final): Ferdiad

  • Kill adds tethered to boss. (Stops “wild card” from expanding)
  • Slime adds bind the target. Slimed people can free themselves by helping DPS.
  • In the 2 slime 1 fat tether setup: just dps the fat tether guy.

The final boss isn’t very notable, pretty much common sense mechanics. TIP: Don’t clump up, the blades left by Black Wind can be annoying if you’re clumped up with friends.

((Back to Top))

Other dungeons released in this tier (2.5):
Amdapor Keep (Hard) || Wanderers Palace (Hard) || Keeper of the Lake

I hope our Ampdapor Keep Hard guide was useful to you! As always, careful speedrunning and be good to first timers!

Follow us on Facebook for more FFXIV updates!

FFXIV Wanderers Palace (WP HARD) Speedrun & Guide

FFXIV Wanderers Palace (HARD) Speedrun & Guide – notes to make your speedrun faster, and general dungeon strategy for first timers to WP hard!

Unlocks via Quest: Not Easy Being Green (Mor Dhona)
Item level requirement: 90
Item level of dropped gear: 100
Also drops 3-star crafting materials (Saurian Skin, Cashmere Fleece etc tier)

Navigation:
General Info (Top) || Speedrun/Map || Boss Guides

WP Hard: General enemy tips
Ignore Banners/Flags/Standards: 
Drag enemies out instead

Wanderers Palace (WP) Hard Speedrun

wanderers palace hard mode wphm speedrun map ffxiv

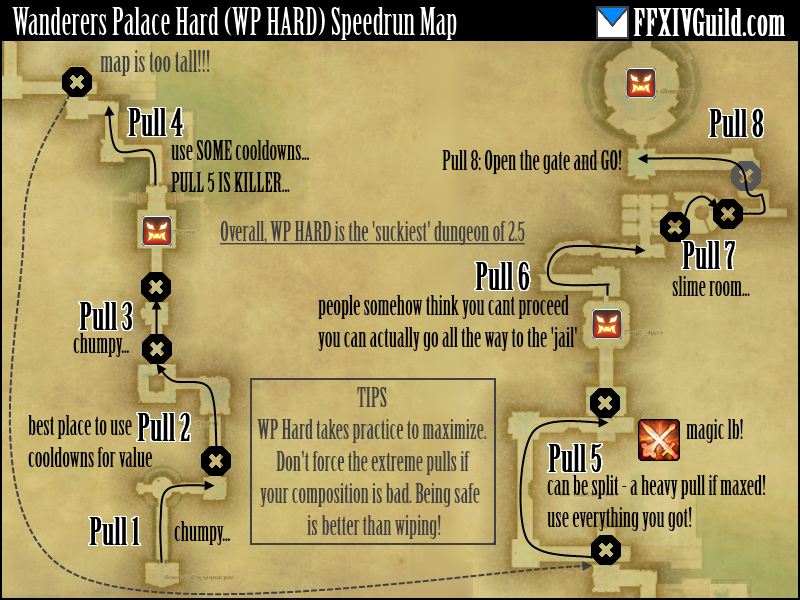
WP HARD is the longest dungeon in this bunch – it can be completed in a minimum of EIGHT PULLS. Although, for many groups, 9 or 10 seems to be the average! Special thanks to Claes Henrietta and Rylai Ariamis for the help with notes/map!

Pull 1: Small pull with 4 mobs, don’t waste anything here.
Pull 2: While not the beefiest of pulls, use your CD’s here since the next pull is chumpy, then boss follows
Pull 3: Small, time extending pull (boss 1 follows)

Pull 4: Can be a tricky pull due to camera angle, LOS the first pile behind the first corner, and get the rest of the chunk. Use SOME cooldowns here – it’s a bit heavy.
Pull 5: This pull is usually split, for good reason. It’s an insane pull that maxes out at 10 or 11 mobs. This, PLUS the fact the previous pull was heavy. Going all the way is NOT recommended for groups that AoE slowly. (boss 2 follows)

Pull  6: A lot of people think you have to stop at the 3 mobs.. you can actually pull allllll the way to the locked up tonberrys. It’s an easy pull of 5 mobs.
Pull 7: is a forced time waster. This is the “slime room”.
Pull 8: People usually split this but you can actually open the door and drag the pudding all the way to the end!!! This is value. (final boss follows)

((Back to Top))

Pull 5 is killer, you might need to chill out if you think your group isn’t up to snuff. We will be recording a vid of the “minimum possible pulls” for both warrior and paladin – stay tuned.


Boss 1: Frumious Koheel Ja

  • Spawns these fireball adds that CANNOT be ignored.

Overall a nondescript boss which doesn’t do anything special. To be honest, I want to type more here – but I just cant.

((Back to Top))

Boss 2: Slithy Zolool Ja

  • Randomly spawns a bunch of flags. You must get (walk into) them to survive. Each flag corresponds to an effect.
  • 3 Negative totem types exist: Heavy, Frog, Fire RES down.
  • One positive type exists: Damage dealt UP – DPS pick these up! BOSS MUST NOT ABSORB THIS.
  • Other totems MAY BE ignored (Except, frog totem cancels out your frog status)
  • Colors are random each time – just remember the DPS+, and healer get everything else!

Key reminders: DPS+ is massive value if picked up by DPS, and massive non-value if picked up by the boss. Frog totem cancelling DPS frog status will greatly reduce the encounter time.

((Back to Top))

Boss 3 (Final): Manxome Molaa Jaja

  • Does a random slash which leaves a debuff: YOU CANNOT GET HIT BY HIS PBAOE if you have this debuff.
  • Leaves flags (standard), just drag him away from the buffing AoE and continue killing.
  • SACRED IDOL must be killed. Looks like the flags, so be aware.
  • Healers: the Doom icon is similar to PS Sire: Healing to full cancels the doom.

TIPS: Don’t stay too far from the boss. he has a MASSIVE cone attack that you might not get out of. Don’t tunnel – kill Sacred Idol ASAP.

((Back to Top))

Other dungeons released in this tier (2.5):
Amdapor Keep (Hard) || Wanderers Palace (Hard) || Keeper of the Lake

Hopefully our Wanderers Palace Hard guide helped you out! Remember, careful speedrunning and accommodate first timers!

Follow us on Facebook for more FFXIV updates!

FFXIV Keeper of The Lake Guide & Speedrun

UPDATED! Keeper of the Lake dungeon strategy guide! Having trouble killing the last boss? Beat up those dragons – get in here and find out how!

Unlocks via Story Quest Requirement. (Dungeon located in Mor Dhona)
Item level requirement: 90
Item level of dropped gear: 100
Also drops 3-star crafting materials (Saurian Skin, Cashmere Fleece etc tier)

Navigation:
General Info (Top) || Speedrun/Map || Boss Guides

Keeper of the Lake: Speedrun

KOTL: General enemy tips
Pre last boss pulls: 
the random helicopter bombs can damage enemies!

keeper of the lake kotl speedrun map ffxiv

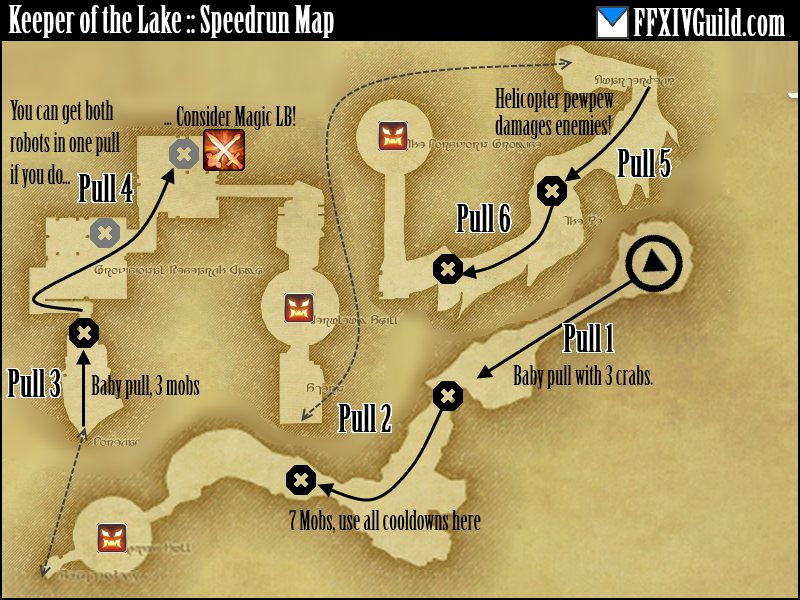
KOTL can be completed in a minimum of SIX PULLS. Seven should be the absolute max! Special thanks to Claes Henrietta and Rylai Ariamis for the help with notes/map!

Pull 1: Useless pull… 3 crabs. Don’t blow any CD’s here.
Pull 2: A bit of a beefy pull. Get all 7 mobs and don’t spare any cooldowns. (boss 1 follows)

Pull 3: Another time extending useless pull. Kill them and get the key to proceed.

Pull 4: THIS CAN (and USUALLY is) split into two. Aggro the chumps, kill the computer, aggro the robot then AoE them down. Do not kill the dudes, then robot… You can pull the whole family but this can be RISKY! This is by far the best use of LB if you do try to pull this off! (boss 2 follows)

Pull 5 and 6: The flying machine AoE’s AFFECT THE ENEMIES. Lure the AoE to the pile by having everyone loosely stack around the mobs, as it targets a random party member.

((Back to Top))


First boss: Einhander

Spawns tanks of fuel at certain intervals. His frontal cleave (and presumably other skills) destroy it and deal damage to nearby allies. Face the boss away from all times and move away from tanks if needed. Sucks all tanks and party members towards him, so move a bit away and face him outside. In a nutshell

  • Spawns fuel tanks you should be far away from. His skills damage these objects – don’t let them die.
  • Small (auxiliary) tanks do around 1-2k… large (main) tanks explode for a TON.  Tanks can set off other tanks… be careful!
  • Pulls all party members and spawned fuel tanks towards it.
  • Reposition away from the fuel tanks and face away from party as usual.
  • Tanks can be knocked around just like Brayflox HM bombs.

Having your MT make small efficient movements to prevent explosion clusterf*cks is key to reducing encounter time here. Pure tunneling, while possible, can cause some unexpected chain explosions.

((Back to Top))

Second Boss: Magitek Gunship

A big mechanical middle finger to melee classes, this guy is just annoying.

  • Spawns adds: 4 chumps, (interval) Magitek Vanguard. The vanguard is chunky.
  • When he moves randomly, he’s setting up his flame skill.
  • He moves in a random direction leaving behind an extremely painful fire DoT. Stay away from these. Especially sucky for melee.
  • If you didn’t use Magic LB earlier: consider using it on Vanguard+Boss. BETTER YET: Ignore the Magitek Vanguard and focus down the boss – he vanishes when it’s over!

((Back to Top))

Final Boss: Midgardsormr

After pulling the boss, a short time passes until first dragon (yellow) resurrrects:

  • Boss is invulnerable during this time.
  • Has a frontal cleave.
  • Wait for a smaller add to spawn – kill this ASAP and get inside the shield it spawns (Similar to Halatali HM)

Boss does a raidwide kill unless you are inside the shield. Kill yellow before the second (blue) dragon spawns:

  • Boss is invulnerable during this time.
  • Has frontal cleave.
  • Must be NEAR BOSS to be damaged.
  • Same mechanic here… small add spawns > kill it > get inside barrier.

Again, your party is dead if you fail to get into the shield. Kill the blue dragon before focusing on boss and killing it. Aside from the above, just avoid all the colorful AoE and you’ll be fine.

((Back to Top))

Other dungeons released in this tier (2.5):
Amdapor Keep (Hard) || Wanderers Palace (Hard) || Keeper of the Lake

Well, I hope you found our Keeper of the Lake guide helpful! GL to you Speedrunners and new players alike!

Follow us on Facebook for more FFXIV updates!

FFXIV Novus Stats Melding (Recommendations)

A nice guide to help you find out what stats and materia SUITS YOU for your Novus Relic Weapon!

So you’re done with the hellish Animus Grind – Welcome to the grindy world of Novus! But wait – What stats should you meld on your Novus!? If that’s what you’re wondering you’ve come to the right place. Let us guide you through the different ways you can meld your Novus Relic!!! Good luck! Each weapon recommendation has My FC Mates Mainclass recommendations. and My preference.

Navigation

TankCurtana / Holy Shield Novus (PLD) || Bravura Novus Stats (WAR)
Healer: Thyrus Novus Stats (WHM) || Omnilex Novus Stats (SCH)
Melee: Sphairai Novus Stats (MNK) || Yoshimitsu Novus Stats (NIN)|| Gae Bolg Novus Stats (DRG)
Caster: Stardust Rod Novus Stats (BLM) || Veil of Wiyu Novus Stats (SMN)

Novus Stats FAQ

Novus to Nexus stat bonus? Huh? for each 22 of a stat, you get a small bonus when upgrading to Nexus. Each weapon can have 3 of these bonuses and we aim to capitalize on it (44 on a stat makes this bonus twice). Sadly, PLD Curtana/Holy Shield can only cap out on 2 of these bonuses.

Accuracy on DPS Novus!?!? Yes. Each DPS class (and tank class) has Accuracy on my “practical” melding recommendation. WHY? For added flexibility choosing the best gear. What happens if you dip below accuracy and are forced to use Skill Speed gear (I’m looking at you, Bard) – oooo I bet you wished you had ACC on your Novus now! Besides RELIC will almost always be filler to final boss weapons.

I MADE A MISTAKE MELDING MY NOVUS!? HELP!? Chill. You can fix that once your Novus is complete. You just need 1 Alexandrite and 1 Materia for each mismeld you did.

If you had one – what melds would you use!? MY (Subjective) preference is underlined and bolded.

I’m poor! Help! The lessen cost melds contain no IV’s AFAIK – and are sometimes even better.

Curtana (Holy Shield) Novus Stats Melding

Defensive: 31 Parry, 22 ACC
+Holy Shield: 11 Parry 11 ACC

A full defense, full flexibility meld that helps you switch gear around for maximizing other stats. Overall, a GREAT choice for any PLD.

Defensive (lessen costs): 22 Parry 22 Accuracy 9 DET
+Holy Shield: 8 Parry 8 ACC 6 DET

Sacrifice a little flexibility for some balance (and money saving) DET on your Curtana/Holy Shield is still pretty damn good.

No Parry: 22 Accuracy 22 DET 9 CRIT
+Holy Shield: 9 DET, 13 CRIT

For the above meld, freely adjust your CRIT and ACC numbers. Max out on DET if you can.

No Parry (lessen costs): 14 ACC 16 DET  23 CRIT
+Holy Shield: 8 ACC, 6 DET, 8 CRIT

This meld is a little weird… you don’t get any stat bonus but save a couple million gil :D.

A note on curtana: It’s hard to save money WHILE shooting for stat bonuses since curtana reaches the Materia IV tier much faster. It’s a bit annoying how the stats are split between the two weapons, but what can we do…

Waiting for FC input!

Mahiko San’s preference: Defensive (Lessen costs) – Since this is a tank class – removing ACC from your relic is folly. A good mix of Parry/ACC/DET is a solid build while saving money – what’s not to like!?

((Back to Top))


Bravura Novus Stats Melding

Practical: 31 DET 22 ACC 22 CRIT
Practical (lessen costs): 22 ACC 23 DET 30 CRIT

I have to say this is a bit influenced by our groups playstyle. We try to make our Warrior OT as much as possible. IN MY OPINION, WAR OT is super effective due to debuff placements, this matters more since we run with a NIN. The melds above also serves as the “No Parry” Bravura melds.

Defensive: 44 Parry 22 ACC 9 DET
Defensive (lessen costs): 31 Parry 22 ACC 22 DET

Basic full defensive meld and a more balanced (IMO Superior) build that saves money and gives a great balance of stats.

Waiting for FC input!

Mahiko San’s preference: Defensive (lessen costs) –  The more I look at that spread of stats, the better it seems. Since the benefit of CRIT isn’t that huge, 22 DET and 31 Parry seem like a great spread between offense and defense! HOWEVER since my group favors WAR OT HEAVILY, I’d personally meld Practical(lessen costs) for MY team.

((Back to Top))

Thyrus Novus Stats Melding

Balanced: 31 Piety, 22 DET, 22 Spell Speed
A good balance of stats – everything your WHM needs!

Balanced (lessen costs): 24 Piety, 23 DET, 28 Spell Speed

Accuracy: 31 Accuracy, 22 Piety 22 DET (Not as good compared to Accuracy on SCH Omnilex)

Just like the Omnilex, the “best stats” for Thyrus will never be universal. Each healer prefers this or that, and depends on playstyle/group. The above are solid recommendations none the less.

Mahiko San‘s (Official FC White Mage!) Novus: (Balanced)

First of all, let’s start with the 22 DET and 22 Spell Speed: I chose this because I don’t want too much DET or too much SS. My playstyle and speed of progression, however, cannot permit me to ELIMINATE Spell Speed (clutch heals and handling mechanics favors SS, not DET). Also, having at least 22 on a Novus stat gives you a +1 stat bonus when it upgrades. So why not, right?

Alot of WHM’s really like DET and don’t like SS. If that’s the case then simply meld 31 into DET, but I personally would not recommend it. The main reason people hate on SS is that bosses are “scripted” and precasting heals + perfect play leads to not needing it. People forget that actual human beings (not robots) pilot characters, and while PROGRESSING FAST thru raids, perfect play isn’t always there since knowledge of the encounter isn’t “ingrained in memory” yet. I like SS a little more than DET, and I stick to that. But I wouldn’t want to live without either.

Rest in Piety (31): I really like Piety. The max is 33 but if you choose to max it out you miss on a stat bonus from another stat (supporting stats cannot reach 22). This seems to be a no brainer. The very minimum Piety I’d meld on a Thyrus is 22. But since it’s the stat I FAVOR MOST – I put as much of it as I can.

No Crit? Yes, no crit. I DO NOT LIKE CRIT on White Mages – plain and simple. If you like crit – by all means… But I personally cannot and would not recommend it.

Lastly, Accuracy on Thyrus? isn’t bad if your group knows how to use it. I wanted to, but ultimately would rather meld Accuracy into body pieces/accessories if needed.

Mahiko San’s preference: Balanced –  Well, for the sake of continuity I had to put this section. If it isn’t obvious by now I chose the Balanced strat. 31 Piety, 22 DET and 22 SS.

((Back to Top))

Omnilex Novus Stats Melding

CRIT Heavy: SCH: 44 CRIT +(31 DET or 31 Piety)
CRIT Heavy(lessen costs): 31 CRIT 22 DET 22 Piety

The obvious crit focused builds. I prefer the lessen costs one here since you may drop too much piety depending on itemization.

Accuracy*: 31 Accuracy, 22 CRIT 22 DET

Don’t laugh. I’d meld my Omnilex this way if I had one.

Like the Thyrus – healing stats really vary from person to person. Adjust as you see fit depending on your statics needs and your own play. Adjust accordingly!

Waiting for FC input!

Mahiko San’s preference: CRIT Heavy(lessen costs) OR Accuracy –  Depending on your groups need/speed, either of these two builds would work wonderfully. If you don’t DPS often, stick to the CRIT Heavy (lessen costs).

((Back to Top))

Artemis Bow Novus Stats Melding

Practical: 44 CRIT 22 ACC 9 DET
Practical (Lessen Costs): 31 CRIT 22 ACC 22 DET

Heavy crit for more Bloodletters – no explanation needed here.

Brainless DPS: 44 CRIT 31 DET
Brainless DPS (lessen costs): Doesn’t exist

Well, trying to get as much CRIT as you can is a no-brainer. DET as a supporting stat is always good for any DPS class.

Waiting for FC input!

Mahiko San’s preference: Practical – I would NEVER meld an Artemis Bow without Accuracy, but that’s just me. If you’re really poor, the “lessen costs” variant is still EXTREMELY SOLID. Again, the accuracy on Artemis Bow helps you make sure you don’t get gimped by your own gear drops (like in FCoB tier).

((Back to Top))

Sphairai Novus Stats Melding

Practical: 31 DET 22 ACC 22 CRIT
Practical (Lessen costs): 30 CRIT 23 DET 22 ACC

Brainless DPS: 31 DET 44 CRIT
Brainless DPS (Lessen costs): 23 DET 31 CRIT 22 Skill Speed

DET ACC CRIT is a common theme amongst DPS relic weapons which you’ll see alot coming up.

Tiffany Faye ‘s (Official FC Monk!) Novus: (Practical)

I recommend the 31-22-22 (DET ACC CRIT) meld because the relic is your comfort weapon. Having accuracy on your main weapon will give you the best flexibility when itemizing your character.
Although the current BiS list for monk already has sufficient accuracy even with the Crit/Det Dreadwyrm weapon, new equipment with better stats might come out on other slots (for example, a Crit/Det rings to replace the Ironworks Str Ring). The Accuracy zodiac would allow you to use the new ring without dropping below the accuracy cap.

Another reason I prefer the 31-22-22 meld because it is MUCH cheaper (potentially save millions of gil by skipping Crit IVs)

Mahiko San’s preference: Practical – 31 DET on MNK is insane if you can afford it. There’s really not much else to say with these straightforward DPS relics like Sphairai.

((Back to Top))

Yoshimitsu Novus Stats Melding

Practical: 31 DET 22 ACC 22 CRIT
Practical (Lessen costs): 31 CRIT 23 DET 22 ACC

Brainless DPS: 31 DET 44 CRIT
Brainless DPS (lessen costs): Doesn’t exist

Yoshimitsu Novus melds are part of the no-brainer relic pile.

Waiting for FC input!

Mahiko San’s preference: Practical – SS is a junk stat on NIN as well. There’s not much else to say. If you’ve got the gil – this is the meld for your Yoshimitsu.

((Back to Top))

Gae Bolg Novus Stats Melding

Practical: 31 DET 22 ACC 22 CRIT
Practical (Lessen costs): 30 CRIT 23 DET 22 ACC

Brainless DPS: 31 DET 44 CRIT
Brainless DPS (lessen costs): Doesn’t exist

Gae Bolg Novus melds are part of the no-brainer relic pile.

Eirlys Castillo ‘s (Official FC Dragoon!) Novus: (Practical)

Explanation for 31-22-22 Gae Bolg melding

(1) Reasons for maxing Det: Det is the most crucial substat for most classes. While crit is nice, an increase in det is a 100% increase in DPS, no matter how minor. Therefore maxing the Det component is something most would consider wise to do.

(2) Reasons for 22-22: The most important reason someone would want to meld 22-22 for the remaining 44 allowances is because 22 is the key number you want the substat to be at. For every 22 points into a substat, each upgrade will increase said substat by 1 point. Anything below 22 will remain that at that value through upgrades. Going 22-22 also means you don’t have to meld IV materias, which means there’s no chance of wasting copious amounts of gil.

(3) Reasons crit-acc: Crit is the next most important substat, some might argue it equally as important or even more so, but personally I think its Det>Crit for the reason stated in (1).

Accuracy is probably the most important substat for any non-healer class. Without sufficient accuracy, you risk missing which results in a massiva DPS loss, especially if it’s one of the big hits (Full thrust, Jump, etc.). While the i130 BiS list already has sufficient accuracy for T13 flanks, having spare accuracy on your weapon means more flexibility for BiS lists in the event of new equipment, especially accessories, being released (e.g. A crit-det ring)

Skill speed is definitely out of the question as it does nothing but help clip your DoTs, which means it’s actually a DPS loss.

Mahiko San’s preference: Practical – Since SS is a junk stat on Gae Bolg most of the time, this is the most feasible build. As always, if low on gil, do the lessen cost one.

((Back to Top))

Stardust Rod Novus Stats Melding

Practical: 44 Spell Speed 22 ACC 9 DET
Practical (lessen costs): 31 Spell Speed, 22 ACC, 22 DET

Brainless DPS: 44 Spell Speed 31 DET
Brainless DPS (lessen costs): 31 Spell Speed 22 DET 22 CRIT

There’s almost NO WAY you can mess up a Stardust Rod Novus melding – all stats CAN be used by BLM.

Waiting for FC input!

Mahiko San’s preference: Practical – The sheer power of Spell Speed when stacked cannot be ignored on BLM’s. 44 SS is extremely potent! The lessen costs variant is still very good for your Stardust Rod.

((Back to Top))

Veil of Wiyu Novus Stats Melding

Practical: 31 DET, 22 ACC 22 CRIT
Practical (lessen costs): 30 CRIT, 23 DET 22 ACC

As long as there’s no Spell Speed – we’re happy.

Brainless DPS: 44 CRIT 31 DET
Brainless DPS (lessen costs): Doesn’t exist.

I’ll say it once, I’ll say it again… Say no to Spell Speed on SMN. These melds look very similar to the Melee Relics, ey? Again since Summoners are severely limited by mana AND Spell Speed scales horribly on them – it should NEVER appear on your Veil of Wiyu.

Waiting for FC input!

Mahiko San’s preference: Practical – Veil of Wiyu should never had Spell Speed melded… If gil isn’t a factor this should be your relic stats. The lessen cost alternative is always there if you’re a little low on gil.

((Back to Top))

Remember, these are just recommendations and you can meld however you want or tweak these builds to your liking! Good luck farming Alex, and finishing your Novus Relic! Hurry up and get to Nexus and get depressed farming lights!

Follow us on Facebook for more FFXIV updates!

FFXIV Ramuh Extreme Mode (The Striking Tree)

How to beat Ramuh EX! Strategy Guide & Loot list! Find out all about thunderstorms, rolling thunder, overcharge and BALLS!

So you’ve gotten to Ramuh Extreme Mode? Don’t be shocked by this electrifying fight! Learn all you need to learn about this encounter – so you can beat up old men – get those i100 rings! This fight isn’t very confusing mechanics wise – It’s all in the Execution, or Electrocution! Defeat the Lord of Levin EXTREME in no time with our strategy guide!

“Those balls are mine! Don’t touch them!” – Common Ramuh party chat

Ramuh EX Mechanics

Ramuh EX has alot of mechanics that persist throughout the whole fight. Don’t be a chump and take these to heart!

Thunderstorm – is basically like Weight of The Land (Plumes). Except they FOLLOW whoever was chosen to get hit by it. There are also “Neutral” thunders that just stay on the ground wherever they spawned. The more BALLS present in the map, the more painful Thunderstorm gets. Do not stay in the water when Thunderstorm hits (or you die). Like plumes, Thunderstorm may hit you multiple times. Thunderstorm also has the benefit of removing Chaos. Speaking of Chaos…

Chaotic Strike – chooses 2 random party members. This happens after every other Thunderstorm. This is marked by a cross-hair. After a short delay, these guys will be “stunned” (Charmed). And start walking towards Ramuh. This is bad, because the next PBAoE attack Ramuh does will INSTANTLY KILL any charmed players. As mentioned earlier a Thunderstorm hit removes the “Charmed” status. (For initial position, see diagram below)

Strategy for Chaotic / Thunder: Use a waymark right behind Ramuh to signify WHERE CHAOTIC affected guys stack. From here we use a numbering system to “save” them. usually from 1-4.

  • If a Black Mage is around usually they are 1. Why? to minimize movement. They stay on the stacking waymark always.
  • Bard & Summoner make the second best savers because they don’t lose much DPS by moving.
  • Healers are the next choice. But they should be lower in the list, since they need to heal.
  • Melee DPS probably make the worst savers.
  • Of course, move out of venn diagrams and unnecessary thunders.

When “saving” people from chaos – do not create a Venn Diagram of Clusterf*ckery. There is alot of space to spread out Thunder from hitting one another.

In his mind, he is the Venn Diagram. It’s him. – Mahiko “Charles Barkley” San.

The “Balls” – after each thunderstorm, balls spawn on the ground. Picking up 1 or 2 balls does nothing. Picking up 3 gives you a buff that protects you from Ramuhs “Cleave”. If you do not have this buff you will die. This is basically a tank-swap mechanic. Picking up a fourth ball results in “Overcharge”. You will still be protected but take significantly reduced healing. Overcharge can have 3 stacks. 3 Stacks means you will get little to no healing. Ideally you will never overcharge, but practically, you will need to OC on every phase change. Random balls lying around will increase damage of Thunderstorm significantly. It should go something like this

Thunderstorm > OT picks up  3 > Provoke > Thunderstorm > Random ball “cleanup” > Repeat. a good reminder is around 20s left on immunity – find them balls, son.


Ramuh EX Phase 2: Adds

Six adds spawn in a circle around Ramuh. They don’t really have any remarkable attacks. However, they must be killed before Judgment Bolt is cast. Or else, you guessed it, it’s a wipe.

All of the previous mechanics are still happening in this phase. The largest problem most groups have during this phase is position. People getting cleaved, Chaotic Stack too far… stuff like this. So we decided – “Why not have the position remain the ‘same’…?”

ffxiv ramuh extreme mode chaotic strike thunderstorm safezone phase 2

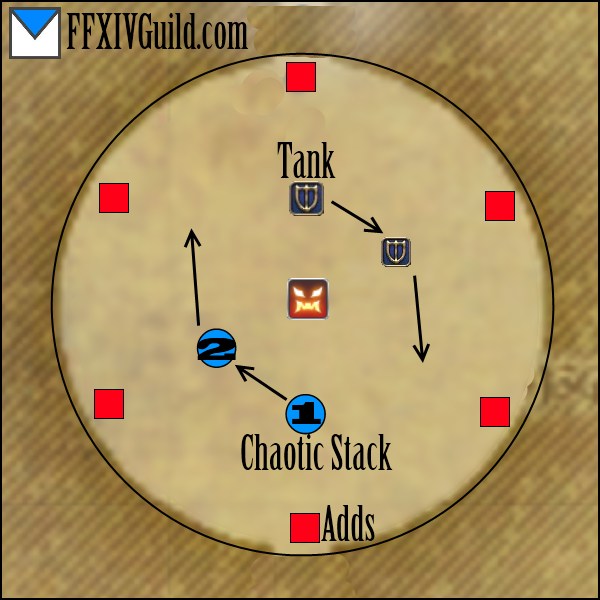
Key: Red Square (Adds), Blue Circle (Chaotic Stack), Paladin Shield (Tank).

SO WHAT DOES THIS DIAGRAM MEAN? The best way to deal with this phase is to “shift” your whole teams position as each add dies. It’s practical because whatever your position in P1 was, it’s the same starting position for P2. Here’s the rundown of what needs to happen:

  • Position only shifts after each add dies.
  • Waymark should be moved (preferably).
  • Otherwise, “Chaotic Stack” is always to be between Ramuh and an Add.
  • Tank should always be looking at an add (positional reminder)

Upon entering P2, the current tank should overcharge to prevent random BS.

This way people always know where to go for Chaotic, DPS wont be randomly cleaved and killed, and tanks wont bother the whole process of killing adds and saving people. Before this phase ends (Judgment Bolt is cast) make sure there arent too many random balls lying around.

Ramuh EX Phase 3: Rolling Thunder

Again to prevent BS, you may have the current MT overcharge. All of Phase 1’s mechanics still persist into the final phase The only addition is…

Rolling Thunder: Creates a tether between two people. If either of these two people do any action, they take damage. The more actions you take, the more shocking the damage gets. Picking up 3 balls removes the tether.

Basically, instead of the  “ball cleanup” phase – it becomes a “Rolling Thunder removal” phase. Here are some reminders regarding Rolling Thunder:

  • A person afflicted by Chaotic Strike may be tethered.
  • DPS should STOP COMPLETELY until tethers are broken.
  • Healer should only use LARGE HEALS when absolutely NECESSARY.
  • Be smart about who should clean the tether…
    • OT>DPS>Healer

OFFTANK should have tether cleaning priority since they need the insulation anyway. DPS should be next in line not to bother healing. Healers should stay still (unless tethered to each other). Healers who aren’t tethered should put up shields/regen on those who are, to be safe.

Nothing much else happens in P3. The adds spawn again but they cannot be targetted. They only do random lightning lasers which should be avoided!


Ramuh EX loot list

Ramuh drops i100 rings and i100 weapons. A ring drops every time, but the weapon is quite rare.

Ramuh EXRingWeapon
TankJudgment Ring of FendingThunderstrike (PLD)
Thunderstorm (WAR)
HealerJudgment Ring of HealingAdjudicators Gavel (WHM)
The Law of Levin (SCH)
MeleeJudgment Ring of SlayingThundercrack (MNK)
Thunderbolt (DRG)
CasterJudgment Ring of CastingAdjudicators Staff (BLM)
Ona Ramuhda (SMN)
BardJudgment Ring of AimingThunderdart (BRD)

Again, this is our in-house strategy, and what we used in our first kill. If you have any suggestions or something to say – hit the comments below!

Follow us on Facebook for more FFXIV updates!

FFXIV Four Star (4*) Master Crafting Rotations (& More)

UPDATED! Master Crafting Rotations! How to make HQ token items (Intricate Silver Brocade, Calibrated Rose Gold Cog etc..) and 4* Equipment!

All you need to know about crafting rotations relevant to the FFXIV crafting current end-game (Three Star / Master), and a step behind (Two Star)! If you’re wondering how to gear up to reach this point, check out our Crafting End-game Gear & Materia. Let me preface this little guide with one thing: Everyone might be at different gear points and you can “upgrade” or “downgrade” these rotations to your liking. Please use http://www.ffxivcrafter.com/ to see if it’s up to scratch. That site is great for testing out these crafting rotations! As you get better gear, you can “upgrade” these rotations to increase your chances.

Navigation:
Four-star (4*) Master Crafting Rotation | Tier 2 Token Item Rotation | Tier 2 Token Item NQ Rotation
Three-star Master RotationToken Item Rotation | 2 Star 40 D | 2 Star 80 D | Crafting Food?

Four star Master crafting Rotation (Equipment)

This is for the 4* equipment such as Arachne Bolero, Wootz Sallet, etc… Again, there are a chunkton of rotations possible, the below outlines is a rather generic rotation with the following upsides:

  • All crafters can easily fit the crossclass required INCLUDING the Rumination + Reclaim escape pod.
  • Easily Reclaimable after all touches and Great Strides
  • REQUIRES only 1 ToT, or sacrificing one touch for Comfort Zone in the middle phase.

You need the following NINE crossclass skills:
Comfort Zone, Tricks of the Trade, Byregot’s Blessing, Hasty Touch, Steady Hand II, Piece by Piece, Rapid Synthesis, Ingenuity II and Waste Not II
This means ALL CRAFTERS can use this rotation. Your tenth skill SHOULD be reclaim. Eleventh should be Rumination (all classes should be able to support this)

Stats: 479 MINIMUM CRAFTSMANSHIP, any control above minimum, 395 CP+ToT.

/ac “Tricks of the Trade” <wait.2>
/ac “Inner Quiet” <wait.2>
/ac “Tricks of the Trade” <wait.2>
/ac “Ingenuity II” <wait.2>
/ac “Steady Hand II” <wait.2>
/ac “Piece by Piece” <wait.3>
/ac “Rapid Synthesis” <wait.3>
/ac “Tricks of the Trade” <wait.2>
/ac “Hasty Touch” <wait.3>
/ac “Tricks of the Trade” <wait.2>
/ac “Master’s Mend” <wait.3> (Changing to Manipulation is OKAY to save CP)
/ac “Tricks of the Trade” <wait.2>
/ac “Steady Hand II” <wait.2>
– The above fits into one macro: If you fail any Rapid Synthesis, reclaim at this point

/ac “Waste Not II” <wait.2>
/ac “Hasty Touch” <wait.3>
/ac “Steady Hand II” <wait.2>
/ac “Hasty Touch” <wait.3>
/ac “Tricks of the Trade” <wait.2>
/ac “Steady Hand” <wait.2>
/ac “Tricks of the Trade” <wait.2>
– The above fits into one macro: You NEED to have hit one ToT at this point. Check if you have 71CP at least

Manual Crafting Begins

Great Strides (SH~4)
Bait 1? (SH~3) (39 CP needed to complete) (Bait with Observe if CP>=50)(Innov if CP>=57)
Byregot’s Blessing (SH~2) (Last chance to Rumination/+Reclaim)
Standard Synthesis (SH~1)

For now, this is a good “general” rotation to follow. But, as always, core knowledge of crafting will always beat rotations in crafts as difficult as these (and much worse, the token items). Again, it all depends on melds… preference of safety versus risk…


“Four star token” HQ Rotation

Some feedback on this rotation says it’s too complex – will “fix” somehow.
It also works with all crafters, but not “rumination+reclaim” safe.
Will be redesigning this to find a middle ground.

OKAY, before anything else – there are MANY MANY MANY rotations and MANY variants, with many possible outcomes. ONE THING FOR SURE is that there is NO WAY to 100% HQ these 100% of the time. There is no BEST rotation, only rotations that are better at one thing or another (Maximum security, maximum chances (but high risk) etc etc).

TO PREVENT CONFUSION, these are the items in question:
Intricate Silver Brocade (WVR), Rich Tomato Relish (CUL), Concentrated Spirits of Salt (ALC), Water-Hardened Hippogryph Strap (LTW), Balanced Darksteel Hook (ARM), Reinforced Darksteel Wire (BSM), Calibrated Rose Gold Cog (GSM), Reinforced Sprice Plywood (CRP). We also assume you bothered with HQ base materials for 1494 starting quality. First, a gear check:

If you’re at this point, you probably have stats similar to one of these sets:
“Didn’t bother with some of the new stuff” “But I have to pick up the offhand” (link)
437 Craftsmanship 393 Control, 388 CP with food.

389 CP is actually useful: more on this later. Actually, I recommend it. If you’re looking for a right-side upgrade, I suggest the Mosshorn Earrings (replacing old-timers Red Coral Earring)

Anything lower than this is SUICIDE. These crafts are not for the feint of heart.

Mahiko “Semi-YOLO” Rotation

PHASE 1 (30%~ success rate)
/ac “Comfort Zone” <wait.2>
/ac “Tricks of the Trade” <wait.2>
/ac “Inner Quiet” <wait.2>
/ac “Tricks of the Trade” <wait.2>
/ac “Piece by Piece” <wait.3>
/ac “Tricks of the Trade” <wait.2>
/ac “Ingenuity” <wait.2>
/ac “Tricks of the Trade” <wait.2>
/ac “Steady Hand II” <wait.2>
/ac “Rapid Synthesis” <wait.3>
/ac “Hasty Touch” <wait.3>
/ac “Tricks of the Trade” <wait.2>

Looks shitty? Yeahp, I won’t even lie. If ANY RAPID SYNTH fails, you must reclaim. I start all of my synths in this tier with this macro. Watch it carefully. YOU NEED AT LEAST 1 ToT to be “safe”. So what you’re looking for here is 684+ Progress, and 340 CP. Progress failure is a MUST RECLAIM, Failure to ToT (5 chances!) is okay, but preferable.

Phase 2 A
/ac “Comfort Zone” <wait.2>
/ac “Tricks of the Trade” <wait.2>
/ac “Master’s Mend II” <wait.3>
/ac “Tricks of the Trade” <wait.2>
/ac “Steady Hand II” <wait.2>
/ac “Waste Not II” <wait.2>

Phase 3 (MANUAL CRAFTING COMMENCES)
/ac “Hasty Touch” <wait.3>
/ac “Steady Hand II” <wait.2>
/ac “Hasty Touch” <wait.3>
/ac “Tricks of the Trade” <wait.2>

Yeahp, that’s 9 Hasty touches. The tricks on the end is “free” NOTE THAT the rotation is designed to REPLACE ONE OF THE HASTYS WITH ToT (or more specifically, gain a ToT by the end) If it happens on the end, nice. In the middle – nice. In the middle and end? NICE.

Phase 4 (Dont have 66CP? Reclaim, scrub)

Let’s take this step by step. If i haven’t mentioned already – LESS THAN 66 CP IS A RECLAIM. If you have 389 base CP you have the luxury of ensuring ONE OBSERVE during the BB Baiting phase.

(88 CP? Steady Hand is a filler option, or do it now)(ToT if its up after)
Great Strides (Baiting begins)
Not a good? Careful Synthesis II or ToT. (SH if you haven’t prior) (Observe if >=34 CP) (Innov if 46 >= CP)
Not a good? ToT or (CSII if you haven’t prior). (SH if you haven’t prior) (Observe if >=34 CP)  (Innov if 46 >= CP)
Last chance for Byregots Blessing. Make your decision now. RUMINATION+RECLAIM if you chicken out.
Careful Synthesis II x 2 (If you didn’t use it to bait earilier)

There are times you wont have 88CP for the Steady Hand -> that’s fine. It’s about half as risky as a reclaim at that point. Now, seriously, theres a million deviations to this rotation and a million variables to work to and against your favor. You need to make some decisions for yourself for MAXIMUM VALUE – but there’s always a trade off. These crafts are not for the faint of heart.

“Four star token” NQ Rotation

This rotation is a basic MINIMUM STAT required method to NO QUALITY a “Four star” or “Tier 2” token.

TO PREVENT CONFUSION, these are the items in question:
Intricate Silver Brocade (WVR), Rich Tomato Relish (CUL), Concentrated Spirits of Salt (ALC), Water-Hardened Hippogryph Strap (LTW), Balanced Darksteel Hook (ARM), Reinforced Darksteel Wire (BSM), Calibrated Rose Gold Cog (GSM), Reinforced Sprice Plywood (CRP). 

(also a macro)
/ac “Steady Hand” <wait.2>
/ac “Piece by Piece” <wait.3>
/ac “Ingenuity II” <wait.2>
/ac “Careful Synthesis II” <wait.3>

There are of course many ways to do this. This rotation is only used to get NQ Tier 2 tokens for SUPRA WEAPON UPGRADE. It has pretty much zero use aside from this.

Three Star Master Crafting Rotation

Required Stats:
396 Craftsmanship
374 Control (minimum)
380 CP (345 + HQ Bouillabaisse)
or meld +1 CP on off-hand for NQ.

  • 1) Comfort Zone (Tricks?)
  • 2) Inner Quiet (Tricks?)
  • 3) Steady Hand II
  • 4) Waste Not II
  • 5) Hasty Touch
  • 6) Hasty Touch
  • 7) Hasty Touch
  • 8) Hasty Touch
  • 9) Steady Hand II
  • 10) Hasty Touch
  • 11) Hasty Touch
  • 12) Hasty Touch
  • 13) Hasty Touch
  • 14) Hasty Touch
  • 15) Manipulation (Tricks?)
  • 16) Steady Hand (Tricks?)***
  • 17) Piece by Piece
  • 18) Great Strides
  • 19) Piece by Piece**
  • 20) Ingenuity II
  • 21) Byregot’s Blessing
  • 22) Careful Synthesis II
  • 23) Careful Synthesis II
  • 24) Careful Synthesis II

*** This is what I call the “Byregot’s Killzone“. After pressing Steady Hand, if ever you get a Excellent just jam Byregot’s in. Failing this, after Great Strides, Ignore Innovation or Ingenuity if you land on a Good. Of course, make sure to do Ingenuity 2 before Careful Synths.

** Piece by Piece is a “filler” to try and get a better than normal condition after great strides. Ingenuity II acts the same way. Again, keep in mind the “Byregot’s Killzone”.

Hasty Touch Failures? Out of nine Hasty Touches, I would say the very least I would gamble with is 6 successes. You can consider reclaiming if 3 fail. If 4 fail, you’re gonna need some luck.

1 Tricks of the Trade? Replace step 20 with Innovation.
2 Tricks of the Trade? Replace step 14 with Basic Touch.
3 Tricks of the Trade? Replace step 13 with Basic Touch

Token Item Rotation (Silver Brocade, Gryphonskin Strap etc)

THIS ROTATION DOES NOT WORK FOR TIER 2 (Intricate Silver Brocade, Water Hardened Gryphonskin Strap) For that, please refer to the above (Tier 2 tokens)

Required Stats:
357 craftsmanship
371 CP (345+HQ Pea Soup)
318 Minimum Control (you’ll want more, though)

Note on these stats: For Craftsmanship you need 105 progress on Careful Synth 2, under Ingenuity 2. I get 106 with 357, so it might be lower like 353…) How do you reach 371 CP? I designed this rotation to fit around the popular base CP of 345. as I wrote above, just eat the Pea Soup.

This Rotation is used to craft the following:

  • Spirits of Salt (ALC)
  • Darksteel Wire (ARM)
  • Darksteel Hook (BSM)
  • Spruce Plywood (CRP)
  • Spicy Tomato Relish (CUL)
  • Rose Gold Gear (GSM)
  • Gryphonskin Strap (LTW)
  • Silver Brocade (WVR)

Token Item “Mahiko Token” Rotation:

  • 1) Comfort Zone (Tricks?)
  • 2) Inner Quiet (Tricks?)
  • 3) Steady Hand II
  • 4) Waste Not II
  • 5) Hasty Touch
  • 6) Hasty Touch
  • 7) Hasty Touch
  • 8) Hasty Touch
  • 9) Steady Hand II
  • 10) Hasty Touch
  • 11) Hasty Touch
  • 12) Hasty Touch
  • 13) Hasty Touch
  • 14) Hasty Touch
  • 15) Manipulation (Tricks?)
  • 16) Steady Hand (Tricks?)
  • 17) Hasty Touch***
  • 18) Great Strides
  • 19) Innovation
  • 20) Ingenuity II
  • 21) Byregot’s Blessing
  • 22) Careful Synthesis II
  • 23) Careful Synthesis II
  • 24) Careful Synthesis II
  • 25) Careful Synthesis II

***Byregot’s Killzone. If Excellent, use it. After Great Strides, if material condition good, use it.

Hasty Touch Failures? Out of eleven Hasty Touches, succeeding only 8 times is still okay. Most of the time you’re going to want to use HQ base materials, anyway.

1 Tricks of the Trade? Replace step 17 with Basic Touch
2 Tricks of the Trade? Replace step 14 with Basic Touch.
3 Tricks of the Trade? Replace step 13 with Basic Touch

2 Star 40 Durability Crafting Rotation

This is only relevant in end-game due to the items you need to submit for the Master Recipe Books.

Required Stats:
Craftmanship: 347
CP: 364 (345 Base CP + Stone Soup)

  • Comfort Zone
  • Inner Quiet
  • Steady Hand II
  • Waste Not I
  • Hasty Touch
  • Hasty Touch
  • Hasty Touch
  • Hasty Touch
  • Manipulation
  • Steady Hand II
  • Waste Not I
  • Hasty Touch
  • Hasty Touch
  • Hasty Touch
  • Hasty Touch
  • Steady Hand***
  • Great Strides
  • Ingenuity II
  • Byregot’s Blessing
  • Careful Synthesis II
  • Careful Synthesis II

***Byregot’s Killzone. If Excellent, use it. After Great Strides, if material condition good, use it.

With your Master Weapon, this needs only one Careful Synth II to fill under Ingenuity II (Exact craftsmanship threshold unknown)

2 Star 80 Durability Crafting Rotation

Required Stats:
Craftsmanship: 347
Control: 318 minimum
CP: 345

  • Comfort Zone
  • Inner Quiet
  • Waste Not I
  • Steady Hand II
  • Basic Touch x 5
  • Great Strides
  • Steady Hand
  • Ingenuity I***
  • Standard Touch
  • Great Strides
  • Byregot’s Blessing
  • Careful Synthesis II
  • Careful Synthesis II
  • Careful Synthesis II

***Byregot’s Killzone. If Excellent, use it. After Great Strides, if material condition good, use it.

While there are opportunities for Tricks of the Trade, and subsequent modifications, it’s not really needed. This rotation nails it 100% of the time NQ to HQ.

CP food reference chart

[to be added]

Navigation:
Three-star Master Rotation | Token Item Rotation | 2 Star 40 D | 2 Star 80 D | CP Food?

Related Guides:
Crafting End-game Gear & Materia |

Well good luck with the big boy crafting recipes! Hopefully, you won’t experience your first heartbreak of NQing a Master!

Wanna add something? Hit the comments below!!

Follow us on Facebook for more FFXIV updates!

FFXIV Rafflesia (Turn 6) Strategy Guide

Thorns, bulbs, bees, honey & slugs! Don’t let Turn 6 get you down! Read our Gardeni… err… Rafflesia Guide!

Welcome to our Rafflesia (Turn 6) Guide! Hopefully we can share with you tips we learned to make this fight less stressful for you!

“Inside your eye sockets are things called eyes. I heard they are useful.” – Mahiko San, FFXIVGuild

Navigation:
[Page 1: Phase 1 & 2 ] [ Page 2: Phase 3 ]
P1 Abilities & Strategy | P2 Abilities & Strategy | Imporant Tips & Reminders

A useful link to have open is our: T6 First Kill Video.

Rafflesia Phase 1 (100%-70%)

Phase 1 Rotation
Thorn Whip – Bulbs – Thorn Whip – Devour/Spit – REPEAT.

Bloody Caress – A strong cleave that adds a stack of Vulnerability up on whoever is hit. Acts as a tank swap mechanic, and you should switch at 3~ stacks.

Thorn Whip – Links two or more people together with a visible tether. Targets will take damage as long as the tether is not broken. The “chain” is broken by moving AWAY from whoever you’re tethered to (a set distance).It’s much easier to break tethers if the initial chain is “short”. Meaning, the closer you guys are stacked for Thorn Whip, the easier it is to break (more on this later).

Dark Matter Bulb – Little plants that can spawn in one of eight possible locations (will never spawn in the same place twice in a row). These bulbs will create a continually growing briar patch until it has grown to max size, or killed (it stops growing, but existing briar will not vanish). Briar prevents movement effects, but also has a huge DoT. This is relevant because…

DEVOUR / SPIT – A Yellow marker appears above the target of “Floral Trap”, and this person will shortly be “Devoured”. Devour is a suction, cone AoE. Be careful – even if you are not the target of Devour, if you are BETWEEN the yellow marked guy and Rafflesia, you’re gonna get sucked in. If Rafflesia eats a guy, he gets a PERMANENT DAMAGE UP.

Blighted Bouquet – Haha, figuring this out the first time was pretty funny. If you take any action towards the end of its cast time – you will die. Simple as that!

Phase Notes
Overall this phase is a non-issue, and pretty much a tutorial for the torment to come. Anyone and their mother can get past Phase 1! Refinement of strategy will be discussed in the Tips & Reminders section.


Rafflesia Phase 2 (70%-40%)

Rafflesia Phase 2 Rotation
Bulbs – Thorn Whip – Devour/Spit – Honey – Thorn Whip – Blight – Bulb – Thorn Whip – Devour/Spit – Thorn Whip – Blight -REPEAT

The briar vanished!” – Everyone.

Thornwhip, Dark Matter Bulb, Devour/Spit and Blighted Bouquet still make an appearance here. In phase 2, though, it is UNSAFE to use old briars to prevent devour. You must always dodge towards newly spawned bulbs/briars.

Again, this is important enough to repeat: If you are targeted by Devour – you may only use briars left by the NEWEST set of bulbs (During Phase 2). Now for the next unique ability of this phase…

Honey / Dark Matter Bee – Rafflesia will target one person to be “Honey Glazed”. This person, well, will attract Bees. Bees do NOT have an aggro table, but luckily they do not hit too hard! They will continue to attack the honey glazed person until he or she dies. Some notes:

  • While in Phase 2, if honey glazed target dies, it will be immediately recast to someone else.
  • If a second bee spawns while the first is alive, the first will begin casting Final Sting. (Hint: It’s not good)
  • If a honeyed guy exists when Phase 3 happens, bees will continue to spawn, likely causing a wipe.

Getting rid of Honey is key to phase 2. How? The Honey Glazed target MUST be devoured. You’ve worked very hard to be not devoured, so getting devoured on purpose should be a no brainer.

Rafflesia Tips & Reminders

Thorn Whip is often underestimated. The mechanic is very simple, and will very likely never cause your death directly. It does, however, start certain chains of events that can lead to strain or failure. We gained considerable consistency and stability when we applied one simple rule: Stack up before Thorn Whip. The shorter the whip, the easier it is to break! Everyone takes less chain damage, everyone has more freedom of movement, less accidental devours, less briar damage…so on, so forth. This lasts throughout the WHOLE FIGHT so you might as well get used to it.

Thorn Whip -> Devour: How? Dodging devour is pretty easy if you’re the one who has the mark. What if you’re chained to someone? What if multiple people ran the same way you did? To prevent all this BS, we applied a simple rule: WAIT FOR DEVOUR UNTIL BREAKING CHAINS!! We would all rather take a bit more chain damage than to risk the entire raid.

Honey/Bee Problems? Well, ideally you only want 1 honey but this isnt always possible. If middle bulbs spawn – you can’t dps the boss! So instead we just applied a rule of “ALWAYS TWO BEES” and “STOP DPS IF NEEDED”. This way, we’re not stressed for time.

Phase Transition happened but a honey is still around!? This guy has to die. Have him stand in ACID RAIN.

——————————————————

80% of this fight is getting through Phase 2 in a “salvageable” state. 20% is the Phase transition, because Phase 3 is actually easier. More on that in Page 2 of this guide!

Follow us on Facebook for more FFXIV updates!

Navigation:
[Page 1: Phase 1 & 2 ] [ Page 2: Phase 3 ]
P1 Abilities & Strategy | P2 Abilities & Strategy | Imporant Tips & Reminders

Sahagin Beast Tribe Guide (+Vendor Items)

All you need to know about the Sahagin Beast Tribe Quests! What items you can get, tips on quests and more!

The Sahagin are one of the beast tribes you can gain reputation with in FFXIV:ARR. Their home (and Beastmen Daily questing hub) is located in Western La Noscea, (Coordinates: 16,22). The nearest Aetheryte is Aleport.

You can unlock the Sahagin Beast quests by doing the quest: They Came From the Deep in Limsa Lominsa Upper Decks.

Sahagin Vendor Item List

ItemPriceReputation
Table Salt2Neutral
Cinnamon4Neutral
Garlean Garlic5Neutral
Smooth Butter2Neutral
Sunset Wheat Flour4Neutral
Olive Oil8Neutral
Black Pepper13Neutral
Sun Lemon28Neutral
Night Milk84Neutral
Midland Basic111Neutral
?????????


Like all beastmen, the neutral items support a certain DoH Class. In Sahagins case it’s mostly Culinarian. Here’s some interesting stuff to know about the Sahagin Rewards.. The following items are commonly used “ingots” that were annoying to craft, but couldn’t be bought ready made… not anymore!

  • Table Salt – I mean, c’mon…
  • Smooth Butter
  • Olive Oil

And more Raw Materials that were never buyable from NPC before..

  • Sun Lemon
  • Night Milk
  • Midland Basil

Overall, reduces some hassles for culinarians and is worth getting Sahagin Neutral just for that.

Picture of Sahagin items

While it’s impossible to have our own pics of them at the moment, we can post the official SE pics of the Sahagin mount& Sahagin minion here in the meantime –

ffxiv sahagin mount and minion


Check out the Other Beast Tribes
Amal’jaa | Sylph | Sahagin | Kobold

Follow us on Facebook for more FFXIV updates!