FFXIV Ramuh Extreme Mode (The Striking Tree)

How to beat Ramuh EX! Strategy Guide & Loot list! Find out all about thunderstorms, rolling thunder, overcharge and BALLS!

So you’ve gotten to Ramuh Extreme Mode? Don’t be shocked by this electrifying fight! Learn all you need to learn about this encounter – so you can beat up old men – get those i100 rings! This fight isn’t very confusing mechanics wise – It’s all in the Execution, or Electrocution! Defeat the Lord of Levin EXTREME in no time with our strategy guide!

“Those balls are mine! Don’t touch them!” – Common Ramuh party chat

Ramuh EX Mechanics

Ramuh EX has alot of mechanics that persist throughout the whole fight. Don’t be a chump and take these to heart!

Thunderstorm – is basically like Weight of The Land (Plumes). Except they FOLLOW whoever was chosen to get hit by it. There are also “Neutral” thunders that just stay on the ground wherever they spawned. The more BALLS present in the map, the more painful Thunderstorm gets. Do not stay in the water when Thunderstorm hits (or you die). Like plumes, Thunderstorm may hit you multiple times. Thunderstorm also has the benefit of removing Chaos. Speaking of Chaos…

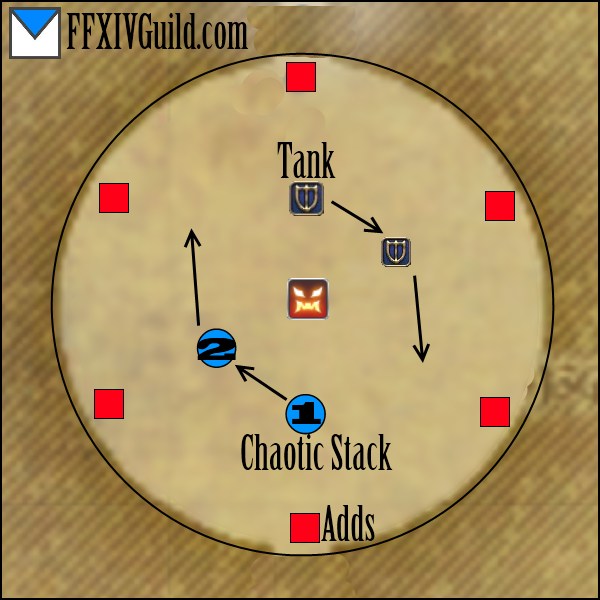
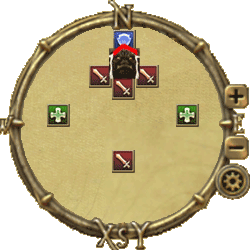
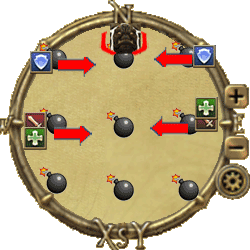
Chaotic Strike – chooses 2 random party members. This happens after every other Thunderstorm. This is marked by a cross-hair. After a short delay, these guys will be “stunned” (Charmed). And start walking towards Ramuh. This is bad, because the next PBAoE attack Ramuh does will INSTANTLY KILL any charmed players. As mentioned earlier a Thunderstorm hit removes the “Charmed” status. (For initial position, see diagram below)

Strategy for Chaotic / Thunder: Use a waymark right behind Ramuh to signify WHERE CHAOTIC affected guys stack. From here we use a numbering system to “save” them. usually from 1-4.

  • If a Black Mage is around usually they are 1. Why? to minimize movement. They stay on the stacking waymark always.
  • Bard & Summoner make the second best savers because they don’t lose much DPS by moving.
  • Healers are the next choice. But they should be lower in the list, since they need to heal.
  • Melee DPS probably make the worst savers.
  • Of course, move out of venn diagrams and unnecessary thunders.

When “saving” people from chaos – do not create a Venn Diagram of Clusterf*ckery. There is alot of space to spread out Thunder from hitting one another.

In his mind, he is the Venn Diagram. It’s him. – Mahiko “Charles Barkley” San.

The “Balls” – after each thunderstorm, balls spawn on the ground. Picking up 1 or 2 balls does nothing. Picking up 3 gives you a buff that protects you from Ramuhs “Cleave”. If you do not have this buff you will die. This is basically a tank-swap mechanic. Picking up a fourth ball results in “Overcharge”. You will still be protected but take significantly reduced healing. Overcharge can have 3 stacks. 3 Stacks means you will get little to no healing. Ideally you will never overcharge, but practically, you will need to OC on every phase change. Random balls lying around will increase damage of Thunderstorm significantly. It should go something like this

Thunderstorm > OT picks up  3 > Provoke > Thunderstorm > Random ball “cleanup” > Repeat. a good reminder is around 20s left on immunity – find them balls, son.


Ramuh EX Phase 2: Adds

Six adds spawn in a circle around Ramuh. They don’t really have any remarkable attacks. However, they must be killed before Judgment Bolt is cast. Or else, you guessed it, it’s a wipe.

All of the previous mechanics are still happening in this phase. The largest problem most groups have during this phase is position. People getting cleaved, Chaotic Stack too far… stuff like this. So we decided – “Why not have the position remain the ‘same’…?”

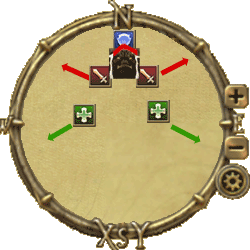
ffxiv ramuh extreme mode chaotic strike thunderstorm safezone phase 2

Key: Red Square (Adds), Blue Circle (Chaotic Stack), Paladin Shield (Tank).

SO WHAT DOES THIS DIAGRAM MEAN? The best way to deal with this phase is to “shift” your whole teams position as each add dies. It’s practical because whatever your position in P1 was, it’s the same starting position for P2. Here’s the rundown of what needs to happen:

  • Position only shifts after each add dies.
  • Waymark should be moved (preferably).
  • Otherwise, “Chaotic Stack” is always to be between Ramuh and an Add.
  • Tank should always be looking at an add (positional reminder)

Upon entering P2, the current tank should overcharge to prevent random BS.

This way people always know where to go for Chaotic, DPS wont be randomly cleaved and killed, and tanks wont bother the whole process of killing adds and saving people. Before this phase ends (Judgment Bolt is cast) make sure there arent too many random balls lying around.

Ramuh EX Phase 3: Rolling Thunder

Again to prevent BS, you may have the current MT overcharge. All of Phase 1’s mechanics still persist into the final phase The only addition is…

Rolling Thunder: Creates a tether between two people. If either of these two people do any action, they take damage. The more actions you take, the more shocking the damage gets. Picking up 3 balls removes the tether.

Basically, instead of the  “ball cleanup” phase – it becomes a “Rolling Thunder removal” phase. Here are some reminders regarding Rolling Thunder:

  • A person afflicted by Chaotic Strike may be tethered.
  • DPS should STOP COMPLETELY until tethers are broken.
  • Healer should only use LARGE HEALS when absolutely NECESSARY.
  • Be smart about who should clean the tether…
    • OT>DPS>Healer

OFFTANK should have tether cleaning priority since they need the insulation anyway. DPS should be next in line not to bother healing. Healers should stay still (unless tethered to each other). Healers who aren’t tethered should put up shields/regen on those who are, to be safe.

Nothing much else happens in P3. The adds spawn again but they cannot be targetted. They only do random lightning lasers which should be avoided!


Ramuh EX loot list

Ramuh drops i100 rings and i100 weapons. A ring drops every time, but the weapon is quite rare.

Ramuh EXRingWeapon
TankJudgment Ring of FendingThunderstrike (PLD)
Thunderstorm (WAR)
HealerJudgment Ring of HealingAdjudicators Gavel (WHM)
The Law of Levin (SCH)
MeleeJudgment Ring of SlayingThundercrack (MNK)
Thunderbolt (DRG)
CasterJudgment Ring of CastingAdjudicators Staff (BLM)
Ona Ramuhda (SMN)
BardJudgment Ring of AimingThunderdart (BRD)

Again, this is our in-house strategy, and what we used in our first kill. If you have any suggestions or something to say – hit the comments below!

Follow us on Facebook for more FFXIV updates!

FFXIV Good King Moggle Mog (Thornmarch) Extreme Guide

Moogles! Moogles Everywhere! If you’re saying “What killed me?!” – Read on! How to bring the Good King to heel in our Thornmarch EX Guide!

You’ve walked into Thornmarch extreme – then that means you’ve recently said “WTF”. Good King Moggle Mog is a pretty confusing fight, but once you get used to it – It’s a breeze! Use our handy dandy guide not get killed by seemingly random things again!

Navigation:
Page 1: Mechanics & Skills | Page 2: “Weird Stuff”, Phases, Tips & Loot
Main Mechanic | Moogle & King Skills | Tanking & Positioning

Main Mechanic: Life sharing

Killing a moogle causes the next phase to begin. The king is invulnerable to damage, and phase transitioning doubles up as the only method to deal damage to him. Here’s how it works: After one moogle dies, the king “gives” them any lost HP they have – damaging the king and healing everyone else to full (and reviving if killed). This has to be repeated three times before entering the final mini-phase. Having ALL MOOGLES AT LOWEST POSSIBLE LIFE BEFORE KILLING is your main objective. Overall, this is how the fight looks like…

Phase 1 -> Kill 1 Moogle -> Phase 2 -> Kill 1 Moogle -> Phase 3 -> Kill All Moogles -> Kill King (mini-phase).

“Moogle Basic Abilities” and “King Skills” will be active the whole fight. “Weird Stuff” will only appear in P2 and P3. This is all discussed below.

Moogle Basic Abilities

Paladin, Warrior and King Moogles have an aggro table. BLM, WHM, BRD, and Thief Moogles do whatever they want.

Paladin & Warrior – They each give a debuff that, long story short, makes tanking both of these moogles simultaneously impossible. Tanks should pick up one each.

===The following Moogles have no Aggro table===
Black Mage – FLARE can (must) be cancelled by dealing direct damage to the caster. Stun/Silence have no effect. He also does meteor, which places a bunch of AoE circles on the ground (blue). Just dodge meteor. [Always have 1 or 2 DPS assigned to cancel flare]

White Mage – Heals. (Amazing, right?)
Archer – Focuses on a random target and does a few basic attacks.
Thief – Approaches a random target and stabs him or her.
Bard – Periodically gives a short buff to surrounding Moogles. (Least threatening)

These abilities continue during the entire fight. If you’re looking for their “ultimate” abilities, and how to deal with them, that’s found in Page 2.

Delta – A combination attack between the Bard, Thief & Archer creating a triangular area of near-certain death. The damage is affected by the total amount of moogle buff stacks all participating moogles! This will leave you at critical HP in the best case scenario, but will most likely one-shot you. Staying away from the middle is the best defense versus delta, but you can also see it coming thru A) A buff on a moogle called “Pombination” which has 3 moogle faces on it. B) Them talking about “Delta! Delta!” & Moving for no reason.


King Moogle Skills

Cleaving attack that reduces mana (Skill name unsure). So healers watch out for this! Moogle Creation is a generic, but thankfully weak, laser attack.

Moogle Buff – Periodically makes nearby Moogles stronger. This is a soft tank swap effect, since the Paladin or Warrior moogles cannot gain too many stacks. Also, tanks must be aware of their position in relation to certain moogles, which will be discussed in the next section. (Skill name unsure)

1000 Kuponze Swing – A slow clunky double cone effect targetting the person who gets a cross-hair. Shouldn’t be a big deal. This skill comes from the two tanks.

Tanking & Positioning Summary

Positioning is very erratic in this fight, but one things for sure: Tanks must be along the outer ring.

“MT” gets Paladin or Warrior + King, “OT” gets whichever the MT didn’t. Once the moogle buff reaches 3~ OT provokes king until his guy reaches 3~ stacks. Tanks can focus target the opposite moogle so they can easily see when they need to taunt. Tanks must also remember to position away from Archer & Thief Moogles. Swap the King when the current MT’s secondary moogle has high stacks.

DPS adjust accordingly, while avoiding middle if possible.

Healers have no reason to stay away from the edge, and SHOULD NOT BOTH BE TOO CLOSE TO PALADIN MOOGLE (More on this in “weird stuff” section).

Follow us on Facebook for more FFXIV updates!

Navigation:
Page 1: Mechanics & SkillsPage 2: “Weird Stuff”, Phases, Tips & Loot
Main Mechanic | Moogle & King SkillsTanking & Positioning

FFXIV Leviathan Extreme Mode (Whorleater) Guide

Heads or Tails!? Don’t let this fight be 50/50! Learn how to smash Leviathan EX in our Whorleater EXTREME Guide!

ffxiv leviathan whorleater extreme mode ex em banner

So you’ve made it to Leviathan Extreme Mode, eh? This is an extremely fun fight that starts with lame music (but makes it up later)! Let our epic guide help you out beating Whorleater Extreme!

Navigation:
Page 1 – Abilities & Adds | Page 2 – Phases, Tips & Loot
Spinning Dive & Body Slam | Adds | Minor Abilities | Briny Mirror

Leviathan Extreme Mode Abilities

As we mentioned above, discussing Levi EX by phase can be a bit confusing. So instead, understanding his abilities first is more important. These two abilities are the most important in the fight, and you’ll be seeing them often –

ffxiv body slam safe spots leviathan extreme mode

Body Slam, often followed by “Oh Sh*t”

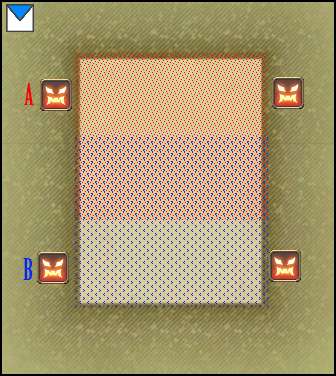
Leviathan emerges from the water, (signaled by a “geyser” animation), and slams the platform with his body, pulling everyone toward that side. If you’re too near him, you take heavy damage – and may fall off the platform resulting in instant KO (when the railings are down). Basically, run to the opposite end to where he spawns. Check this out:

Body Slam Dodging Tips: Look at one side only. If you do not see the geyser – run forward! It only means it’s behind you. Using headphones also helps! If he spawns in A – run to B! If he spawns in B – run to A!

It’s quite easy to dodge, honestly, but panic and or complacency can get the best of us! Just remember in the later phases – this means instant Death. So get used to it quick!

ffxiv levi divebomb spiral dive dodging leviathan extreme modeLeviathans “Divebomb” (Spinning Dive)
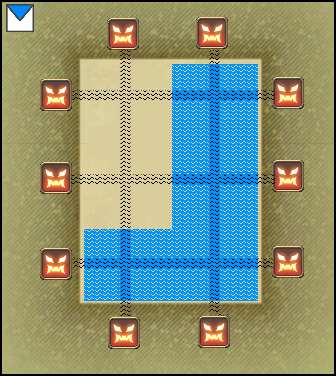
(See diagram on right) This may be extremely disheartening at first for newer players, but after you get used to it, it’s a piece of cake! This ability is popularly called Divebomb, after Twintanias skill.

The “starting point” of Spinning Dive is, like body slam, marked by a geyser. It will travel all the way across the platform following the lines (the black lines in the diagram). These divebombs are pretty thick. The blue area signifies this. The “Vertical” spinning dives take up exactly 50% of the map, while the “Horizontal” ones take up 33%

To make matters worse, These water balls fall from the sky on random raidmembers before each Spiral Dive. It does significant damage and a slow.

This skill has some quirks, though. If he begins his Divebomb on the North Side (Vertical), the next Divebomb will start from the South (Could be Vertical of Horizontal). Horizontal Divebombs are trickier, though. He will also always begin his dive from the side he was tanked at.

The Horizontal divebombs are a bit messier. Of the three possible horizontal setups, the middle one happens most often. The horizontal divebombs do not seem to follow a strict rule (or they are too rare for me to have observed patterns; please chime in on the comments if you have info)

This skill is often followed by “Oh Sh*t”, excuses or both.


Adds – “The Fat & Thins”

Leviathan spawns two kinds of adds (that fight back). In our FC we call them the Fat, and the Thins.

Thin adds (Wavespine Sahagin)

There are many strategies as to which tank pulls which add. One pulls both is fine, or one each is also fine – really depends on what you guys are used to, and what your composition looks like.

After a certain time – they cast a skill called Hydroshot, leaving a circular AoE on the ground. If stepped on, you get a MASSIVE water DoT! (Is it Esunable? We haven’t got hit by this in a while)

The Fat (Wavetooth Sahagin)

Have a tank pick this one up (Usually the tail tank). If you’re the tank remember this – After the fat casts his 3rd skill, start chain stunning. Kind of like DK’s in T5. This can be hard if you have two warriors.

You see, this guy gets very pissed off after three skills. He casts one of two things, both with extremely unfavorable results. Dreadstorm leaves a circle on the ground, that if stepped on, causes you to run around in fear for 9323478 seconds, and you can step on it again while feared. If the railings are down, this can cause you to walk off. Dreadwash is a medium AoE shout that fears you for roughly 9323478 seconds, If the railings are down, this can cause you to walk off. Yes I copy-pasted that.

This add is often followed by “Oh Sh*t”, then “Where’s the Stun!?”.

As a desperate measure, these things can be stopped by the WHM Fluid Aura or SMN Garuda Push. (Or at least we imagined it to be so, when it happened once; again chime in on comments if confirmed / busted)

Levi Ex Minor Abilities

Majority of the fight, the two tanks split up tanking the Head and Tail. Each end has it’s own abilities.

Leviathan Head Skills

Leviathans head reflects ranged physical damage, and cannot be back attacked – so Magic DPS should target this.

Dread Tide – A line attack that comes from the head. Hits fairly hard, about 3000 damage on a tank. Main tank should position himself away from the raid, especially during adds phases. He usually does this after 3 basic attacks or around every 25 seconds.

Tidal Roar – Raid wide magic damage. Insignificant in the early stages – massive later on. Can be Virused or Dragon Kicked to help reduce it a bit.

Water Spout – An AOE attack originating from both healers. Make sure to split up.

Leviathan Tail Skills

Leviathans tail  reflects magic damage, and is always a flank/back attack – so Melee DPS & Bards should target this.

Scale Darts – A single target attack that comes from the tail. Hits a tank for about 1500 damage.

Tail Swipe – A frontal cone attack that comes from the tail. The damage is shared among all targets hit. Ranged guys make sure to get out of this.

Briny Mirror – look below :)

Briny Mirror – How to deal with it

A Debuff that is applied to whoever has top emnity on the tail of Leviathan when it appears (usually tanks). Briny Mirror is an annoying debuff that applies a stack each time you heal the person who has it. Each stack reduces healing range. Upon reaching 16 stacks – the healer is stunned for a significant time!

You can “cheat” Briny Mirror by doing the following things:

  • WHM Stoneskin doesn’t give stacks.
  • REGEN and its ticks don’t give stacks.
  • EOS/SELENE ignore this mechanic.

So yeah, have your pet near Tail tank, have your WHM seal+regen & SS the guy. You can further make your life easier by using things like Eye for an Eye, Storms Path etc etc…

Stacks are, at times, unavoidable. If you have to get one don’t be too stressed about it. Medica / Succor will likely get you one. But dont sweat it – if you manage your heals well, you’ll never reach the dreaded 16 stacks, or even get close to it. After the Divebomb / Slap phase, make sure you be extra careful in waiting for existing stacks to fall off before you AoE heal again. (Or simply position so you wont hit the guy).

That’s it for Page 1. Understand these mechanics first of all! Page 2 has what we know of Levi’s Phase Transitions.

Follow us on Facebook for more FFXIV updates!

Navigation:
Page 1 – Abilities & Adds | Page 2 – Phases, Tips & Loot
Spinning Dive & Body Slam | Adds Minor Abilities | Briny Mirror

FFXIV Ultima Weapon : The Minstrels Ballad

Ultima Weapon (“Hard/Extreme” Mode) Strategy Guide and Loot List

Ultima Weapon Teaser Video

*Still the teaser vid -> will be updating soon.
*Guide still under refinement

Ultima Weapon has a bajillion abilites, and a very entertaining fight!

Ultima Weapon Phase 1 – Primal Phase

Garuda / Titan Phase

Two main abilities happen here:

  • Garuda appears on the screen then releases a HUGE AoE cone in the direction she’s facing. Don’t linger on the edges, or you might not make it to safety.
  • A Vortex appears in the middle, once it vanishes, move towards the edge of the stage in preparation for Titans “Geocrush”

Due to the nature of these abilities, it’s best not to stay too near the edges of the stage.

Ifrit / Titan Phase

  • In/Out Plumes – The usual outer ring / inner cluster plume formation. Keep the same positioning mentality as the Garuda phase.
  • Plumes + Crimson Cyclone – This is a pretty fun one. Radiant Plumes happens while a single Ifrit does his “Line Rush” skill.


Ultima Weapon Phase 2 – “Machines!”

Magitek Ray – Much like piercing laser from ADS. A thick randomly targetted line AoE.

Magitek Bit – Little adds that point and shoot lasers at random targets. The first pattern they spawn in is a circular group of.

Freefire – AKA Airship bombs. The glowing cross-air on the floor represents its epicenter, and the further you are from it, the less damage you take.

Ultima Weapon Loot List

Ultima Weapon drops Item Level 80 Chokers and Bracelets.

Chokers

Tank – Ultima Choker of Fending
Healer – Ultima Choker of Healing
Bard – Ultima Choker of Aiming
Caster – Ultima Choker of Casting
Melee – Ultima Choker of Striking

Rings

Tank – Ultima Band of Fending
Healer – Ultima Band of Healing
Bard – Ultima Band of Aiming
Caster – Ultima Band of Casting
Melee – Ultima Band of Striking

Don’t get caught in a laser!

Follow us on Facebook for more FFXIV updates!

FFXIV ARR – Good King Moggle Mog

All we know about Good King Moggle Mog in the upcoming 2.1 Patch!

Good King Moggle Mog Teaser Video


Good King Moggle Mog Known Mechanics

A bunch of adds – It seems that Good King Moggle Mog has brought a full party of his own!

The fight is quoted to be “About as difficult as garuda hard mode”.

This page will be converted into a strategy guide as soon as we can!

Follow us on Facebook for more FFXIV updates!

Titan Extreme Mode (FFXIV: ARR)

All we know about Titan Extreme Mode in the upcoming 2.1 Patch!

Titan Extreme Mode Teaser Video

Titan Extreme Mode abilities

Double Granite Gaol – Granite Gaol is back, but has a few new tricks!

  • ALWAYS targets a healer + dps.
  • Crushes the target if not destroyed in time.
  • Damage recieved is half if both gaols are in close proximity to one another.
  • Double Granite Gaol is always followed by upheaval…

Upheaval – very similar to demon walls “repel”. You get pushed outwards from titan. You CAN fall if you’re not careful!

Due to how double granite gaol and upheaval work, there are two popular strategies dealing with this:

  • A) Gaoled Healer under titan, Gaoled DPS at the edge – “Safer” since healers break out first, to top up the party for the upcoming stomps.
  • B) Gaoled DPS under titan, Gaoled healer at the edge – What we use, since the dps gets released first, the second gaol dies faster.

Mountain Buster – Now gives a stacking debuff which increases damage taken.

Titan Extreme Post-Heart

Granite Gaoler – mini-titans that give the main titan a determination up buff if too close, they also have Landslide, and an AoE pulse (like Tumult). Killing them leaves a slow field that does a massive heavy and DoT to anyone who walks there!

“Asterisk” Bomb Pattern – A Strange bomb pattern with 3 sets. the “X” set. the “+” set, and the center bomb. The + Set will always spawn in N,S,E,W. (These blow up first) the X spawns at “1:30 – 4:30 – 7:30 – 10:30”. (These blow up second). Then finally the center. The timing of the bomb blowing up is considerably slower than hard mode. For many of us, that delay is what caused the most difficult adjustment.

5 Direction Landslide – an upgrade from the 3 direction: The tank has to dodge, too!

Double Weight of the Land – exactly like weight of the land but it happens twice in succession. all non-tanks should stack behind titan, dodge outwards, then dodge inwards. Sounds horrible, but much easier than you think.

“Superbombs” – a bomb pattern with ZERO SAFE SPOTS. You must kill one of the (preferably) edge bombs to remain safe! A pseudo DPS check.


Titan Extreme Mode Rotation [refinement]

First Phase (“Irrelevant Phase”)

Landslide – Weight of the Land (“Plumes”) – Mountain Buster – Tumult – Landslide – Geocrush at 85% (Repeat)

Second Phase (“Tutorial”)

Landslide – Double Gaol – Upheaval – Landslide – Tumult – Plumes – Mountain Buster -Landslide – Plumes – One-side bombs –  Mountain Buster – Landslide – Geocrush (If life at 55% or lower)

If his life is above 55%, he will continue to do this pattern:

Double Gaol – Mountain Buster – Landslide – Tumult – Plumes – Mountain Buster

It is currently unclear to us how or when this pattern continues, but it should be dying much sooner than this.

Heart Phase (No mountain buster!)

Plumes – Double Gaol – Upheaval – Landslide – Tumult – Plumes – *Clock Bombs – Landslide. [Super combo: Plumes – Tumult – Earthen Fury]

*Titans Heart should be killed at or around this time… if Titan extends past this time he does a super combo which is pretty difficult to dodge – effectively killing you with earthen fury even if your party killed the heart.

Post-Heart -> Death

ADDS – Mountain Buster – Asterisk Bombs – Landslide – Plumes – Double Gaol – Mountain Buster – Tumult – Double Plumes – Three Rows Bomb – Landslide – Mountain Buster – Super Bombs – Tumult – Plumes – Geocrush – (Repeat 3x)

Titan Extreme Mode Loot List

Tank – Tremor Earring of Fending
Healer – Tremor Earring of Healing
Caster – Tremor Earring of Casting
Bard – Tremor Earring of Aiming
Melee – Tremor Earring of Striking 

Follow us on Facebook for more FFXIV updates!

Ifrit Extreme Mode (FFXIV: ARR)

All we know about Ifrit Extreme Mode in the upcoming 2.1 Patch!

Ifrit Extreme Mode Teaser Video

Ifrit Extreme Mode Abilities

Radiant Plumes, Incinerate, Cleave and all his goodies make a return. Just a bit more beefy now!

Eruption – Now non-interrupt-able. There are variations of the basic single eruption, and the eruption that follows two different members (Like Ultima Weapon).

Crimson Cyclone – Ifrits rush skill. Now with a much fatter AoE and 4 clones!

Searing Wind – The key mechanic to Ifrit extreme mode. Always targets a healer. The target continually pulses a large AoE pushback. This does massive damage, and all other party members should avoid the afflicted healer.

Tank Swapping – Ifrits stacking debuff is especially nasty. Reduction of max hp for each stack – switch it up once the OT is clean!

Infernal Fetters – A chain that links 2 people together, it has 3 effects, becoming more severe as their distance grows. Obviously, stay close to each other to prevent this.

  • Fire DoT.
  • Increase damage taken.
  • Decrease damage dealt.

Infernal Nail – now causes damage and vulnerability up when killed. As usual, any nails present before Hellfire is cast means a KO for the party.

Ifrit has three Nail -> Hellfire cycles.


Ifrit Extreme 1st Nail Phase

The first set of nails are pretty basic. 4 nails, 1 on each edge of the map. All dps should focus on the nail opposite from Ifrit, then once the searing wind target is determined melee may destroy the nail of the “safe” healer, and ranged on the “dangerous” healer.

Hellfire is cast and then then Radiant Plumes quickly after.

A note on Radiant Plumes

  • The safespot changes after each Hellfire.
  • Every safespot has a “mirror” safespot on the opposite end.
  • If you feel like you won’t make it – just get hit by one. It’s better than dying.

Radiant plume safe-spot is around 1:30 for this one.

Ifrit Extreme 2nd Nail Phase

The second set of nails goes all the way around the ring of the stage. Again, kill the opposite nails(melee), and nail nearest ifrit(ranged). When searing wind is refreshed, ranged and melee should clear the nails of the respective healers.

Infernal fetters makes its appearance here. The off-tank is targetted, and a random DPS. DPS and off-tank should travel closely together. This can be tricky when a tank swap is needed. Make sure that while the chain is on, you do not stay too far apart from each other.

Again, Hellfire is cast and then then Radiant Plumes quickly after.

Radiant plume safe-spot is around 2:00~ for this one. (Mirrored on opposite end)

Ifrit Extreme 3rd Nail Phase

The third and final set of nails are, well, everywhere. with one mega nail in the middle. 13 Nails in total. The large nail should be killed last. After identifying which healer has searing wind, DPS must work on the nails closest to healers, then outwards. Killing the large nail does quite a significant AoE pulse.

The final Hellfire is cast, and Ifrit should be defeated shortly after.

Radiant plume safe-spot is around 2:30~ for this one.

Ifrit Extreme Tips / Strategy

Ifirt Extreme Mode Loot List

Tank – Inferno Bangle of Fending
Healer – Inferno Bangle of Healing
Bard – Inferno Bangle of Aiming
Caster – Inferno Bangle of Casting
Melee – Inferno Bangle of Striking

Follow us on Facebook for more FFXIV updates!


Garuda Extreme Mode (FFXIV: ARR)

Garuda Extreme Mode strategy guide and Loot List!

Garuda Extreme Mode Teaser Video

Garuda EX Abilities

Some of the usual suspects return for extreme mode:

Slipstream: Avoidable cone stun that does extreme damage.
Friction: The usual targetted AoE
Wicked Wheel: Garuda does Wicked Wheel whenever the adds are alive. It’s extremely powerful and should be avoided.

Whenever Garuda disappeard from the map, a large spread of AoE’s will follow in her last location. They deal moderate damage, and cause Windburn (Wind DoT).

Adds (Suparna, Chirada) Abilities

Suparna (Red):

[Special] Wicked Wheel: Suparnas Wicked wheel is extremely powerful. For a non-tank, it’s a potential KO. It’s avoidable so GTFO.
Slipstream – Channeled Frontal Cone stun.
Friction
: The usual targetted AoE
Downburst: A medium strength cone attack.

Chirada (Green):

[Special] Downburst: Chiradas downburst is extremely powerful. It’s a cone attack. The target is marked by a crosshair.
Slipstream – Channeled Frontal Cone stun.
Friction: The usual targetted AoE

While either Chirada or Suparna are alive: Garuda cannot be damaged.

Razor Plumes: Like before, they target a stone pillar or guy, and will explode dealing damage after a set time.

Spiny Plumes: The “Key” add to this fight. Upon killing it, releases an AoE which causes Windburn (Wind DoT). A short time after it’s death – it will put up a “Safe Zone” wherein Garudas Reckoning will do significantly less damage to those inside. The initial target of Spiny Plume seems to be the second Highest Enmity (and in some rare cases – the MT).

Spiny Plumes give a stacking debuff to its target. If it reaches 3 stacks it will do “Super Cyclone” dealing tons of damage (Likely a KO) to everyone. Provoking the Spiny Plume before its target reaches 3 stacks is important, and is one of the main reasons many groups will wipe.


Garuda EX Phase 1 – Stone Pillars

Reminiscent of Garuda Story and Hard Mode. Nothing special here. The first sub-phase, every non-melee should be in dead-center of the pillars. Preserving the stones are your goal for this phase. It has 3 Sub-phases:

Starting Phase – All non melee stack dead center to avoid Friction hitting rocks. Once she vanishes, hide behind the rocks old-school style.

Razor Plumes – Razor Plumes show up and target random rocks. Kill them asap. Again try to stack in the middle as much as possible, with the exception of tank and melee. This mini-phase has the usual “Vortex” mechanic.

Initial Adds – The first time adds spawn. You should memorize what to do here, for the next time adds spawn:

  • MT picks up Suparna(Red) and Garuda.
  • OT picks up Chirada.
  • Chirada must be tanked ACROSS the map from the others. If they’re too near each other -> they gain immense defense.
  • Ranged DPS and healers should stay in a place where friction wont hit rocks.

There are things you have to note here:

  • Downburst will hit the OT for heavy damage, but shouldn’t be much of an issue.
  • On the MT side, WICKED WHEEL becomes a “one hit KO”. Make sure melee DPS and MT avoid this. Using virus on both Garuda and Suparna is a good “insurance” in case tank gets hit. All forms of damage reduction / mitigation should be used in preparation.
  • Chirada uses Downburst simultaneously with the Wicked Wheel on the other side. This always happens after Friction!

If you have enough rocks alive, Reckoning shoudn’t kill you! On to the next phase…

Garuda EX Phase 2 – Vortex

Wind surrounds the outer ring of the stage, and players should remain near the middle, or suffer a pushback + large damage.

Spiny Plume makes its first appearance here, along with a bunch of Razor Plumes. Your goals here are simple:

  • Kill all Razor Plumes
  • Leave Spiny Plume at a low HP%.

A rather simple phase, with no heavy incoming damage. A great time to use Mages Ballad, as you’ll be needing max DPS next phase.

Once Garuda disappears, destroy the Spiny Plume and seek refuge inside the safe-zone it generates. (Remember to avoid the initial death AoE of spiny plumes)

Garuda EX Phase 3 – Tornado

5 Tornados spawn in static locations on the map, forming a cross-like (T) formation. The safe spots are located near the brown markings on the map (Where the pillars used to be).

Chirada and Suparna show up during this phase. As usual, MT takes both Garuda and Suparna. Off-tank takes Chirada. And again, Suparna should be the first target. There are some things to note during this phase. The main difference in this phase is Tornadoes + Spiny Plumes.

  • The MT’s position should be loose enough that the melee dps and himself can get away from the “Double Wicked Wheels”.
  • Healers and Ranged DPS should stay at the very tip of the center tornado, to be in range of everyone.
  • Like last phase, leave Spiny Plume at a low HP%, and destroy it at phase transition.
  • There are four safe pockets – Ranged and healers should have a good spread.

Travelling between “safe-zones” through tornadoes can be done using the following:

  • Sprinting along the edges (Recommended for casters…)
  • Dragoon jumps
  • Monk Shoulder Tackle.

Remember not to kill the Spiny Plume too early, or too late!

If you pass this phase, You go back to the Vortex Phase -> Tornado Phase -> Vortex Phase, repeats until Garuda is dead!

Garuda Extreme Mode Loot List

Garuda EX drops iLevel 90 Loot:

Tank – Vortex Ring Of Fending
Healer- Vortex Ring Of Healing
Melee – Vortex Ring Of Striking
Bard – Vortex Ring Of Aiming
Caster – Vortex Ring Of Casting

Follow us on Facebook for more FFXIV updates!

FFXIV ARR Titan Hard Mode

Getting tired of Titan? Are you stuck in Titan Hard Mode? Keep your hopes up and let us guide you through one of the most fulfilling fights in FFXIV ARR.


From deep within their mines, the kobolds have watched and waited for another opportunity to summon their Great Father and wreak havoc on Limsa Lominsa. With the destruction of Ultima Weapon, the final obstacle to their plans was removed, allowing the beastmen to summon their god without fear of imperial reprisal. Once more, it falls to you to ensure that the Lord of Crags never sees the light of day.

The first LEGIT Gear check in the game, and if you have lag issues, get ready to die in this fight! We had fun learning how to play Titan and beat him. We will show you two videos below, one is our first defeat of Titan and the second is where we helped a few of our FC members get past him.

Our very first Titan HM Kill:

One important thing to note is, all non-tank players must ideally have more than 3,500 life to survive this fight (specially important in the last phase where he does 6-8 Tumults straight). Lag and slow reaction time also play a major factor in beating Titan, you must be focused, know his rotation and position yourselves carefully in order to win.

Team Compositions:

  • PUG: 2 Tanks, 2 Healers, 4 DPS (The type of party you get from duty finder)
  • 3 Healers: 1 Tank, 3 Healers, 4 DPS (Safest run, best for lesser geared groups)
  • 5 DPS: 1 Tank, 2 Healers, 5 DPS (Ideal for more experienced groups)
  • Carry: 1 Tank, 2 Healers, 3-4 DPS, 1-2 Carry (when we want to get a guild member through)

Abilities

In hard mode, Titan has some a new rotation with new abilities also

  • Landslide (Pushback): Like in Titan Story mode, watch out for this frontal pushback ability, if you get hit chances are you will fall from the stage, and the moment one party member falls its practically a wipe.
  • Tumult (AoE): Back with a vengeance, in post heart phase, Titan can dish out 6-8 Tumults in succession.
  • Weight of the Land (Plumes): Another skill from Titan Story mode, this time with a vengeance. It’s important the team positions themselves so that when he casts this they can move away to a safe position.

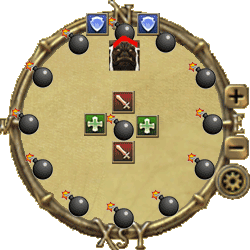
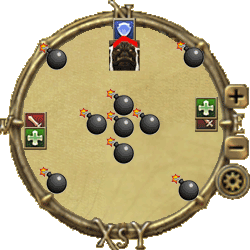
FFXIV-ARR-Titan-Hard-Mode-Bomb-1 FFXIV-ARR-Titan-Hard-Mode-Bomb-2 FFXIV-ARR-Titan-Hard-Mode-Bomb-3

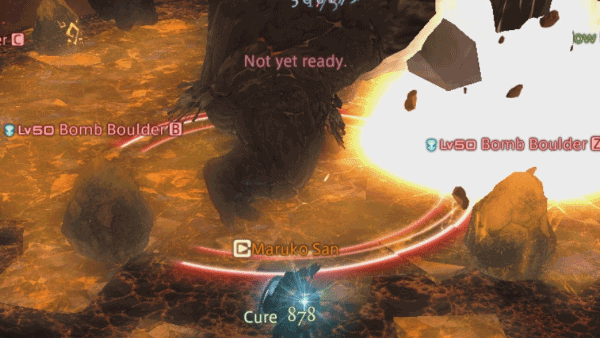
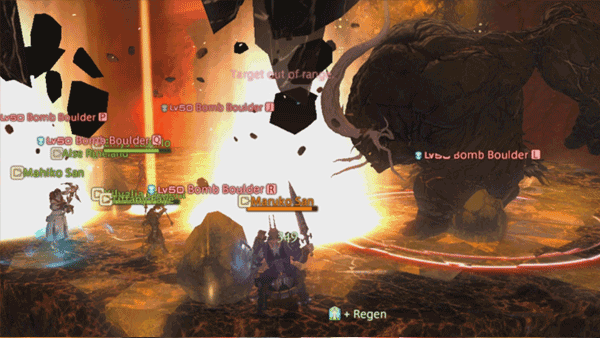
  • Bomb Boulders: A new mechanic, Titan calls down bombs that explode in a certain pattern, there are 3 types to watch out for but the rule of thumb is, the first bomb to light up is the first bomb to go
    • Type 1: Clockwise detonation, tanks will either take one bomb damage or hide between two bombs so they do not get hit (takes practice to hide believe me!)
    • Type 2: We call this the easy bombs, just find a safespot in either the N,S,W or E areas of the map
    • Type 3 (Post heart only) : This is where it gets tricky, 3 bombs get dropped parallel to each other. In this set the middle group of bombs always blow up first. So you want to stay where the last set will blow and immediately move to the middle once it blows up. (Titan usually casts Landslide right after these bombs show up, the moment he lets go of Landslide is when we move to the center)
  • Gaol: Much like the Story Mode mechanic, a random party member will get imprisoned and will be tagged with a determination down debuff (it’s important that the healers strip this debuff after the party member gets freed from the Gaol). Also, Titan sometimes casts Landslide on an imprisoned member of the team, make sure you wait till after he casts Landslide to free your team member.
  • Geocrush (Jump): Just like in Story Mode, Titan Jumps up and after each jump the stage gets smaller, key position here is to group up so that healers can cast their AoE heals before going back into position
  • Earthen Fury (Ultimate): Same mechanic in story mode, if you do not defeat his heart in enough time Earthen Fury will destroy you! This is a DPS check and you will need to your whatever limit break you have to kill the heart. We usually time this right after the last Weight of the Land in the heart phase.
  • Mountain Buster: Heavy hitting frontal cone attack (never stay near the tank in this phase or you will fall. Tanks need to time their mitigation for this skill if they are not topped up.


General Strategy for roles:

Tank: Positioning is important, mitigation should be timed. You want to position Titan as close to the edge as possible to give your party enough space behind to move around and dodge ‘Weight of the Land’. Positioning is also important during the ‘Bomb Boulder‘ phases. In our FC, it is the tanks job to memorize Titan’s rotation and call out ‘Weight of the Land‘ and ‘Mountain Buster

FFXIV-ARR-Titan-Hard-Mode-Bomb-Boulder-Type-1-Tank-Position

Healer: Healers are the key to this fight, if one falls you are in for a ride! Positioning is important for healers to make use of their AoE abilities, after each Geocrush, Healers need to pre-cast their heals so the party gets topped up and during the post heart phase the healers need to ensure they top-up the tank before ‘Mountain Buster’ and also pre-cast AoE heals before he does ‘Tumult

DPS: All the DPS need to be careful of is avoiding Landslide, Weight of the Land and getting to know positioning during the bomb phases. They must also be conscious of their position so that the healers can have a place to run to when weight of the land hits.

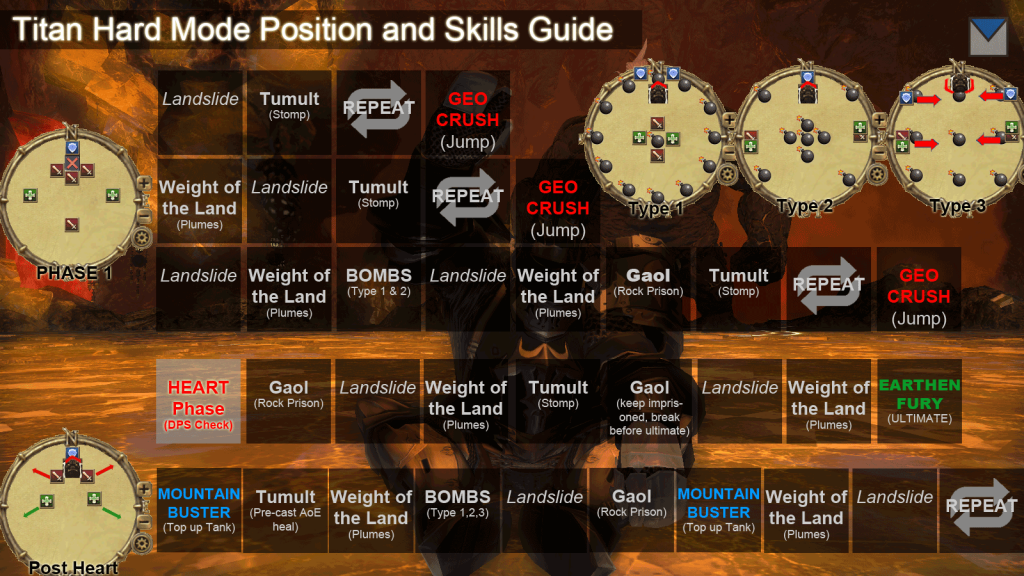
Titan Hardmode Infographic

FFXIV-ARR-Titan-Hardmode-Infographic-Visual-Guide

1st Phase (Pre-heart)

Skill rotation: Landslide, Tumult, GEOCRUSH (Jump), REPEAT > Weight of the Land, Landslide, Tumult, GEOCRUSH (Jump), REPEAT > Landslide, Weight of the Land, Bombs, Landslide, Weight of the Land, Gaol, Tumult, GEOCRUSH (Jump)

FFXIV-ARR-Titan-Hard-Mode-Pre-Heart

In the first phase we see Titan showcase some of his new abilities namely the Bomb Bomb rotations. This phase will test how well the group can dodge Landslide and Weight of the Land. You will also be able to get a feel for how much DPS your group can do. Remember to save DPS cooldowns for when he reaches the heart phase

2nd Phase (Heart) 50% life

Skill rotation: Gaol, Landslide, Weight of the Land, Tumult, Gaol, Landslide, Weight of the Land, EARTHEN FURY

One the heart pops out, pop all DPS cooldowns and make sure to free whoever is in a Gaol. Note that when he casts Gaol the second time, the party should ignore the Gaol and focus on defeating the heart. We suggest to use your limit break, whether level 1 or 2 right after he casts the last Landslide or Weight of the Land. Once the heart is defeated immediately focus your attention on the imprisoned party member, if they are not freed from the Gaol before he casts Earthen Fury, the party member will fall.

3rd Phase (Post-heart)

Skill rotation: Mountain Buster, Tumult, Weight of the Land, Bombs, Landslide, Gaol, Mountain Buster, Weight of the Land, Landslide

FFXIV-ARR-Titan-Hard-Mode-After-Heart

The scary phase here are the first 3, most specially for the healers who will need to ensure the tank is topped up just before Mountain Buster and immediately focus on healing the group in time for Tumult. Swiftcast for healers is an awesome and almost critical mitigating skill in this part of the fight.

The Bomb phase always takes first timers by surprise. The key to dodging the bombs in this phase is not to PANIC. in the Bombs Type 3, always remember that the middle bombs will explode first, simply find where the last exploding set of bombs are and stay in that area (dont be afraid to stand next to a bomb! you will need to move because he casts landslide) just remember to move to the center right after he lets go of landslide.

One more thing to note is that when he reaches about 25% life he increases the amount of Tumults he does from 6 to 8 times, this is where AoE healing and positioning is key.

Visual Notes on the Titan Hard Mode Fight

Dont Release your Party Members from the Gaol until after he casts landslide on them like so:

FFXIV-ARR-Titan-Hard-Mode-Gaol-Landslide

This is an example of Type 3 Bombs, in this case I move with the party to my left, and wait for Titan to cast landslide and then move to the middle

FFXIV-ARR-Titan-Hard-Mode-Bomb-Boulder-Type-3-Example

FFXIV-ARR-Titan-Hard-Mode-Bomb-Boulder-Type-3-Run

Sample Positioning for Weight of the Land

FFXIV-ARR-Titan-Hard-Mode-Weight-of-the-Land-Positioning

The three main reasons people die at Titan hard:

  1. Weight of the land: Your dps and healers should already look for where to run BEFORE weight of the land hits. Because of this, unnecessary movements should be avoided. If you know WHEN the next weight hits, and WHERE to run beforehand, you will dodge it 100% of the time, believe me.
  2. Type 3 Bombs: The triple line bomb formation is the reason most people die. To be honest, it’s largely because they panic. All non-tank players should simply move to the middle-bomb of the last set that spawned. Once titan punches the ground, move towards the center. Simple as that!
  3. Mountain Buster: Both the tank and the healers should be aware of when the next “table flip” occurs. Tanks can pop a cool-down, and healers can pre-cast shields and heals. Note that every random damage that happens to the raid makes it harder for healers to keep the tank up to 100%. As a DPS, you got one job: Avoid damage.

Finally, Good Luck in your fight with Titan!

FFXIV-ARR-Titan-Hard-Mode-Thanks

Follow us on Facebook for more FFXIV updates!

FFXIV ARR Ifrit Hard Mode


While your victory over the Ultima Weapon has set off waves of celebration across the land, the jubilation is short-lived, for the beast tribes are seeking to summon their gods once more. Confirmation has arrived that the Amalj’aa have already succeeded in calling forth Ifrit, who is returned far mightier than his last incarnation owing to the vast amounts of crystals he has gorged upon. Prepare yourself for a scorching encounter.

Ifrit hard mode is the first hard-mode boss you will encounter, as the entry level eight-man encounter. His fight has three phases, and a transition in between.

Interrupting Eruption is the key to winning this fight, from Phase 1 to end. Ifrit has 2 interruptible skills, Eruption and Radiant Plume. Interrupting Eruption is much more worth it. Why? It’s “harder” to dodge and predict Eruption, as compared to Radiant Plume. And in his final phase, Eruption pretty much covers 80% of the map.

Ifrit Hard Mode Phase 1

Phase 1 of Ifrit is just like Ifrit normal mode. He has the same abilities, but obviously much much stronger.

  • Incinerate – The usual frontal cone attack, but it hurts like hell to non-tank classes. Face away from your party.
  • Vulcan Blast – Massive PBAoE pushback. Healers, stay at maximum range to the tank to prevent getting hit by this. An untimely vulcan blast can mean getting into a bad situation.
  • Eruption – The same random AoE attack which blows up after a certain time.
  • Radiant Plume – A non-random AoE attack which blows up after a certain time. Either on the outer ring, or inner part.
  • Crimson Cyclone – Ifrit disappears and randomly reappears in one end of the ring. After a short period he will dash forward all the way to the other end, dealing damage too all in his path. Increases to two “clones” after a while.

P1-p2 Transition

Infernal Nail shows up again. This time, there are FOUR that spawn. Failing to kill these will result in an instant KO by Hellfire.

Using a Summoner or Black Mage Limit Break is highly advised here, and makes this transition much easier.


Ifrit Hard Mode Phase 2

  • Eruption – Increases the number of AoE’s as time progresses. Again, you must interrupt these as they are deadly and can result in situations where a player can’t escape.
  • Radiant Plume – Radiant plume gains a third pattern. The only reliable safe zones are directly behind him, and in front of Ifrit. Ranged players, don’t stay too far from Ifrit at this point. You wont make it behind him in time.
  • Crimson Cyclone – maxes out at 3 clones, and will usually kill anyone hit by 2.

Hard mode Ifrit Loot List

Ifrit drops Item Level 60 Weapons for all Classes.

Paladin – Ifrit’s Blade. Marauder – Ifrit’s Battleaxe
White Mage – Ifrit’s  Cane. Scholar – Ifrit’s Codex.
Monk – Ifrit’s Claws. Dragoon – Ifrit’s Harpoon.
Black Mage – Ifrit’s Cudgel. Summoner – Ifrit’s Grimoire.
Bard – Ifrit’s Bow.

Summary & Tips

He has all the same skills, only gaining Crimson Cyclone. 3 Clones max. Staying in between 2 of the clones is actually a safe zone.

Again, interrupting Eruption is the key to winning this fight. Make sure you have one or two guys (preferably Paladin) to interrupt it. However, make sure it’s a coordinated effort because doing stuns unnecessarily will result in him RESISTING the stun. DPS and Healers, have faith in the cancelling of Eruption. If you’re running with a good group, don’t move out of it. More movement = longer fight. But to be safe you can make a run for it each time Eruption lands at your feet.

Ranged / Healers – Do not stay too close to edge of the ring. An outer Radiant Plume will likely tag you, even if you run ASAP. Stay a good 25% away from the edge, as you can minimize movement to dodge either a inner or outer Radiant Plume.

Follow us on Facebook for more FFXIV updates!