What’s a good conjurer stats build? What are useful white mage stats? Conjurer/White Mage materia? If any of these questions brought you here, you came to the right place. Whether its by stat allocation, gear or materia, knowing what stats your Conjurer or White mage need should never be far from mind!
Conjurer (CNJ) & White Mage (WHM) Stats
What are the conjurer or white mage stat weights?
MND > PIE > Determination > Spell Speed > Critical Chance > VIT
*These may vary slightly from patch to patch, or by personal preference. Following the recommendation above will always give you a good CNJ & WHM build.
Conjurer (CNJ) & White Mage (WHM) Primary Stats Allocation
What stats should I add as a conjurer or white mage?
MND > PIE> VIT
Since this is where people may mess up the most, I’ll explain it in word for word. When you allocate stats, put as much points into MND (Mind) as you can. If you cannot put any more points into MND, place points into PIE (Piety). If you cannot put any more points into MND and/or PIE, invest in VIT(Vitality).
Mind – Increases healing power. An obvious choice for Conjurers. This is by far your most important stat, hands down. You will ideally want to obtain as much of it as possible, wether it be through Stat Allocations, Gear or Materia.
Piety – Increases Mana (MP) Pool. Another no-brainer. More mana equals more healing.
Vitality – While you may never find the need to allocate or slot materia for a third primary stat, Vitality is a suitable choice. Why? Taking a hit or two before going down is never bad. The more durable you are, the more you can focus on healing others, and the less desperate you need to be when things go out of hand.
Conjurer (CNJ) & White Mage (WHM) Secondary Stats
What are good secondary stats for conjurer and white mage, and why?
While you can’t allocate this directly, these will be heavily considered when picking gear upgrades and slotting materia.
Determination – Affects Healing and Damage Dealt. More healing. Need I say any more? This stat acts more consistently than Crit, and is much better for CNJ/WHM.
Spell Speed – This stat is a bit controversial, most CNJ’s and WHM’s debate whether this is better than critical chance, due to its low returns. I personally like this better than crit.
Critical Chance – A random crit wont do you much help, as it will probably “Overheal” your target. While a lucky crit can get you out of a bind, I’m much more in favor of consistency.
Note from Mahiko: These stats will forever be debated for CNJ / WHM, as long as FFXIV remains online. Mark my words. My personal preference leans towards Spell Speed over Determination. Remember that any mix of these stats is good, so don’t stress out about it and focus on being a better healer (Playerskill), having better teamwork and communication.
Conjurer (CNJ) & White Mage (WHM) Materia
This is directly related to the first section. As you may know, all gear has a limit for each stat it can have, the higher its Item Level, the higher amount of stats it can hold. So the idea is to max out (or get close to maxing out) the left most, and work your way right. Again:
MND > PIE > Determination > Spell Speed > Critical Chance > VIT
Materia Name MND: Mind PIE: Piety Determination: Savage Might Spell Speed: Quicktongue Critical Chance: Savage Aim VIT: Vitality
Jumping into the world of FFXIV A Realm Reborn? New to the game, and need that extra hand to give you a headstart? You’ve come to the right place! The goal of this guide is to give you a birds eye view of what will help you get settled into FFXIV, providing you links to detailed information along the way! This guide may be long, but worth it!
Step 1: Pre-order / Buy the game
Can’t play a game without buying the game! You will need the base game, and at some point I imagine you would want to pick up Heavensward as well.
Three choices in character creation: Class – Race – God.
Classes – who, what why?
The decision of your starting class will affect you in the early game only. Since in FFXIV you can eventually max out ALL CLASSES AND JOBS with one character. Check a brief description of the ffxiv classes here. We’ll also put each class guide here, for your reference.
Again you’re not locked into your class forever. It simply determines your starting city: Archer, Lancer, Conjurer: Gridania. Thaumaturge, Gladiator, Pugilist: Ul’dah. Arcanist, Marauder: Limsa Lominsa.
Race – does it matter?
Our Racial Stats Guide will tell you EVERYTHING you need to know about classes. Here are the main things you must take into consideration
The difference between the best and worst race for your class is negligible. (But this wont stop min/maxers)
Every race has a sub-race for Physical stats, and one for Magical stats. Choose appropriately.
Aesthetics is the main reason to choose between races.
God – does it matter?
The final step is Choosing Your God. TL;DR God choice is pretty much irrelevant right now.
Server Choices – does it matter? Actually yes.
SERVER CHOICE is also very important. Testing your lag to various server groups should be one of your main concerns. If you have a JP server as your lowest ping, but are afraid of not having any English people to talk to, dont be afraid! Tonberry server is the “unofficial” non-legacy server for people like us. Masamune is the Legacy counterpart.
Alternatively, if you’re part of the Asian/Oceanic region and want to play on NA, Behemoth is the “unofficial” server for this. (Please comment if we are wrong)
Get to level 10! If this is your first character, you must… and I mean MUST: FOLLOW YOUR STORY QUEST. Around level 10 you unlock your first new features, Levequests, Guildhests and the ability to Change Classes. FFXIV actually has a lot of unlockable content as you level up. Luckily we have come up with an ‘Unlockable content guide & checklist’ so you won’t miss out. For now do Guildhests! Queue up for them now and gain some quick & massive EXP.
What to do when you are Level 15? Reaching level 15 story quest also unlocks the airship pass – now is the perfect time to pickup your crafting& gatheringclasses, as you will be forced to visit the other cities anyway! Keep in mind there is no downside to unlocking ALL CLASSES at this or any point. (Except maybe main hand inventory space). You also unlock Duty Roulette, a key tool in leveling up quickly.
During this quest to travel around the main cities, make sure you unlock your Challenge Log while in Limsa!!! Make sure you check out a list of the unlocks. From here on I will only be mentioning the extremely important ones.
Leatherworker needs a little from all classes, and monster drops.
ALL CLASSES NEED SOMETHING FROM EVERY OTHER CLASS anyway. These are just the “main” ones.
Don’t worry – you’ll eventually want 50 in all classes, so it’s more of a “What do I get first” than something you lock-in to forever.
Very soon after, you’re going to be doing the newbie dungeon trio. Sastasha, Tam-Tara Deepcroft and the last ‘tutorial dungeon’, Copperbell Mines. Don’t act like a newb fighting the Copperbell Ooze. Since you’re around Copperbell, Unlock the armor Dye system. For characters who didn’t start in Ul’dah, this is a good time to get it. Don’t worry though, you’ll be visiting Vesper Bay A LOT.
Key unlock reminders
Materia – Level 19 (story quest): You’ll have a quest “Life, Materia and Everything”. This would be the best time to unlock the Materia System. Keep an eye out for the quest Forging the spirit. For melding materia you need to Level up a DoH, and it’s unlocked in the same camp.
Chocobo Mount – Level 20: (See: our Chocobo Guide) Getting your first mount isn’t a main story quest actually. But it’s arguably the most worth-it sidequest ever. Increasing your travel speed does wonders for leveling speed, and sanity. The starting quest is My Little Chocobo, found in your GC base. Speaking of GC’s…
Which Grand Company do I choose??
Ah, the good old question. Basically there isn’t much difference between each GC game wise. They dont currently offer anything game-breaking end-game wise, so it’s purely aesthetic. The clincher? It determines which city you’ll personally be visiting a lot. So it’s in your best interest to choose the city you like best. Are all cities equal? In my opinion, No.
Limsa (Maelstrom): Marketboard is next to Aetheryte. GC Base requires an extra load screen.
Gridania (Twin Adders): Marketboard requires an extra load screen. GC Base is next to Aetheryte.
Ul’dah (Immortal Flames): Marketboard requires an extra load screen. GC Base is next to Aetheryte.
In this point of view, Gridania and Ul’dah are similar, and Limsa is the outlier. It’s not a huge difference, since people usually hang out in their FC houses anyway.
Key unlock reminders
Chocobo Battle Companion : (See: our Chocobo Guide): At level 30 you can unlock your fighting chocobo via the quest My Feisty Little Chocobo. Very useful little guy to have. Just a reminder, you can mount your battle chocobo by right-clicking it.
Level 30: Advanced Job (soulstone quest)
Do NOT delay getting your ‘soulstone’ any more than you need to. Check the Job Requirements Guide. Becoming an advanced job requires a few things:
Level 30 in the primary base class (Finishing all class quests).
Level 15 in the secondary base class.
Sufficiently progressed in story line.
(Heavensward classes act differently – to be updated)
From here you should be able to handle yourself. Make use of our guides! Check the main menu above, or use the search functionality in the upper right. Don’t be afraid to ask us questions either (Twitter is best for this)!
Good luck starting out, and making progress! Make sure to Like us on Facebook, Follow us Twitter, and subscribe to our YouTube – all great channels to geat awesome FFXIV updates! [Back to Top]
Our very first issue of “The Week That Was”! Every Sunday (a little late for this one) we will be posting what happened around FFXIVGuild & FFXIVARR news in general! Check it out!
We posted our first class comparison guide! Be sure to check it o ut if you haven’t! You can contribute to the guide, if you feel like you have something to say! Comment on the article, or discuss it on the specific PLD vs WAR Forum thread.
We fixed up our Mining Guide & FAQ, and Botany Guide & FAQ. Currently, we need some help with these two guides. We have no clue what else people need to know about mining & botany. Help us out by letting us know!
Why join our linkshells? Levelling up in groups is quicker and easier! Find friends so you don’t need to look around for quality party members! Registering is quick and easy: Don’t give yourself a hard time! Register for the site, and gain access to site commenting, and forums with one username!
Polishing Content Basically, we’re all preparing to rip into open beta (Who isn’t?). We do have a bunch of updates lined up (Who woulda thought?). Were preparing for the huge updates due to all the changes that have to be made! Due to the tight time-frame we all have, alot of the guides have lacking images and general refinement. Be sure that once this open-beta and early access frenzy dies down, we will be polishing alot of our content!
Cross-class Skills Once we really know what the requirements are for each job, we can really sink out teeth into cross-class skills guides. Also, Stat allocation & Materia Guides for all classes should be up very soon – in time for Open Beta! We don’t want people borking their characters!
Like always, if you have something to write about please let us know, message us through any means, comment or post on [Content Suggestions Forum]. Be sure to like us on Facebook or follow us on Twitter so you wont miss out!
Warrior Or Paladins? Is one truly better than the other? In this battle of the fat, we try to determine just that. PLD VS WAR comparison!
Inevitably, it’s come to this. “Who is better”, Warriors (Marauders) or Paladins (Gladiators)? Here, we will try our best to give you the ins and outs of each class. Note that we will be discussing level 50 PLD and WAR capabilities, and this somehow extends to lower-level Gladiator and Marauder comparisons.
This is also our very first ‘community driven’ guide – we will be discussing key points in the forums, ultimately leading to the content to this page. Participate and be commended! PLD vs. WAR Forum thread
Warrior The main advantage of a warrior is it’s immense maximum HP. Does a lot of damage, and indirectly increases defenses by doing so. Marauders and Warriors are extremely combo sensitive, and are definitely more difficult to play. This further extends by adding the “Defiance” / “Infuriated” warrior system. Compared to Paladins, these guys pack a huge punch. Parrying serves as a welcome additional defense (Although Paladins have this too), they cannot block.
Paladin Damage reduction / mitigation is the paladins key trait. Wears a shield by default (Blocks!). Paladins have a reactive gamplay style, and are much easier to play ‘mechanically’ than warriors. Paladins are susceptible to burst damage with a low HP pool, but over the course of longer encounters – their mitigation more than makes up for it. Their “Effective HP” is much much higher than a Marauder. Their damage is so pathetic, and could possibly be out DPS’d by a Conjurer.
So here we see the main difference, Warriors rely on HP and Damage. Paladins rely on Damage Reduction. This becomes brutally clear in the next section:
Defensive Skills
Warrior — MRD — Foresight – Increases defense by 20% for 20s. Recast 90 (Traited) Bloodbath – Gain 25% “Lifesteal” for 30s (Traited). Recast 90. Mercy Stroke – Killing a target with mercy stroke restores 20% of max HP. Recast 30 (Traited) Thrill of Battle – Increases max HP by 20% (Traited) and heals for that amount. Duration 10s. Storms Path – (If Combo’d into) Creates a shield equal to 20% of damage dealt up to 10% of max HP. —WAR— Defiance – (Stance) Increases maximum HP by 25%, while lowering damage dealt by 30% and increasing enmity.
Paladin — GLD — Rampart – Reduces damage taken by 20% (Traited) for 20s. Convalescence – Increases HP restored by spells or actions by 30% (Traited) for 20s. Awareness – Reduces critical strike damage taken by 15% for 25 (Traited) seconds. Tempered Will – Immediately cures Bind and Heavy, while preventing knockback and draw-in effects. Sentinel – Reduces damage taken by 40% (Traited) for 10s. Bulwark – Increases block rate by 60% for 15s. — PLD — Shield Oath – (Stance) Reduces damage taken by 25%, and damage dealt by 30% but increases enmity generated. Hallowed Ground – Renders you impervious to most attacks
Wow, from here it becomes rather obvious that warriors have the short end of the stick when it comes to purely defensive skills. Foresight is directly inferior to Rampart (Which also reduces magic damage) and Sentinel (40%!). Thrill of Battle is ‘cute’ at best, amounting to a large heal. Storms Path is the warrior saving grace here, giving you a reusable shield without a long cooldown.
Paladins on the other hand have a long list of defensive skills, all ridiculously effective. Just by comparing the stances, the trade-off for 30% reduction for damage dealt is just completely lopsided in the paladins favor: 25% damage reduction for the paladin, and 35% max hp for the warrior. While 35% HP is better in a vacuum, when healers are involved, this becomes next to useless (Remember Effective HP?)
Warriors scale extremely well with offense, and even benefit from it defensively. While this is good, the survivability gained is just nowhere NEAR the Paladin. Not even close.
Threat Generation
Both Paladins & Warrior have no trouble generating threat. It’s the small differences and situations that make the Warrior superior to Paladin in terms of threat. It’s very unlikely that DPS will pull aggro during a fight from either a Paladin or Warrior, so what’s the difference? Two key points.
Threat on Demand The main difference? Warriors are better in more desperate times. When sh*t hits the fan – you’re going to want a warrior. When resources are tight, and adds spawn, Warriors are much much better at picking them up and making them stick. Paladins have superior resource management and will match a warriors threat over time. Warriors excels at keeping up with initial burst aggro when picking up and killing newly spawned adds.
Adds, AoE In both single target and AoE situations, Warriors will out-threat Paladins any day. Paladins also have decent AoE threat, but simply pale in comparison to what Warriors can do to multiple enemies, and struggle alot less to build up initial aggro. It’s like Warriors WANT adds to spawn, and lots of them, while Paladins would rather not!
Due to the length of this post, we split it into two pages. In Page 2, we discuss Healer Preference, Overall Kit, and finally Summary and Recommendations.
To add a gathering class to your your list of classes, you must first pass level 10 in your story quest. After that, speaking to the Guild Receptionist will direct you to the respective Guild leader. Then that’s it! Equipping the main hand arms of the class will switch you to the corresponding class (Botanist: Hatchet, Miner: Pickaxe, Fishing: Fishing Rod)
The Botanists Guild is in Gridania The Miners Guild is in Ul’dah The Fishing Guild is in Limsa Lominsa [City & Guild Locations]
Note that this is a very general breakdown. Each gathering class contributes to every crafting class in a small way – the above just represents the more commonly used items. In the end, we would recommend being a high level gatherer for all classes so you have the freedom to get whatever you need.
Gathering Skills & Traits
Mining and Botany have almost the exact same skills & traits, with a different name and icon. They only very slightly differ in three skills.
From what we’ve heard about Fishing, the system will be different. We can assume the skills and traits will be a bit different too.
How do I gather?
The first step to gather is to make sure your ‘triangulate’ (Botany) or ‘Prospect’ (Mining) skill is toggled on. These skills are learned at level 1, and allow you to see gathering nodes on the minimap. Note that at level 2, you get the trait “Auto-triangulate” or “Auto-prospect” which automatically toggles this on when you change to a gathering class. Below is a sample of what nodes look like on the minimap.
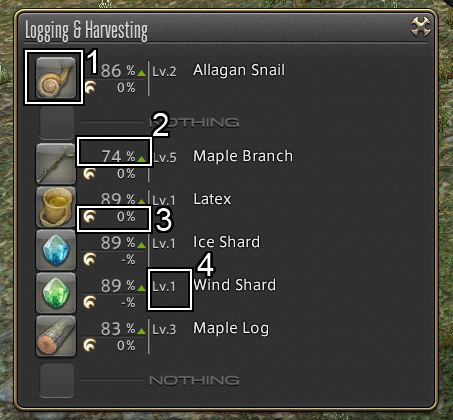
Approaching a node will give you information on what kind of node it is. example “Level 5 Mature Tree”. Note that not all of the same nodes are equal, different areas with different “level 5 Mature Trees” will have different gatherable materials within. Interacting with the node will bring up the gathering window, pictured below. You do not have to rush to gather nodes in fear of other people getting there first, each person has their own nodes.
1. Item preview:Here is the item preview of what you’re trying to gather, along with its name on the far right. You can highlight the picture to see the tooltip.
2. Gathering Chance:The chance you will successfully gather a no quality version of the material. This is increased by level and the Gatheringstat.
3. High-Quality Chance:The chance that you will succesfully gather a high quality version of the material. This is increased by level and the Perceptionstat. Note that there is never a minimum 1% chance, if your perception is lower than the item levels minimum perception needed, as pictured above, you will have zero chance to gather a high quality material.
4. Item Level:An materials level is an indicator of its difficulty to gather (both no or high quality). Naturally, the higher it is – the more difficult.
Each node naturally has a lifespan of 6 strikes. Meaning you can attempt to gather 6 times from any given node, whether you choose to gather 6 different items, or 6 of the same item – it doesn’t matter.
Finding New Nodes
New nodes are made available for you to see for each five levels. Note that there is no way around this. Even if you have godly gear or whatever, you simply cannot see nodes above your gathering level.
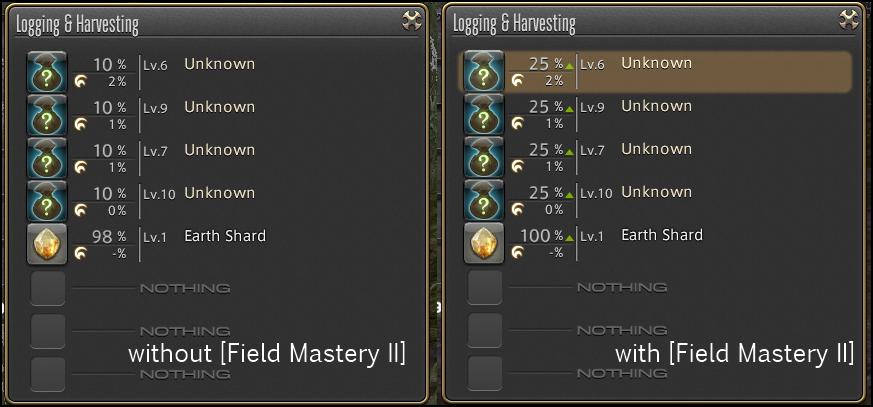
When first gathering a new node, you will see that the various materials are still “Unknown”. This is annoying because unknown materials have a base gather chance of 10%. So on average, you’re going to need 2 nodes to successfully discover 1 Unknown Material. Luckily you can increase this chance. The botanist skill [Field Mastery] and mining skill [Sharp Vision] increases the chance to successfully gather items. They also affect unknown materials!
Once you’ve successfully gathered an unknown item, you do not have to go through this process again. So expect to go through each time you find a new cluster of nodes. Since new nodes are available every 5 levels, you might as well go to your guildmaster (They offer a new quest every 5 levels) to get a clue as to where they are, and free gear upgrades!
Another way to increase your chances at gathering unknown (and known) materials are discussed below –
Tree Whisperer / Stone Whisperer
Starting level 11 you will obtain the Tree Whisperer and Stone Whisperer trait (Botanist and Miner respectively). Some nodes have special requirements that, if met, give you a bonus to gathering or perception. Note that not all nodes have this. It’s pretty random, but it’s a nice boost when it comes around. Make sure to make the most out of it!
n the example below, we see this certain Lv.15 Lush Vegetation has this special requirement triggered. It’s pretty self explanatory – If you have a Gathering Stat of 77 or higher -> You get a 10% bonus to gathering success rate! Note that this differs between types of nodes.
Preparation: Gathering HQ Items
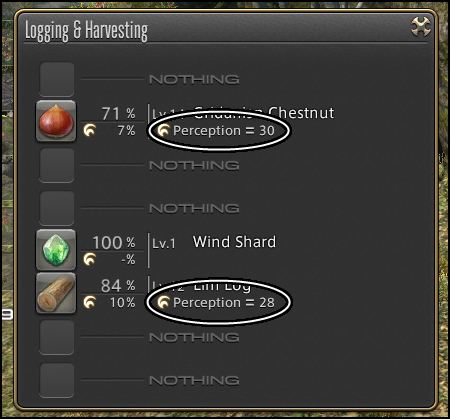
Starting level 12, you can passively see how much minimum perception you need to gather a high quality item. This is made possible by the passive skill [Preparation]. In the example below, you can now see how much minimum perception you need to gather an HQ item. In the case of Gridanian Chestnut, you need 30 perception for a 1% chance.
Gathering Stats & Gear
GP: Increases GP, which is used to cast gathering skills. Gathering: Increases chance to gather an item successfully. Perception: Increases chance to gather a high quality item.
These are mostly gained through better fieldcraft gear. More info on gathering gear coming soon!
Summary
Mining & Botany are the main gathering classes, and you should try to max one of them (Whichever suits your crafting needs more)
New nodes are made accessible every 5 levels, and new quests are handed out by your guildmaster every 5 levels.
For now, I guess that’s all we can write about in a general sense. Please subscribe so you’ll be the first to know about anything new we pick up! We are cooking up a HQ item gathering guide, class specific guides, gear guides and more!
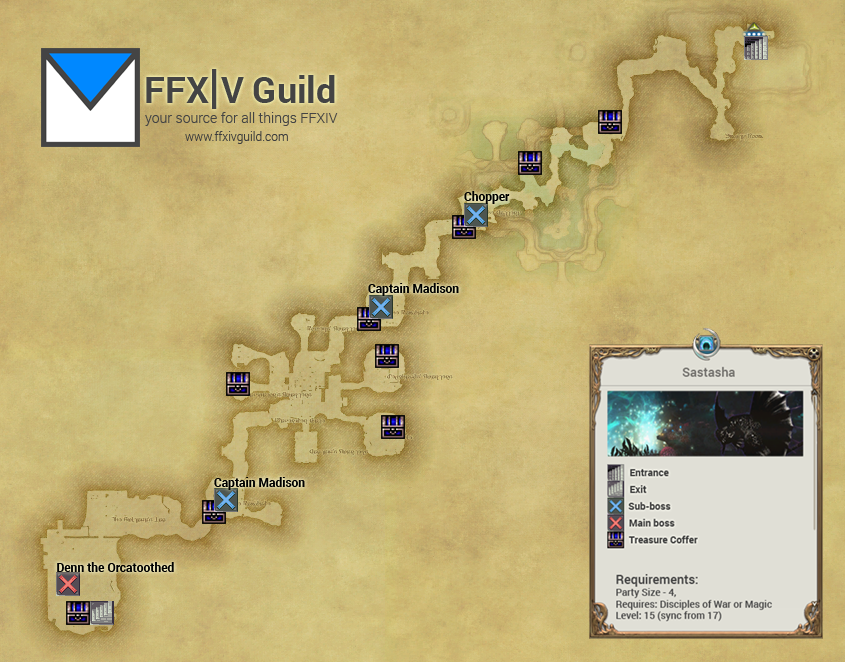
After a period of relative silence following the Calamity, the Serpent Reavers have once again taken to terrorizing the inland hamlets of La Noscea, killing the men, kidnapping the women and children, plundering the storehouses, and burning what little they leave behind. For years, it was not known how the pirates were able to raid areas so far from the coast, until a local shepherd sighted a band of painted ruffians entering the Sastasha Seagrot, carrying large quantities of sacks and crates. Could it be that there is more to this cave than meets the eye?
Requirements
Party Size: Four
Either a disciple of war or magic
Level: 15 (sync from 17)
Must be on Level 15 story quest ‘Must be pirates‘
Time Limit: 90mins
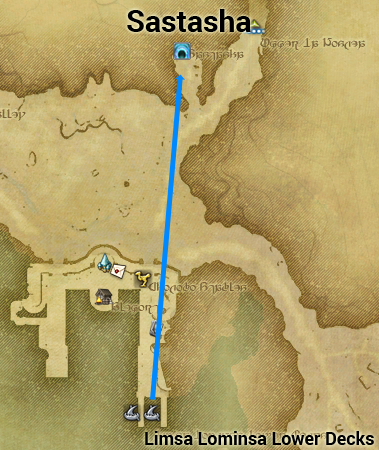
Where is Sastasha?
The Sastasha dungeon is located in Western La Noscea.
From Limsa Lominia Lower Decks go to Western La Noscea (Aleport) and follow the map below, don’t forget to attune with the Aetheryte on the way to Sastasha.
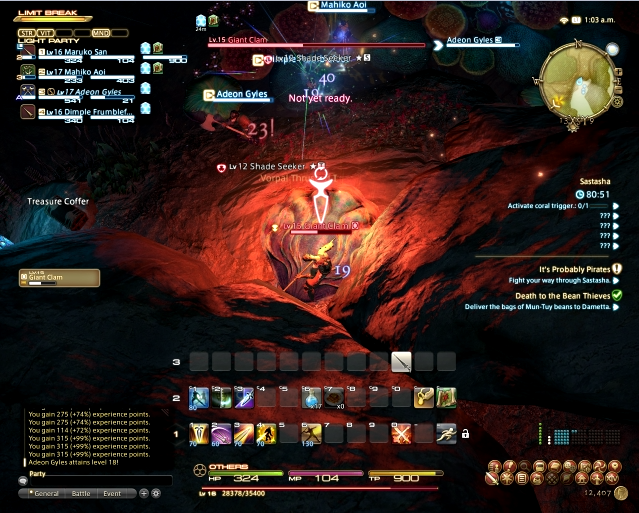
Giant Clams: In the first parts of Sastasha, you will fight ‘Giant Clams‘ who are closely guarded by ‘Shade Seekers‘. The clams will keep on spawning seekers until you kill them. Make sure to have your DPS kill the clams and note that Clams cannot be damaged unless their shell is open.
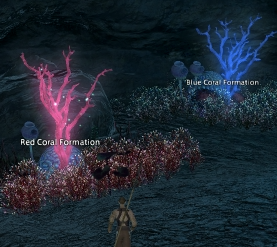
The Cattery: You will enter an area with 3 coral switches, get a hint from the message to determine which color switch to activate. Activating the wrong color will poison you.
Pirate Mobs: Beware of pirate mobs that heal each other, it’s best to engage these mobs one group at a time.
Locked doors: As you explore Sastasha you will notice some locked doors, the keys may be found nearby, sometimes after defeating the nearest guard.
Sastasha Boss Strategy
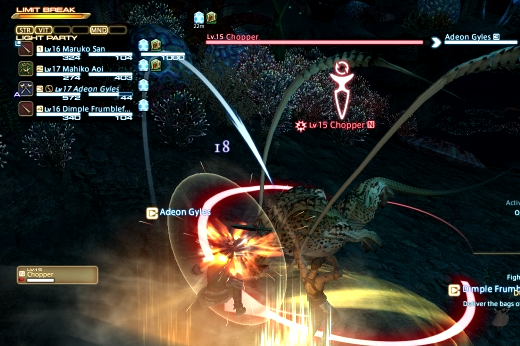
Chopper
This is a fairly simple fight, no strategy needed
Captain Madison
You will encounter Captain Madison twice throughout Sastasha
On your first encounter, he will be accompanied by two ‘Shallowtail Reaver’s’, defeat the reavers before focusing on Captain Madison
On the second encounter, he will again be with reavers and when he reaches about 25% health he will unleash ‘Scurby Dogs’, make sure you defeat the reavers and the dogs before focusing on the Captain
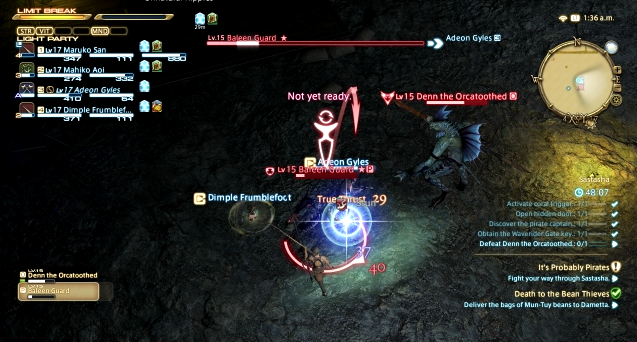
Denn the Orcatoothed
There are four ‘Unnatural Ripples‘ surrounding Denn
Interacting will deactivate them, otherwise ‘Baleen Guards‘ will spawn
Everything you need to know about crafting in FFXIV! From becoming one, to leveling up to 50, you’ll find the info you need right here.
So you wanna be a crafter in a realm reborn ey? Well you came to the right place! Everything you need to know about crafting is found right here!
How do I become a crafter?
Once you pass your level 10 story quest, you can gain different jobs and classes. Crafting classes are no exception. Basically, just like choosing any class for the first time, any Disciple of Hand class you pick up starts at level 1, and you begin the cycle of leveling up yet again. Luckily, crafting is fun (for us at least) and we found out some great tips to make leveling as quick and easy as possible.
Also, just like any combat class, you can switch into any Disciple of Hand class by changing your mainhand weapon.
Talking to the guild receptionist in any guild should point you to the guildmaster. Who gives you a small task (Quest) to begin your career as a crafter!
Crafting: The basics
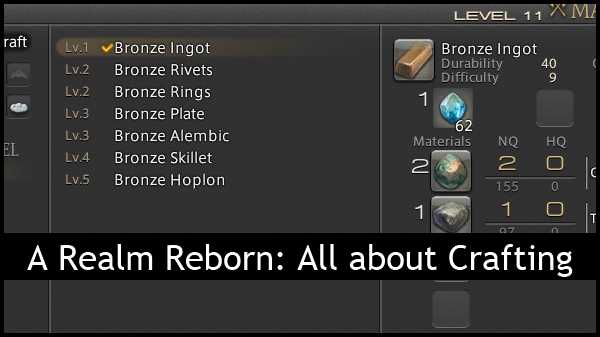
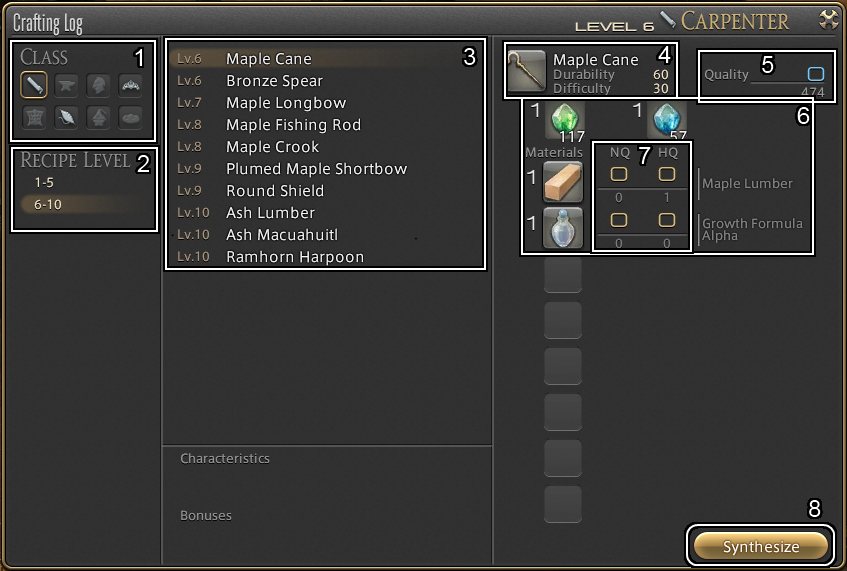
You can access your item recipes through your crafting log. As pictured below.
Your crafting log acts a lot like your hunting log, which is different for each Disciple of Hand class you have. Similarly, completing an entry in your crafting log grants bonus EXP. More on this later.
Once you select an item you want to craft and press “Synthesize”, you will be brought to what we like to call the crafting mini-game interface. But first, here’s a small explanation of the different things found in the crafting UI.
Crafting UI Explanation
The crafting Log
1. Class Selector You can easily choose which crafting class you wish to use/level with this little selector.
2. Level Selector “Recipe Level” shows you the recipes you have, sorted by levels, depending on what crafting class you selected above.
3. Recipe List Clicking on the level selector now populates this field with the different recipes you have of the selected level.
4. Item Stats This shows you a preview of how much durability the item starts with. Durability determines how many steps you can take “working” the item before you fail or succeed. Also you can see the items base “difficulty” to craft.
5. Base Quality Indicator By selecting High quality base materials, you can increase the amount of quality the item has even BEFORE you begin crafting. This makes high quality base materials very valuable.
6. Materials Required Here you can see the various materials you need to begin crafting. Pretty self-explanatory.
7. No Quality / High Quality Material Selector These little boxes give you the choice whether you wish to use a No Quality or High Quality base material.
8. Synthesize Button Clicking on this begins the actual crafting process. Pictured below.
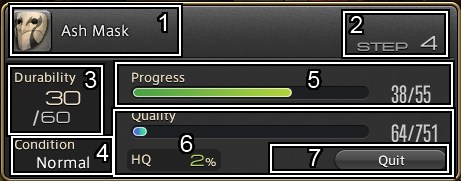
Crafting UI
1. Item preview Shows you what item you’re crafting.
2. Current Step Shows you how many times you have ‘worked’ this craft.
3. Durability Shows current / max amount of durability. Durability goes down by 10 (normally) for every time you work the item. When it reaches zero, and the progress bar isn’t full – you fail the craft.
4. Material Condition Material condition indicates how ‘responsive’ the current step is when trying to add quality. Normal grants no bonus, Perfect gives a huge bonus to quality if successful, and Poor material states should be avoided by waiting, or by adding synthesis.
5. Progress Bar Shows you the current ‘completion’ level of the item you’re trying to craft. Adding to this bar is based on your Craftsmanship stat.
6. Quality Bar Indicated how much ‘quality’ the item has. Note that there is no middle-ground. Either the item comes out as normal or high quality. You do not need 100% to get a HQ item. The higher the bar goes, the better chance you have in obtaining a HQ item (see the box above which says “HQ 2%”). You can increase this before you even start crafting by adding HQ base materials. Adding to this bar is based on your Control stat.
7. Quit Cancels your current crafting attempt.
Crafting Actions
Disciple of Hand classes currently do not have traits, but they do have skills. Many skills are shared among all Crafting / Disciple of Hand. Below are a table of skills shared between all crafting classes.
Each class currently offer three unique crafting skills, all learned at level 15, 25 and 43. Descriptions and discussions of these skills are found on their respective pages.
Check on your guildmaster every 5 levels
Just like combat classes, crafting classes also have class-specific quests. They seem to come every 5 levels as far as we could gather. Doing these give you a free equipment upgrade, as well as some important skills to be unlocked for your class. Usually, they also “send you on the right direction” if you feel lost about what to craft, or what kind of materials you need.
Crafting gear!?
Yes, you need gear to craft too. Crafting level isn’t the only thing to consider when trying to craft higher level stuff. Crafting gear plays a big part in increasing your crafting stats. The different crafting classes each have a unique Main and Off-hand weapon (Tools). For example, equipping a Saw makes you a carpenter, and it’s unique offhand tool is a Claw Hammer.
Obtaining the much sought after high-quality items will be nearly impossible without a great set of crafting gear. We will be making a guide on that too, soon enough!
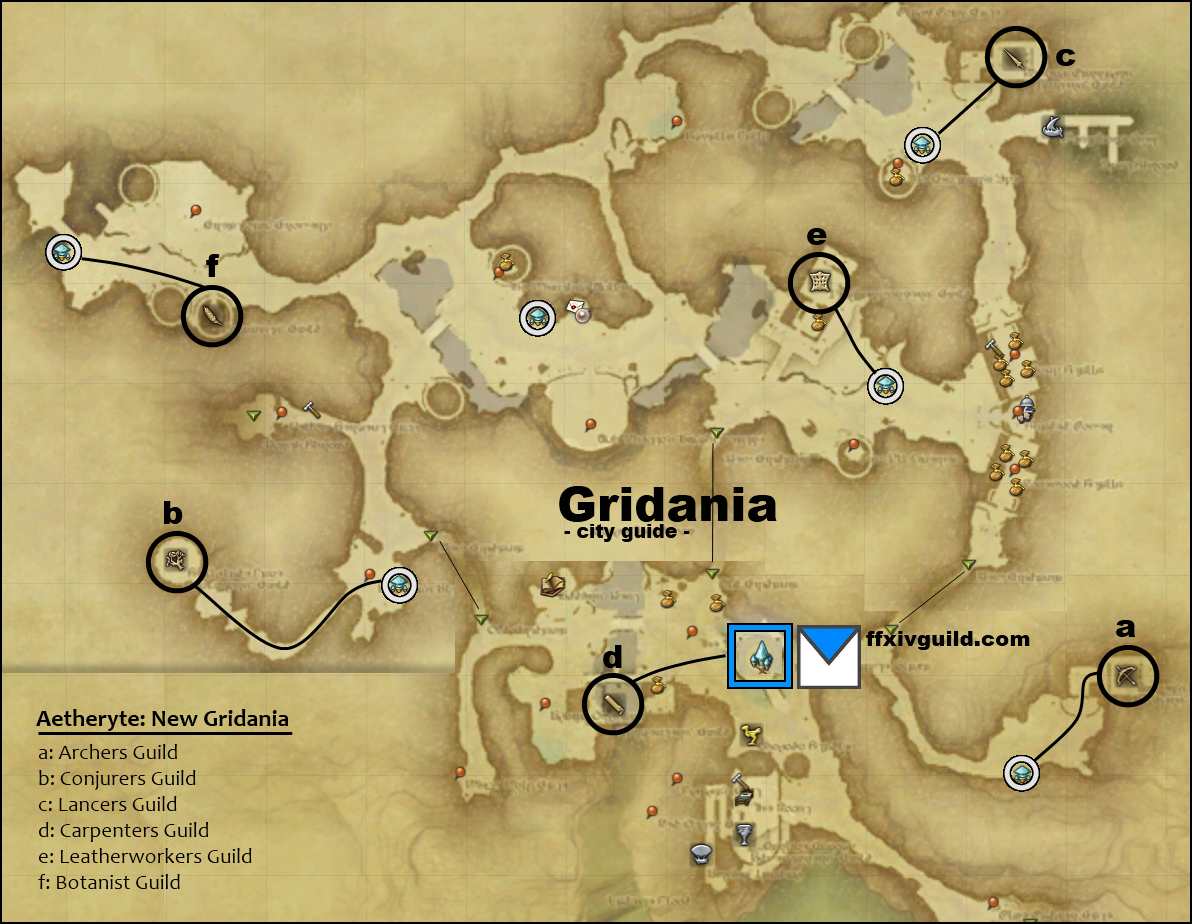
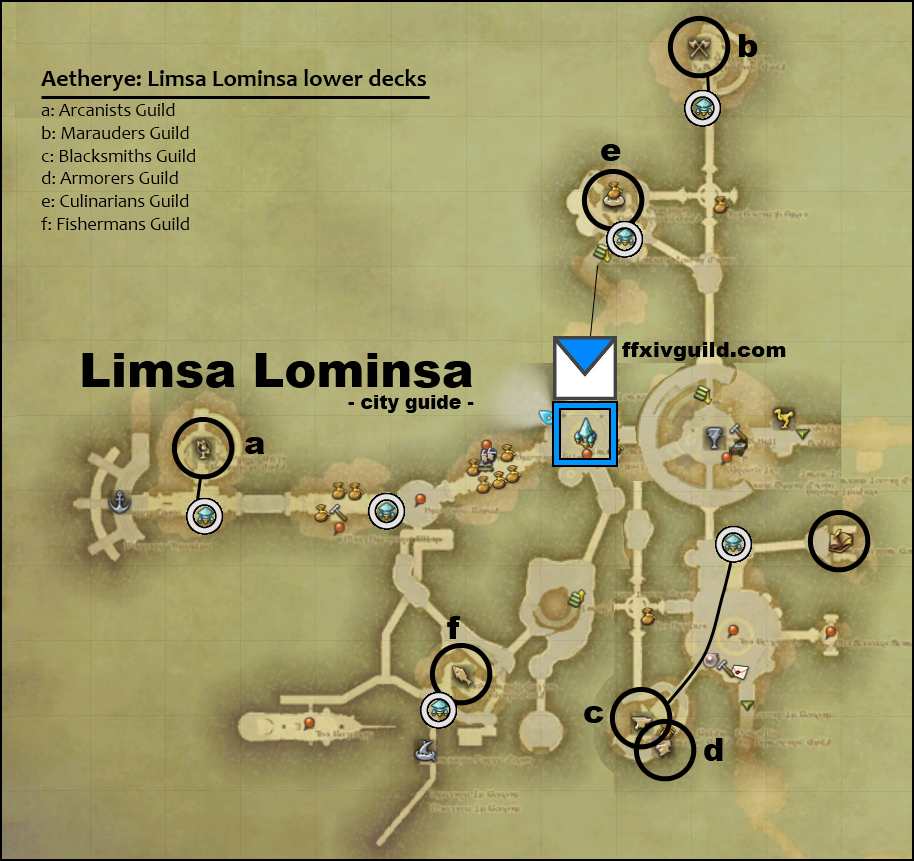
Don’t waste time figuring out what is where, and how to get there! Maximize your time on Eorzea with these FFXIV maps!
Make your life navigating Eorzea easier with these simple maps!
If you’re planning on cross-classing, getting proper crafting classes, or getting all the gathering jobs (recommended!), check in here so you won’t waste time! So far, only Limsa Lominsa has a confusing Aethernet. The others are pretty self-explanatory (but boring, heh). Also, simple cross city travel guide will be provided, if needed.
We will be updating this regularly! Hopefully soon we can have an interactive map for the more common destinations! Subscribe so you won’t miss out! clicking on a map brings you a mini-gallery of the three. Enjoy!