FFXIV Ultima Weapon : The Minstrels Ballad

Ultima Weapon (“Hard/Extreme” Mode) Strategy Guide and Loot List

Ultima Weapon Teaser Video

*Still the teaser vid -> will be updating soon.
*Guide still under refinement

Ultima Weapon has a bajillion abilites, and a very entertaining fight!

Ultima Weapon Phase 1 – Primal Phase

Garuda / Titan Phase

Two main abilities happen here:

  • Garuda appears on the screen then releases a HUGE AoE cone in the direction she’s facing. Don’t linger on the edges, or you might not make it to safety.
  • A Vortex appears in the middle, once it vanishes, move towards the edge of the stage in preparation for Titans “Geocrush”

Due to the nature of these abilities, it’s best not to stay too near the edges of the stage.

Ifrit / Titan Phase

  • In/Out Plumes – The usual outer ring / inner cluster plume formation. Keep the same positioning mentality as the Garuda phase.
  • Plumes + Crimson Cyclone – This is a pretty fun one. Radiant Plumes happens while a single Ifrit does his “Line Rush” skill.


Ultima Weapon Phase 2 – “Machines!”

Magitek Ray – Much like piercing laser from ADS. A thick randomly targetted line AoE.

Magitek Bit – Little adds that point and shoot lasers at random targets. The first pattern they spawn in is a circular group of.

Freefire – AKA Airship bombs. The glowing cross-air on the floor represents its epicenter, and the further you are from it, the less damage you take.

Ultima Weapon Loot List

Ultima Weapon drops Item Level 80 Chokers and Bracelets.

Chokers

Tank – Ultima Choker of Fending
Healer – Ultima Choker of Healing
Bard – Ultima Choker of Aiming
Caster – Ultima Choker of Casting
Melee – Ultima Choker of Striking

Rings

Tank – Ultima Band of Fending
Healer – Ultima Band of Healing
Bard – Ultima Band of Aiming
Caster – Ultima Band of Casting
Melee – Ultima Band of Striking

Don’t get caught in a laser!

Follow us on Facebook for more FFXIV updates!

FFXIV ARR – Good King Moggle Mog

All we know about Good King Moggle Mog in the upcoming 2.1 Patch!

Good King Moggle Mog Teaser Video


Good King Moggle Mog Known Mechanics

A bunch of adds – It seems that Good King Moggle Mog has brought a full party of his own!

The fight is quoted to be “About as difficult as garuda hard mode”.

This page will be converted into a strategy guide as soon as we can!

Follow us on Facebook for more FFXIV updates!

Titan Extreme Mode (FFXIV: ARR)

All we know about Titan Extreme Mode in the upcoming 2.1 Patch!

Titan Extreme Mode Teaser Video

Titan Extreme Mode abilities

Double Granite Gaol – Granite Gaol is back, but has a few new tricks!

  • ALWAYS targets a healer + dps.
  • Crushes the target if not destroyed in time.
  • Damage recieved is half if both gaols are in close proximity to one another.
  • Double Granite Gaol is always followed by upheaval…

Upheaval – very similar to demon walls “repel”. You get pushed outwards from titan. You CAN fall if you’re not careful!

Due to how double granite gaol and upheaval work, there are two popular strategies dealing with this:

  • A) Gaoled Healer under titan, Gaoled DPS at the edge – “Safer” since healers break out first, to top up the party for the upcoming stomps.
  • B) Gaoled DPS under titan, Gaoled healer at the edge – What we use, since the dps gets released first, the second gaol dies faster.

Mountain Buster – Now gives a stacking debuff which increases damage taken.

Titan Extreme Post-Heart

Granite Gaoler – mini-titans that give the main titan a determination up buff if too close, they also have Landslide, and an AoE pulse (like Tumult). Killing them leaves a slow field that does a massive heavy and DoT to anyone who walks there!

“Asterisk” Bomb Pattern – A Strange bomb pattern with 3 sets. the “X” set. the “+” set, and the center bomb. The + Set will always spawn in N,S,E,W. (These blow up first) the X spawns at “1:30 – 4:30 – 7:30 – 10:30”. (These blow up second). Then finally the center. The timing of the bomb blowing up is considerably slower than hard mode. For many of us, that delay is what caused the most difficult adjustment.

5 Direction Landslide – an upgrade from the 3 direction: The tank has to dodge, too!

Double Weight of the Land – exactly like weight of the land but it happens twice in succession. all non-tanks should stack behind titan, dodge outwards, then dodge inwards. Sounds horrible, but much easier than you think.

“Superbombs” – a bomb pattern with ZERO SAFE SPOTS. You must kill one of the (preferably) edge bombs to remain safe! A pseudo DPS check.


Titan Extreme Mode Rotation [refinement]

First Phase (“Irrelevant Phase”)

Landslide – Weight of the Land (“Plumes”) – Mountain Buster – Tumult – Landslide – Geocrush at 85% (Repeat)

Second Phase (“Tutorial”)

Landslide – Double Gaol – Upheaval – Landslide – Tumult – Plumes – Mountain Buster -Landslide – Plumes – One-side bombs –  Mountain Buster – Landslide – Geocrush (If life at 55% or lower)

If his life is above 55%, he will continue to do this pattern:

Double Gaol – Mountain Buster – Landslide – Tumult – Plumes – Mountain Buster

It is currently unclear to us how or when this pattern continues, but it should be dying much sooner than this.

Heart Phase (No mountain buster!)

Plumes – Double Gaol – Upheaval – Landslide – Tumult – Plumes – *Clock Bombs – Landslide. [Super combo: Plumes – Tumult – Earthen Fury]

*Titans Heart should be killed at or around this time… if Titan extends past this time he does a super combo which is pretty difficult to dodge – effectively killing you with earthen fury even if your party killed the heart.

Post-Heart -> Death

ADDS – Mountain Buster – Asterisk Bombs – Landslide – Plumes – Double Gaol – Mountain Buster – Tumult – Double Plumes – Three Rows Bomb – Landslide – Mountain Buster – Super Bombs – Tumult – Plumes – Geocrush – (Repeat 3x)

Titan Extreme Mode Loot List

Tank – Tremor Earring of Fending
Healer – Tremor Earring of Healing
Caster – Tremor Earring of Casting
Bard – Tremor Earring of Aiming
Melee – Tremor Earring of Striking 

Follow us on Facebook for more FFXIV updates!

Ifrit Extreme Mode (FFXIV: ARR)

All we know about Ifrit Extreme Mode in the upcoming 2.1 Patch!

Ifrit Extreme Mode Teaser Video

Ifrit Extreme Mode Abilities

Radiant Plumes, Incinerate, Cleave and all his goodies make a return. Just a bit more beefy now!

Eruption – Now non-interrupt-able. There are variations of the basic single eruption, and the eruption that follows two different members (Like Ultima Weapon).

Crimson Cyclone – Ifrits rush skill. Now with a much fatter AoE and 4 clones!

Searing Wind – The key mechanic to Ifrit extreme mode. Always targets a healer. The target continually pulses a large AoE pushback. This does massive damage, and all other party members should avoid the afflicted healer.

Tank Swapping – Ifrits stacking debuff is especially nasty. Reduction of max hp for each stack – switch it up once the OT is clean!

Infernal Fetters – A chain that links 2 people together, it has 3 effects, becoming more severe as their distance grows. Obviously, stay close to each other to prevent this.

  • Fire DoT.
  • Increase damage taken.
  • Decrease damage dealt.

Infernal Nail – now causes damage and vulnerability up when killed. As usual, any nails present before Hellfire is cast means a KO for the party.

Ifrit has three Nail -> Hellfire cycles.


Ifrit Extreme 1st Nail Phase

The first set of nails are pretty basic. 4 nails, 1 on each edge of the map. All dps should focus on the nail opposite from Ifrit, then once the searing wind target is determined melee may destroy the nail of the “safe” healer, and ranged on the “dangerous” healer.

Hellfire is cast and then then Radiant Plumes quickly after.

A note on Radiant Plumes

  • The safespot changes after each Hellfire.
  • Every safespot has a “mirror” safespot on the opposite end.
  • If you feel like you won’t make it – just get hit by one. It’s better than dying.

Radiant plume safe-spot is around 1:30 for this one.

Ifrit Extreme 2nd Nail Phase

The second set of nails goes all the way around the ring of the stage. Again, kill the opposite nails(melee), and nail nearest ifrit(ranged). When searing wind is refreshed, ranged and melee should clear the nails of the respective healers.

Infernal fetters makes its appearance here. The off-tank is targetted, and a random DPS. DPS and off-tank should travel closely together. This can be tricky when a tank swap is needed. Make sure that while the chain is on, you do not stay too far apart from each other.

Again, Hellfire is cast and then then Radiant Plumes quickly after.

Radiant plume safe-spot is around 2:00~ for this one. (Mirrored on opposite end)

Ifrit Extreme 3rd Nail Phase

The third and final set of nails are, well, everywhere. with one mega nail in the middle. 13 Nails in total. The large nail should be killed last. After identifying which healer has searing wind, DPS must work on the nails closest to healers, then outwards. Killing the large nail does quite a significant AoE pulse.

The final Hellfire is cast, and Ifrit should be defeated shortly after.

Radiant plume safe-spot is around 2:30~ for this one.

Ifrit Extreme Tips / Strategy

Ifirt Extreme Mode Loot List

Tank – Inferno Bangle of Fending
Healer – Inferno Bangle of Healing
Bard – Inferno Bangle of Aiming
Caster – Inferno Bangle of Casting
Melee – Inferno Bangle of Striking

Follow us on Facebook for more FFXIV updates!


Binding Coils of Bahamut Turn 2 – ADS Guide & Strategy

All you need to know about deez d*mn ballz… our Coils Turn 2 Guide!

Coils Turn 2 isn’t exactly just one Boss – it’s a series of mini-bosses leading up to the final boss. The stage itself has certain mechanics you should be aware of.

Coils Turn 2 Stage Mechanics

You have a time limit of 12 minutes to complete Turn 2. If the 12 minute mark is reached, and players still remain inside – a pulse doing heavy damage will continually affect players, inevitably causing a wipe.

There are 6 mini-bosses and 1 main boss. Killing a mini-boss does 2 things:

  • REMOVES that mini-bosses unique ability from the main boss.
  • GIVES that mini-bosses unique passive BUFF to the main boss.

Here’s the Turn 2 Map showing the various nodes abilities and buffs:
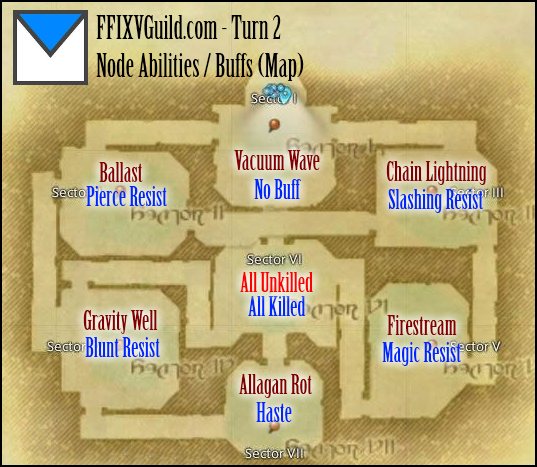
bcob coils turn 2 map node abilities and buffs ffxiv arr

It’s currently impossible to kill all mini-bosses within the time limit, so you must choose a certain course to follow. While there are many different ways to do Turn 2, these two routes are how we do it. We consider the alternative routes IMPOSSIBLE or HIGHLY IMPRACTICAL. First, we discuss the skills shared across all mini-bosses…

Shared Turn 2 Node skills

ALL NODES share certain abilities, up to the final boss.

Frontal Cleave – no surprise here… However, his basic cleave leaves a really bad…

Stacking debuff – Which increases damage taken. Stacks infinitely and refreshed upon every cleave. Drops after 30 seconds.

High Voltage – Remember from turn 1 ADS? It’s back. But this time a hundred times more fatal if it lands…

Repelling Cannons – Same ability from turn 1 ADS. But tanks with the debuff also take bonus damage!

So as usual, have your melee avoid cleave and cannons, and setup a silence rotation for High Voltage. As for the stacking debuff…

Dealing with the Turn 2 stacking debuff – Tank Swap
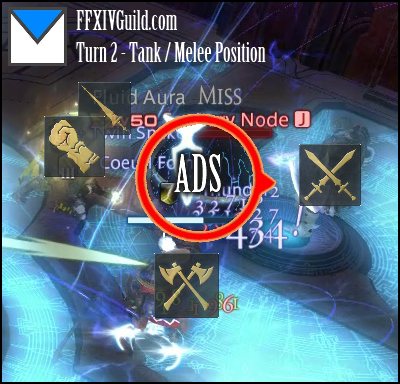
bcob turn 2 tank and melee positioning tank swap cleave avoidanceTank positioning is extremely sensitive for Turn 2. Here’s how we position our tanks (and melee dps). Your first goal in positioning should be to minimize or eliminate unnecessary cleaves – since the debuff wont fall off if your tanks get tagged!

Of course, with the shown, the melee dps have zero chance to get cleaved. The tanks also won’t get hit by each others cleave, when it’s not their turn to tank.

There’s many ways to swap… the method that worked for us is to have your current offtank do his enmity combo and WAIT on the last one (Rage of Halone or Butchers Block). Once the main-tank wants to switch (which we signal by jumping), simply Provoke and finish the combo!


Best Routes to take in Turn 2

As we mentioned above, the “South Eastern” Route is not really practical to do as of now… so here are the paths we use:
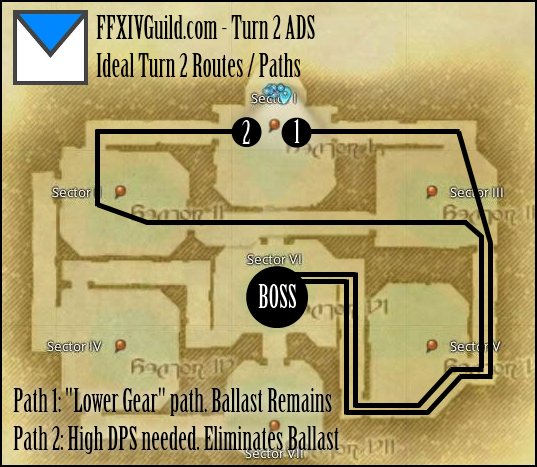
bcob coils turn 2 paths routes ffxiv arr

Route 1: Not Killing ‘Ballast’
Route one is the basic route.

Route 2: Killing ‘Ballast’.
As our gear progressed, we were able to kill an extra node on our way to the last boss. Eliminating ballast makes the final boss a little easier.

Using either of the two routes, you eliminate these abilities from the last boss:

  • Vacuum Wave – An AoE attack that pulls all players closer to ADS.

  • Chain Lightning – A generic arcing nuke that does medium damage.

  • Firestream – An omnidirectional AoE that does massive damage and leaves a huge burning DoT.

  • (If route 2…) Ballast – A massive cone AoE with a small safe-spot behind ADS. Getting hit pushes you back a significant distance.

The abilities remaining on the last boss: Allagan Rot and Gravity Well will be discussed in the final boss section.

Turn 2 Final Boss – ADS

High Voltage -> Piercing Laser -> Repelling Cannons cycle makes a comeback with the turn 2 final boss. You may remember the similar mechanic from T1 ADS. This happens throughout the fight!

He’s just like all of the other nodes until he reaches certain life percents:

at 75% Allagan Rot – The defining mechanic of turn 2. Managing Allagan Rot will determine 90% of your chances at beating turn 2! This will be discussed in the next section.

at 50% Gravity Well – This is a randomly targetted AoE ground effect which applies a 15 second Heavy Debuff. The ground effect lasts for 15 seconds, and is recast 10 seconds after is expires.

at 25% Ballast – if you didn’t kill the node earlier on. Like explained earlier, A massive cone push back with a safe spot behind him.

Limit Break (Melee DPS) should be used anytime under 50% or 25% HP to reduce the time he has more skills active. Healer LB is also a viable choice if things go awry.

Dealing with Allagan Rot

Allagan Rot is a debuff that lasts 15 seconds. If 15 seconds pass and it is not passed to another player, the current victim will explode, and deal AoE damage (unlivable) to the entire raid – resulting in a wipe.

Passing Allagan Rot is as simple as walking to another player. After you’ve passed Allagan Rot, you have an Immunity that lasts 45 seconds. You cannot have Allagan Rot again until Immunity expires.

So what does all this mean!? You need to keep passing Allagan Rot amongst your party until ADS is dead. Failing to do so will result in Allagan Rot blowing up and you guys wiping, like mentioned earlier. This sounds confusing? It is at first, but when you get the hang of it – it’s quite simple. Look at the table below

Sample of Allagan Rot being passed at 5 seconds remaining

(Immunity is italicized, Rot is bold)

Rot Passed at 5sPlayer 1Player 2Player 3Player 4Player 5
Pass 115000
Pass 24515000
Pass 335451500
Pass 4253545150
Pass 51525354515

As you can see, passing rot at 5 seconds remaining will result in pass 6 failing. Immunity on #1 has 15s remaining, and so does Rot on #5. So judging by this chart, the ideal time to pass between 5 people is with 4 or less seconds remaining on Allagan Rot.

We Highly Recommend numbering your party beforehand, and simply follow the numbers wherever rot initially lands, to eliminate all confusion! Here’s a sample…
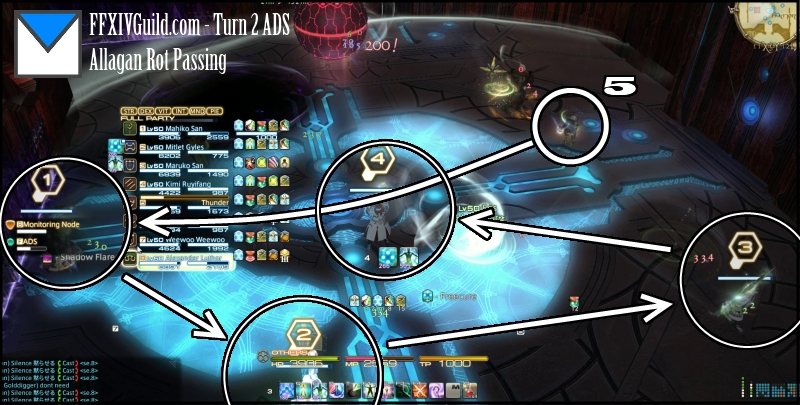
bcob coils turn 2 allagan rot numbering positioning example ffxiv arr

Passing of rot changes depending on the setup of your DPS:

Rot Passing (2 Melee 2 Ranged): [The DF setup]
Ranged (1) -> Healer (2) -> Ranged (3) -> Healer (4) -> Melee (5) -> Ranged (1) [Repeat]

Quite self-explanatory. If things go “wrong” simply have your extra melee (6) pass from (4) to (1). We always have 4 to 1 as a “Melee Assisted Pass”.

Rot Passing (1 Melee 3 Ranged): [Somewhat easier setup]
Ranged (1) -> Healer (2) -> Ranged (3) -> Healer (4) -> Ranged (5) -> Ranged (1) [Repeat]

Same as the setup above, but have your 3rd ranged “pretend” he’s melee by staying just outside Repelling Cannon Range. He can stay right above (1) in the picture above!

Rot Passing (4 Ranged) [“Stacking Method”]
Ranged (1) -> Healer (2) -> Ranged (3) -> Healer (4) -> Ranged (5) -> Ranged (1) [STACK UP]

While we never do this, If you have an all ranged party you can actually stack up after Ranged (5) gives it to Ranged (1). Rot will, amazingly, pass itself after that. If you do this method make sure you all DODGE IN THE SAME DIRECTION, when getting lasered or gravity welled.

Rot Passing (3 melee 1 Ranged): [“Not so bad!” setup]
Melee (1) -> Healer (2) ->  Melee (3) -> Healer (4) -> Melee (5) -> Melee (1) [Repeat]

This one isn’t so bad as many people think. It’s actually pretty Easy. Once “Melee (5)” goes back to DPS the boss, he will automatically pass it to Melee (1) once (1)’s immunity expired!

Rot Passing (4 melee): [“Extreme” mode]
We won’t be discussing this method. It’s possible, but ultimately unlikely that it’s going to happen to many people. The hassle isn’t worth it. Although it could make a pretty interesting video… (idea…)

Turn 2 Positioning Guide

And finally, our suggested positioning during the final encounter:
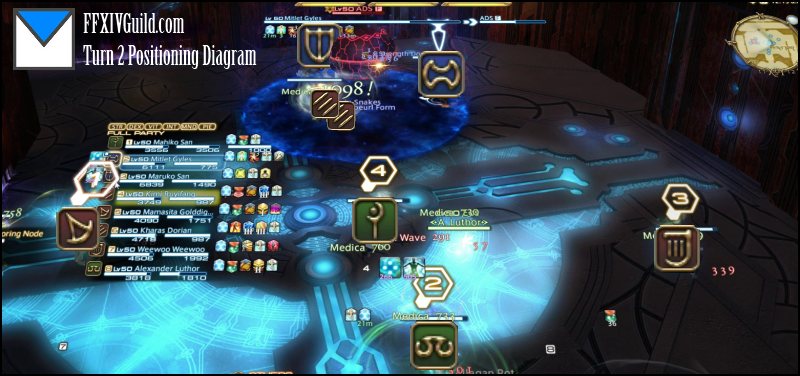
bcob turn 2 group positioning guide diagram ffxiv arr

ADS (Turn 2) Loot List

TankHealerCasterMNKDRGBRD
Weapon------
Off-Hand------
Head-Allagan Circlet of Healing---Allagan Visor of Aiming
Body--Allagan Tunic of Casting---
Hands--Allagan Gloves of CastingAllagan Gauntlets of StrikingAllagan Gloves of Maiming-
WaistAllagan Plate Belt-----
LegsHeavy Allagan Cuisses-----
Boots-Allagan Boots of HealingAllagan Boots of Casting---
Neck-Allagan Choker of Healing--Allagan Choker of Maiming
EarringsAllagan Earrings of Fending--Allagan Earrings of Striking-Allagan Earrings of Aiming
Bracelets--Allagan Bracelets of Casting---
RingAllagan Ring of Fending-----

Well, I guess that’s it! If you think we missed any tips, or anything you’d like to chime in on – let us know in the comments!

Follow us on Facebook for more FFXIV updates!

Garuda Extreme Mode (FFXIV: ARR)

Garuda Extreme Mode strategy guide and Loot List!

Garuda Extreme Mode Teaser Video

Garuda EX Abilities

Some of the usual suspects return for extreme mode:

Slipstream: Avoidable cone stun that does extreme damage.
Friction: The usual targetted AoE
Wicked Wheel: Garuda does Wicked Wheel whenever the adds are alive. It’s extremely powerful and should be avoided.

Whenever Garuda disappeard from the map, a large spread of AoE’s will follow in her last location. They deal moderate damage, and cause Windburn (Wind DoT).

Adds (Suparna, Chirada) Abilities

Suparna (Red):

[Special] Wicked Wheel: Suparnas Wicked wheel is extremely powerful. For a non-tank, it’s a potential KO. It’s avoidable so GTFO.
Slipstream – Channeled Frontal Cone stun.
Friction
: The usual targetted AoE
Downburst: A medium strength cone attack.

Chirada (Green):

[Special] Downburst: Chiradas downburst is extremely powerful. It’s a cone attack. The target is marked by a crosshair.
Slipstream – Channeled Frontal Cone stun.
Friction: The usual targetted AoE

While either Chirada or Suparna are alive: Garuda cannot be damaged.

Razor Plumes: Like before, they target a stone pillar or guy, and will explode dealing damage after a set time.

Spiny Plumes: The “Key” add to this fight. Upon killing it, releases an AoE which causes Windburn (Wind DoT). A short time after it’s death – it will put up a “Safe Zone” wherein Garudas Reckoning will do significantly less damage to those inside. The initial target of Spiny Plume seems to be the second Highest Enmity (and in some rare cases – the MT).

Spiny Plumes give a stacking debuff to its target. If it reaches 3 stacks it will do “Super Cyclone” dealing tons of damage (Likely a KO) to everyone. Provoking the Spiny Plume before its target reaches 3 stacks is important, and is one of the main reasons many groups will wipe.


Garuda EX Phase 1 – Stone Pillars

Reminiscent of Garuda Story and Hard Mode. Nothing special here. The first sub-phase, every non-melee should be in dead-center of the pillars. Preserving the stones are your goal for this phase. It has 3 Sub-phases:

Starting Phase – All non melee stack dead center to avoid Friction hitting rocks. Once she vanishes, hide behind the rocks old-school style.

Razor Plumes – Razor Plumes show up and target random rocks. Kill them asap. Again try to stack in the middle as much as possible, with the exception of tank and melee. This mini-phase has the usual “Vortex” mechanic.

Initial Adds – The first time adds spawn. You should memorize what to do here, for the next time adds spawn:

  • MT picks up Suparna(Red) and Garuda.
  • OT picks up Chirada.
  • Chirada must be tanked ACROSS the map from the others. If they’re too near each other -> they gain immense defense.
  • Ranged DPS and healers should stay in a place where friction wont hit rocks.

There are things you have to note here:

  • Downburst will hit the OT for heavy damage, but shouldn’t be much of an issue.
  • On the MT side, WICKED WHEEL becomes a “one hit KO”. Make sure melee DPS and MT avoid this. Using virus on both Garuda and Suparna is a good “insurance” in case tank gets hit. All forms of damage reduction / mitigation should be used in preparation.
  • Chirada uses Downburst simultaneously with the Wicked Wheel on the other side. This always happens after Friction!

If you have enough rocks alive, Reckoning shoudn’t kill you! On to the next phase…

Garuda EX Phase 2 – Vortex

Wind surrounds the outer ring of the stage, and players should remain near the middle, or suffer a pushback + large damage.

Spiny Plume makes its first appearance here, along with a bunch of Razor Plumes. Your goals here are simple:

  • Kill all Razor Plumes
  • Leave Spiny Plume at a low HP%.

A rather simple phase, with no heavy incoming damage. A great time to use Mages Ballad, as you’ll be needing max DPS next phase.

Once Garuda disappears, destroy the Spiny Plume and seek refuge inside the safe-zone it generates. (Remember to avoid the initial death AoE of spiny plumes)

Garuda EX Phase 3 – Tornado

5 Tornados spawn in static locations on the map, forming a cross-like (T) formation. The safe spots are located near the brown markings on the map (Where the pillars used to be).

Chirada and Suparna show up during this phase. As usual, MT takes both Garuda and Suparna. Off-tank takes Chirada. And again, Suparna should be the first target. There are some things to note during this phase. The main difference in this phase is Tornadoes + Spiny Plumes.

  • The MT’s position should be loose enough that the melee dps and himself can get away from the “Double Wicked Wheels”.
  • Healers and Ranged DPS should stay at the very tip of the center tornado, to be in range of everyone.
  • Like last phase, leave Spiny Plume at a low HP%, and destroy it at phase transition.
  • There are four safe pockets – Ranged and healers should have a good spread.

Travelling between “safe-zones” through tornadoes can be done using the following:

  • Sprinting along the edges (Recommended for casters…)
  • Dragoon jumps
  • Monk Shoulder Tackle.

Remember not to kill the Spiny Plume too early, or too late!

If you pass this phase, You go back to the Vortex Phase -> Tornado Phase -> Vortex Phase, repeats until Garuda is dead!

Garuda Extreme Mode Loot List

Garuda EX drops iLevel 90 Loot:

Tank – Vortex Ring Of Fending
Healer- Vortex Ring Of Healing
Melee – Vortex Ring Of Striking
Bard – Vortex Ring Of Aiming
Caster – Vortex Ring Of Casting

Follow us on Facebook for more FFXIV updates!

FFXIV Crafting (DoH) Gear Guide

Crafting gear: When to upgrade!? My inventory is ful!? Relax… find out best DoH gear on your road(s) to 50.

Hey guys! Here we will be discussing about DoH gear, why you should update your gear every so often, and when you should do it!

Why upgrade your crafting gear?

There are many many ways to level a crafting class…

  • Crafting your own levequest items.
  • Casually crafting your way to 50, completing logs etc…
  • Grinding (not so ideal, hehe).
  • Buying levequest items from the marketboard for you to submit.
  • Having someone else craft leve items for you to submit.

If you’re part of the “buying items” or “having someone else craft” group, this guide is largely useless to you. You guys should proceed to the Crafting End-Game Gear (+Max Melds) Guide.

Crafting your own levequest items is the most cost efficient method in leveling a Disciple of Hand class. But for that you’re going to need two things. A good sense of crafting technique, and some decent crafting gear. Of course, we will be discusing the latter here.

Getting better gear means being able to:

  • Prevent failure when crafting.
  • Obtain HQ items more reliably
  • (and in the best scenario) Obtain HQ items from No-Quality materials.

All of the above reasons, and more, make it ideal to get decent crafting gear. Your return on investment will be massive!

Should I buy every crafting gear upgrade I can find!?

Well, not really. If you have the money for it, or can craft it yourself – why not. But not all upgrades are as equal! Some pieces of gear are more important than others. The three key pieces you NEED to update are: Main Hand, Off-hand and Chest.

Following that are the CP granting accessory slots: Neck, Wrist, Rings, Ear. These are pretty important, but not as critical.

Then least important are the control only slots (Non-chest body pieces): Head, Hands, Waist, Legs, Boots.

I’m confused! There’s so much DoH gear! When do I upgrade?

We made tables of that. The first one represents all pieces worn on the body. Left is most important (chest). Followed by accessories, then non-chest body pieces. (Click the class to sort by it or enter your level in the search box!)

LevelChestNeckEarWristRingsHeadHandsLegsFeetWaist
1xxxxxxx
2
3
4
5xxx
6xx
7
8
9xx
10xxxxx
11
12x
13
14
15xxxxxx
16x
17
18xxx
19xx
20xxxx
21x
22
23x
24xxx
25xxxx
26xx
27xxx
28xxxx
29xxx
30x
31xx
32x
33xxx
34x
35xxxx
36x
37xxx
38xxxxxx
39xx
40x
41xxxxx
42x
43xxxxx
44xxx
45xx
46xxxxxx
47x
48xxxxxx
49x
50xxxxxxx


Disciple of Hand (DoH) Main-Hand Weapons

We were surprised they weren’t uniform either… (Click the class to sort by it or enter your level in the search box!)

Level (Main Hand)ALCARMBSMCULCRPGSMLTWWVR
1xxxxxxxx
2
3
4
5
6
7
8xxxxxxxx
9
10
11xxxx
12xxxx
13
14xxxx
15xx
16xx
17
18xxx
19xxxx
20x
21xxx
22
23xxxx
24xxxx
25
26
27
28xxxxx
29xxx
30
31xxxx
32xx
33
34xxxxxxx
35
36
37x
38xxx
39xxxx
40x
41
42
43xxxxxxx
44x
45
46
47
48xxxxxxxx
49
50xxxxxxxx

Disciple of Hand (DoH) Off-Hand Weapons

Non-uniform levels here as well… (Click the class to sort by it or enter your level in the search box!)

Level (Off-Hand)ALCARMBSMCULCRPGSMLTWWVR
1
2
3
4
5xxxxxxxx
6
7
8
9
10
11xxxxxxxx
12
13
14
15xxxx
16xxxx
17
18
19xx
20xxx
21xxx
22
23xx
24xxx
25xxx
26
27x
28xxxx
29xxx
30
31xxxx
32x
33xxx
34
35xxxx
36x
37
38xxx
39xxxx
40x
41
42
43xxxxxxx
44
45x
46
47xxxxxxx
48
49
50xxxxxxxx

Cost efficient Disciple of Hand Gearing strategy

Of course, if you can afford all pieces and you’re planning to get all crafting classes to 50, investing in good gear for every tier is going to pay off MASSIVELY. Do you NEED them? No, not really. So here we discuss how and when you should buy gear…

Main Hand, Off-Hand and Chest should be upgraded as often as you can. (As a very general rule, check every 4 levels. Look at the table above to be more specific). You can ditch the level 47 ones since you’re nearing 50 anyway.

Accessories are also very important. They aren’t that expensive, and CP really does alot for you. You can skip the copper tier, and begin your investment in brass (Level 15~19). You can live to 50 with this, but I prefer upgrading this all the time. Electrum Choker(49) and Red Coral Earrings(45) should be picked up ASAP since they are best in slot.

Non-chest body pieces are the least priority. You should get a complete HQ low-level set (15~) at least, as they’re inexpensive. You can comfortably get to 50 with this. If you want to upgrade, I would suggest skipping the Velveteen tier (expensive). Upgrading to the Linen tier (Level 32-38 for a complete set), since it’s much cheaper than Velveteen and Felt. And live with that until you’re 50. I wouldn’t really invest in Felt because you’ll be 50 soon after. Raptorskin Merchant Pouch (48) is an exception. It’s the best possible waist slot right now, and you might as well pick up an HQ as soon as you can.

Investing in gear getting to 50 is worth it, and becomes more so when you plan to get more than one class to 50. Using the guidelines above, and tables, you don’t need to be confused and check the MB every time you level up. Hopefully this helps you out!

So you got to 50, ey? Then it’s time to gear up. Check this out: Crafting End-Game Gear (+Max Melds) Guide.

Follow us on Facebook for more FFXIV updates!

FFXIV Caduceus Strategy Guide (Coils Turn 1)

Turn this fight from an epic mess of confusion into a breeze. Our guide to Caduceus – Binding Coils of Bahamut Turn 1 boss!

Ah, if you thought Titan Hard Mode was difficult, this guy will “WELCOME” you to coils! While the mechanics of Caduceus are very simple – positioning and overall strategy are the key to defeating him!

Caduceus Video Guide

Abilities

First, let’s discuss the abilities you’re going to see from caduceus. Note that he does not gain or lose abilities throughout the fight.

Basic Attack – Caduceus’ Basic attack is a (seemingly) 180 degree frontal cone. Only the tanks should ever be hit by this.
Hood Swing – Extreme Damage Frontal Cone.
Whip Back – (aka Tail Swipe) Exactly as it sounds. A devastating back facing cone AoE.
Acid Slime Spit – Spits at random raid member and leaves a green floor effect that does DoT and Heavy.

The next three mechanics are the “core” to Caduceus’ fight.

Steelscales – Buff that increases damage but can be “cleaned” by feeding him a Dark Matter Slime. Feeding Caduceus a slime will heal him depending on the percent life remaining on the slime.

Glowing Floor Tiles Spawns Dark Matter Slime (From here on referred to as “Slime”) on whoever is standing on one at the end of the glow duration.

Dark Matter SlimesWill explode if they are too far from whoever spawned them. Instantly killing anyone in a huge AoE. They pack a surprising punch, and can be a problem when the spawner gets hit by a random acid spit.

General Strategy

Caduceus’s fight revolves around managing stacks of Steel Scales. He gains a stack roughly every 45 seconds. To remove stacks you must “feed” Caduceus a slime by first spawning one (Standing on a glowing tile), then bringing it near him. As mentioned above Caduceus heals himself whenever he eats a slime, so make sure the slime is at the smallest possible health before feeding it to him.

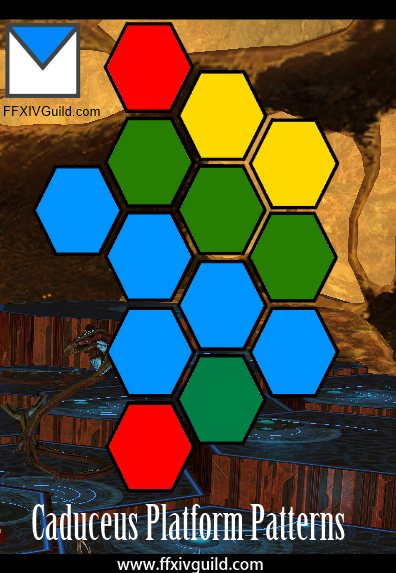
“These platforms seem random!? How can we predict which tiles glow?
Relax – we have an image for that.

ffxiv caduceus platforms tiles patterns

The colors represent the possible platforms that will light up at any given time. There are four possible patterns. Which pattern spawns between the four is completely random, and the same pattern may appear twice in a row.

Slime Feeding Tips

Caduceus frontal cone is HUGE. It can and will destroy you if you pass anywhere near his front. Approach him from the center as much as possible. Keep in mind Tailswipe exists, so the closer you are to his center, the better. While it seems safe to pass behind him, if you get slowed into a tailswipe, you’re going to regret it.


Caduceus Pre-fight Preparation

Organize yourselves into two teams of 1 Tank, 1 Healer and 2 DPS.

What position do you guys use!? We will discuss that at the bottom of the guide. There are many possible positions, each with their pro’s and con’s.

Caduceus Phase 1 (Pre-Split) Phase

Caduceus hits hard. There’s no way around that. It only gets worse for each stack he gains. So you must succeed at spawning and feeding each time the platforms light up. Each time you miss it, it means you have to get two slimes on the next glowing tiles. That can get messy quick, especially post-split phase.

Your primary goal in Phase 1 is to make sure Caduceus has no Stacks of Steel Scales shortly before he reaches 66% HP (when he splits in two)

How can you ensure that!? Our strategy here is to make him split shortly after the second slime. Save DPS cooldowns for after the second slime and melt him to 66% before he gains another stack. (At our current gear level it can be done after the first. So if your group lacks DPS, try to make him split after the third slime!)

Help! Our DPS is too fast/slow and he splits with a stack of Steel Scales! STOP DPS if you think he will split while he has stack. I’m not kidding. Stand and do nothing if you have to.

Got him to split without stacks? Good. Now on to arguably the most difficult part about Caduceus, the split phase.

Caduceus Split Phase (P1 – P2 Transition)

While not technically a phase, most wipes will come from “Messy splits”.

Your ONLY GOAL in the next 5-10 seconds in this phase is to reposition the clone a fair distance away from the original. What could go wrong? Well….

Basically you want to maximize the chances that your off-tank picks up and settles into his new position. Everyone can do their part during this phase.

Melee DPS – Disengage the boss for a few seconds. Don’t worry about lost DPS. Caduceus frontal cleave is insane, and will sometimes do it (or worse, Hoodswing / Whip Back) while splitting. It doesn’t happen always, but it’s best not to take chances. “But I’m losing DPS if i stop for a bit! I LIVE FOR THE PARSER!”. You do zero DPS when you’re dead, son. “He tailswiped while splitting! That Doesn’t always happen!!!” You can’t say we didn’t warn you.

Healers – Do not apply HoT (Regen, Whispering Dawn, Medica 2) shortly before splitting. Virus helps, too. Make sure Stoneskin is up on the off-tank BEFORE the split.

Main Tank – Use a damage mitigation skill during this time. If healers heal you too much while this phase is ongoing, they will pull aggro.

Off Tank – Yep, the most stressful part of the fight for you. If you’re in a PUG you’re going to get blamed alot. Smack the clone with your best aggro generating skill and make him stick until you settle into your designated spot. Provoke, Tomahawk/Shield Lob are your friends here.

Caduceus Phase 2 (Post-split)

Both copies of Caduceus retain all the abilities from the Phase 1 (Pre-split). The clone hit exactly as hard as the original one. Hooray! And did I mention slime spawning and feeding continues in this phase, only this time doubled? Great! Also expect to see two to three times more random acid spitting!

Your primary goal in this phase is to DPS both of them as equally as possible.

The only new mechanic is that when both copies of Caduceus are brought near each other, or when one dies, the fight progresses into the Final Phase.

Caduceus Final Phase (Two possibilities)

Caduceus will enter the final phase if one of these two things happen:

  • They are moved too close to each other.
  • One clone dies.

Scenario 1 (Unfavorable): Aggro messes up and one Caduceus moves towards the original one, they combine. This will likely result in a Wipe

Scenario 2 (Emergency): You guys were Soooo clooose, but one of your tanks die, and Caduceus found his buddy. They combine (Total life equals sum of both HP)

  • Scenario 2 still sucks, but it’s an “emergency plan” that happens more often than you think! We got our first kill on Caduceus in this circumstance. If this happens, you have to kill him quickly! This would be a good time to use DPS Limit Break. You have a limited time to kill him, as at any time he combines he will gain stacks extremely quickly, eventually one shotting your tank – and you.

Scenario 3 (Ideal) : One clone dies while the other is below 5%. All dps move to the remaining clone and kill him. You have a short grace period here before he starts going crazy with gaining stacks. Again, another good time to use DPS Limit Break, as there wont be any other chance to.

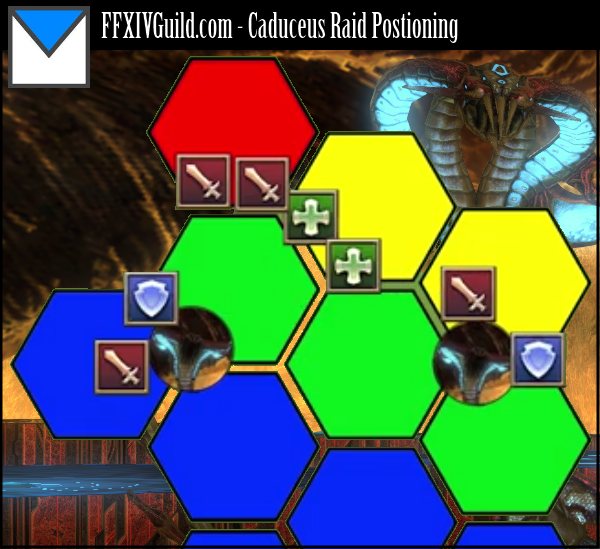
How to position in Caduceus

We haven’t really checked other guides, but we get alot of messages asking for this because of the extremely confusing (or vague) positioning mentioned in other places. Here’s our strategy…

coils bcob turn 1 caduceus positioning ffxiv arr

We ignore the South of the map completely, forcusing our entire group in the north.

Pros of our positioning Strategy:
– Healers can heal all members easily, and effectively assist each other.
– AoE heals reach everyone.
– All members have access to all pattern types.

Cons of our positioning Strategy:
– Our tight position makes acid spit a problem. It can get out of hand easily.
– More prone to AoE Damage.
– Little to no room for unnecessary movement.

Caduceus (Turn 1) Loot List

TankHealerCasterMNKDRGBRD
Weapon------
Off-HandAllagan Round Shield-----
Head--Allagan Circlet of Casting---
BodyHeavy Allagan Armor---Allagan Cuirass of Maiming-
Hands-Allagan Gloves of Healing---Allagan Gauntlets of Aiming
Waist----Allagan Tassets of Maiming-
Legs---Allagan Trousers of StrikingAllagan Trouseres of Maiming-
BootsHeavy Allagan Flanchard-----
NeckAllagan Choker of Fending-----
Earrings-Allagan Earrings of Healing--Allagan Earrings of Maiming-
Bracelets---Allagan Bracelets of Striking-Allagan Bracelets of Aiming
Ring--Allagan Ring of CastingAllagan Ring of Striking--

Well, that was long! It’s still missing some parts, but hopefully we can complete it soon!

Follow us on Facebook for more FFXIV updates!

FFXIV ARR Botany Node Locations

Where is that Mature Tree? I can’t find that Lush Vegetation!! NO MORE!

Remember on the upper right of the table you can use the Search/Filter box. For example you can search for Specific Materials, Areas, Node Levels or a combination of all (Ex. 15 shroud).


Mature Tree & Lush Vegetation Materials & Locations

Material NameItem LevelPerceptionNode LevelLocationZoneNode ID
Allagan Snail2195Jadeite ThickCentral Shroud05a
Maple Branch5225Jadeite ThickCentral Shroud05a
Latex1185Jadeite ThickCentral Shroud05a
Ice Shard15Jadeite ThickCentral Shroud05a
Wind Shard15Jadeite ThickCentral Shroud05a
Maple Log3205Jadeite ThickCentral Shroud05a
Beehive Chip5225Blessed BudNorth Shroud05b
Cinnamon4215Blessed BudNorth Shroud05b
Maple Sap2195Blessed BudNorth Shroud05b
Earth Shard15Blessed BudNorth Shroud05b
Crow Feather102710East VeinCentral Shroud10a
Ash Branch92610East VeinCentral Shroud10a
Wind Shard110East VeinCentral Shroud10a
Ash Log82610East VeinCentral Shroud10a
Tinolqa Mistletoe62310East VeinCentral Shroud10a
Cock Feather62310Spineless BasinCentral Thanalan10b
Cloves102710Spineless BasinCentral Thanalan10b
Lightning Shard110Spineless BasinCentral Thanalan10b
Ash Branch92610E-tatts SpireNorth Shroud10c
Earth Shard110E-tatts SpireNorth Shroud10c
Ash Log82610E-tatts SpireNorth Shroud10c
Tinolqa Mistletoe62310E-tatts SpireNorth Shroud10c
Kukuru Bean92610CedarwoodLower La Noscea10d
La Noscean Orange72410CedarwoodLower La Noscea10d
Earth Shard110CedarwoodLower La Noscea10d
Gridanian Chestnut143815The Matron's LetheCentral Shroud15a
Wind Shard115The Matron's LetheCentral Shroud15a
Elm Log123515The Matron's LetheCentral Shroud15a
Buffalo Beans123515The Matron's LetheCentral Shroud15b
Wind Shard115The Matron's LetheCentral Shroud15b
Marjoram153915The Matron's LetheCentral Shroud15b
Tree Toad113515The Matron's LetheCentral Shroud15b
Carnation133615Bentbranch Meadows (S)Central Shroud15c
Cotton Boll143815Bentbranch Meadows (S)Central Shroud15c
Wind Shard115Bentbranch Meadows (S)Central Shroud15c
Lavender123515Bentbranch Meadows (S)Central Shroud15c
Chanterelle113515Bentbranch Meadows (S)Central Shroud15c
Black Pepper143815The ClutchCentral Thanalan15d
Lightning Shard115The ClutchCentral Thanalan15d
Yellow Ginseng113515The ClutchCentral Thanalan15d
Alpine Parsnip153915The ClutchCentral Thanalan15d
Rye113515Sunrise GateWestern Thanalan15e
Moko Grass113515Sunrise GateWestern Thanalan15e
Water Shard115Sunrise GateWestern Thanalan15e
Coerthas Carrot133615Sunrise GateWestern Thanalan15e
Grass Viper123515Sunrise GateWestern Thanalan15e
Ruby Tomato153915Seasong Grotto (E)Middle La Noscea15f
Sunset Wheat113515Seasong Grotto (E)Middle La Noscea15f
Straw123515Seasong Grotto (E)Middle La Noscea15f
Fire Shard115Seasong Grotto (E)Middle La Noscea15f
La Noscean Lettuce133615SummerfordMiddle La Noscea15f
Cinderfoot Olive133615La Thagran EastroadLower La Noscea15g
Lowland Grapes113515La Thagran EastroadLower La Noscea15g
Earth Shard115La Thagran EastroadLower La Noscea15g
Cieldales Spinach143815La Thagran EastroadLower La Noscea15g
Highland Parsley153915La Thagran EastroadLower La Noscea15g
Ogre Pumpkin133615Nophica's WellsWestern Thanalan15i
Garlean Garlic111115Nophica's WellsWestern Thanalan15i
Water Shard115Nophica's WellsWestern Thanalan15i
Wild Onion123515Nophica's WellsWestern Thanalan15i
Faerie Apple165820Nine Ivies (W)East Shroud20a
Yew Branch206520Nine Ivies (W)East Shroud20a
Wind Shard120Nine Ivies (W)East Shroud20a
Yew Log196320Nine Ivies (W)East Shroud20a
Wind Shard120Nine Ivies (SW)East Shroud20b
Galago Mint165820Nine Ivies (SW)East Shroud20b
Belladonna186220Nine Ivies (SW)East Shroud20b
Gil Bun196320Nine Ivies (SW)East Shroud20b
Grade 1 Carbonized Matter2020Aleport (N)Western La Noscea20c
Ice Shard120Aleport (N)Western La Noscea20c
Lightning Shard120Black BrushCentral Thanalan20d
Nopales186220Black BrushCentral Thanalan20d
Lalafellin Lentil176020QuarterstoneWestern La Noscea20e
Paprika165820QuarterstoneWestern La Noscea20e
Ice Shard120QuarterstoneWestern La Noscea20e
Fire Shard120SandgateEastern Thanalan20f
Popoto186220SandgateEastern Thanalan20f
White Scorpion206320SandgateEastern Thanalan20f
Sun Lemon176020CedarwoodLower La Noscea20g
Earth Shard120CedarwoodLower La Noscea20g
Gridanian Walnut217225Upper PathsSouth Shroud25a
Ice Shard125Upper PathsSouth Shroud25a
Walnut Log247825Upper PathsSouth Shroud25a
Matron's Mistletoe237625Upper PathsSouth Shroud25a
Noble Grapes227425OakwoodUpper La Noscea25b
Pixie Plums217225OakwoodUpper La Noscea25b
Sticky Rice258025OakwoodUpper La Noscea25b
Earth Shard120OakwoodUpper La Noscea25b
Chamomile247825OakwoodUpper La Noscea25b
Ala Mhigan Mustard237625Drybone (N)Eastern Thanalan25c
Pearl Ginger247825Drybone (N)Eastern Thanalan25c
Millioncorn258025Drybone (N)Eastern Thanalan25c
Fire Shard125Drybone (N)Eastern Thanalan25c
Button Mushroom227425Drybone (N)Eastern Thanalan25c
Chocobo Feather2910130Silent ArborSouth Shroud30a
Alligator Pear3010430Silent ArborSouth Shroud30a
Moor Leech3010430Alder SpringsNorth Shroud30b
Wizard Eggplant279730Alder SpringsNorth Shroud30b
Jade Peas269530Alder SpringsNorth Shroud30b
Midland Cabbage289930Alder SpringsNorth Shroud30b
Grade 2 Carbonized Matter3030Three-malm BendMiddle La Noscea30c
Fire Crystal2630Three-malm BendMiddle La Noscea30c
Red Pigment2830Three-malm BendMiddle La Noscea30c
Grade 2 Carbonized Matter3030Upper PathsSouth Shroud30d
Ice Crystal2630Upper PathsSouth Shroud30d
Grey Pigment2830Upper PathsSouth Shroud30d
Grade 2 Carbonized Matter3030BloodshoreEastern La Noscea30e
Water Crystal2630BloodshoreEastern La Noscea30e
Blue Pigment2830BloodshoreEastern La Noscea30e
Grade 2 Carbonized Matter3030BentbranchCentral Shroud30f
Wind Crystal2630BentbranchCentral Shroud30f
Green Pigment2830BentbranchCentral Shroud30f
Grade 2 Carbonized Matter3030PeacegardenNorth Shroud30g
Earth Crystal2630PeacegardenNorth Shroud30g
Brown Pigment2830PeacegardenNorth Shroud30g
Yellow Pigment2830PeacegardenNorth Shroud30g
Grade 2 Carbonized Matter3030Spineless BasinCentral Thanalan30h
Lightning Crystal2630Spineless BasinCentral Thanalan30h
Purple Pigment2830Spineless BasinCentral Thanalan30h
Tarantula3511535Lower PathsSouth Shroud35a
Oak Branch3110635Lower PathsSouth Shroud35a
Oak Log3210835Lower PathsSouth Shroud35a
Desert Saffron3511535Broken WaterSouthern Thanalan35b
Laurel3411335Broken WaterSouthern Thanalan35b
Aloe3210835Broken WaterSouthern Thanalan35b
Wildfowl Feather3411335Camp TranquilSouth Shroud35c
Flax3110635Lower PathsSouth Shroud35c
White Truffle3311035Lower PathsSouth Shroud35c
Dragon Pepper3511535BloodshoreEastern La Noscea35d
Midland Basil3210835BloodshoreEastern La Noscea35d
Mandrake3311035BloodshoreEastern La Noscea35d
Salt Leek3411335BloodshoreEastern La Noscea35d
Iron Acorn3611740Raincatcher Gully (Docks)Eastern La Noscea40a
Almonds4012640Raincatcher Gully (Docks)Eastern La Noscea40a
Nutmeg3912440Raincatcher Gully (Docks)Eastern La Noscea40a
Mahogany Log3711940Raincatcher Gully (Docks)Eastern La Noscea40a
Maiden Artichoke3812240Raincatcher Gully (Docks)(S)Eastern La Noscea40b
Ramhorn Zucchini3912440Raincatcher Gully (Docks)(S)Eastern La Noscea40b
Mugwort3711940Raincatcher Gully (Docks)(S)Eastern La Noscea40b
Blood Currants3611740Lower Paths (E)South Shroud40c
Thyme3912440Lower Paths (E)South Shroud40c
Rolanberry4313345Camp Bronzelake (E)Upper La Noscea45a
Sagolii Sage4112845Camp Bronzelake (E)Upper La Noscea45a
Dart Frog4513745Camp Bronzelake (E)Upper La Noscea45a
Black Scorpion4213145Camp Bronzelake (E)Upper La Noscea45a
Mirror Apple4213145Camp Dragonhead (W)Coerthas45b
Mistletoe4413545Camp Dragonhead (W)Coerthas45b
Rosewood Branch4716150The Bramble PatchEast Shroud50a
Rosewood Log4615550The Bramble PatchEast Shroud50a
Grade 3 Carbonized Matter50050The Unholy HeirCentral Thanalan50b
Maiden Grass5016850Forgotten Springs (S)Southern Thanalan50c
Thanalan Tea Leaves4816450Forgotten Springs (S)Southern Thanalan50c
Lava Toad4916650Forgotten Springs (S)Southern Thanalan50c

To be added: 40-50+ nodes to follow.

More Info:
Gathering General Guide |
Botany FAQ | Botany Leveling Guide

Follow us on Facebook for more FFXIV updates!

FFXIV ARR Ifrit Hard Mode


While your victory over the Ultima Weapon has set off waves of celebration across the land, the jubilation is short-lived, for the beast tribes are seeking to summon their gods once more. Confirmation has arrived that the Amalj’aa have already succeeded in calling forth Ifrit, who is returned far mightier than his last incarnation owing to the vast amounts of crystals he has gorged upon. Prepare yourself for a scorching encounter.

Ifrit hard mode is the first hard-mode boss you will encounter, as the entry level eight-man encounter. His fight has three phases, and a transition in between.

Interrupting Eruption is the key to winning this fight, from Phase 1 to end. Ifrit has 2 interruptible skills, Eruption and Radiant Plume. Interrupting Eruption is much more worth it. Why? It’s “harder” to dodge and predict Eruption, as compared to Radiant Plume. And in his final phase, Eruption pretty much covers 80% of the map.

Ifrit Hard Mode Phase 1

Phase 1 of Ifrit is just like Ifrit normal mode. He has the same abilities, but obviously much much stronger.

  • Incinerate – The usual frontal cone attack, but it hurts like hell to non-tank classes. Face away from your party.
  • Vulcan Blast – Massive PBAoE pushback. Healers, stay at maximum range to the tank to prevent getting hit by this. An untimely vulcan blast can mean getting into a bad situation.
  • Eruption – The same random AoE attack which blows up after a certain time.
  • Radiant Plume – A non-random AoE attack which blows up after a certain time. Either on the outer ring, or inner part.
  • Crimson Cyclone – Ifrit disappears and randomly reappears in one end of the ring. After a short period he will dash forward all the way to the other end, dealing damage too all in his path. Increases to two “clones” after a while.

P1-p2 Transition

Infernal Nail shows up again. This time, there are FOUR that spawn. Failing to kill these will result in an instant KO by Hellfire.

Using a Summoner or Black Mage Limit Break is highly advised here, and makes this transition much easier.


Ifrit Hard Mode Phase 2

  • Eruption – Increases the number of AoE’s as time progresses. Again, you must interrupt these as they are deadly and can result in situations where a player can’t escape.
  • Radiant Plume – Radiant plume gains a third pattern. The only reliable safe zones are directly behind him, and in front of Ifrit. Ranged players, don’t stay too far from Ifrit at this point. You wont make it behind him in time.
  • Crimson Cyclone – maxes out at 3 clones, and will usually kill anyone hit by 2.

Hard mode Ifrit Loot List

Ifrit drops Item Level 60 Weapons for all Classes.

Paladin – Ifrit’s Blade. Marauder – Ifrit’s Battleaxe
White Mage – Ifrit’s  Cane. Scholar – Ifrit’s Codex.
Monk – Ifrit’s Claws. Dragoon – Ifrit’s Harpoon.
Black Mage – Ifrit’s Cudgel. Summoner – Ifrit’s Grimoire.
Bard – Ifrit’s Bow.

Summary & Tips

He has all the same skills, only gaining Crimson Cyclone. 3 Clones max. Staying in between 2 of the clones is actually a safe zone.

Again, interrupting Eruption is the key to winning this fight. Make sure you have one or two guys (preferably Paladin) to interrupt it. However, make sure it’s a coordinated effort because doing stuns unnecessarily will result in him RESISTING the stun. DPS and Healers, have faith in the cancelling of Eruption. If you’re running with a good group, don’t move out of it. More movement = longer fight. But to be safe you can make a run for it each time Eruption lands at your feet.

Ranged / Healers – Do not stay too close to edge of the ring. An outer Radiant Plume will likely tag you, even if you run ASAP. Stay a good 25% away from the edge, as you can minimize movement to dodge either a inner or outer Radiant Plume.

Follow us on Facebook for more FFXIV updates!