My Aura Twitter Campaign – Moogreus

Using the official FFXIV benchmark, create an Au Ra character and tweet a picture to the official FFXIV twitter account to win

ffxiv-my-au-ra-twitter-campaign-moogreus

What: Using the official FFXIV benchmark, create an Au Ra character

When: Tuesday, April 28, 2015 at 12:00 a.m. (PDT) to Monday, May 11, 2015 at 11:59 p.m. (PDT)

How to enter: Follow the FINAL FANTASY XIV Twitter account, Take a screenshot of an Au Ra character with the following information on your tweet:

  • A screenshot of an Au Ra created using the Heavensward benchmark software
  • The #FFXIV hashtag
  • The #MyFFXIVAu_Ra hashtag
  • Your full in-game character name
  • Your World name
  • An “@” mention to @FF_XIV_EN
  • Sample tweet:”Name: Moogreus World: Tonberry #FFXIV #MyFFXIVAu_Ra @FF_XIV_EN Kupo!

Prize: During the campaign window the FFXIV Community and Operations teams will select up to two hundred (200) winners. Winners will be selected based on overall creativity and originality. Winners will be awarded one (1) “Scarf of Wondrous Wit” in-game item.

ffxiv au ra twitter campaign moogreus

Rules and other disclaimers can be found at the Lodestone

For more awesome FFXIV updates, go ahead and Like us on Facebook – and if you need to drop a line, follow us on Twitter!

Click on Moogreus below for past news and updates. Kupopo!

Moogreus

Moogreus Live Letter Part XX Digest

Just in case you missed it, here’s a quick recap of the latest Heavensward Live Letter (Part XX)

ffxiv-Moogreus-Live Letter-Part-XX-Digest

Just in case you missed it, here’s a quick recap of the latest Heavensward Live Letter (Part XX) Digest

The detailed digest can be found in this forum post.

Key highlights:

  • The Main Scenario will have about 50 hours of gameplay (minus the cutscenes) (04:09)
  • New fields will be added that are roughly 50-100% larger than what is available now (08:45)
  • Flying mount footage is included in the video (09:56)
  • Battle System including the 3 new jobs + Increasing the level cap to 60 (19:27)
  • ‘Specialist System’ from level 55 onwards for DoH (26:10)
  • Artwork for new ‘Dungeon Reward Sets’ and ‘PVP Gear’ available in this post.

Full Youtube covereage:

Want to know more about Heavensward? Head over to our FFXIV Heavensward 3.0 Information page!

FFXIV Warrior (WAR) Leveling Guide

How to level up your Warrior (WAR) fast! Useful cross-class skills, reminders, and the best places to be in any level – HERE!

A Warry kind of guy huh? You’ve found the right guide if you’re leveling a Warrior! Check out the Warrior Basics if you need a refresher. You NEED to complete all MRD class quests (last is level 30) (got Butchers Block?, that means you’ve done it). Also Gladiator (GLD) class quests up to 15 (got Shield Lob on your Gladiator? check). Again, this WAR leveling guide should be used ALONG SIDE the General Leveling Guide.

Help! Where’s the WAR Guildmaster / quest giver? It’s Curious Gorge, located in Costa Del Sol, Eastern La Noscea (18, 27). No quest? backtrack to the MRD Guild in Limsa.

Wait a second, I’m below level 30! No problem, the Marauder Leveling Guide is for you :) Coming into this guide, be done with your level 20-29 hunting log, and allocate all stat points into STR. Messes up your stats? Get a Keepers Hymn from your GC.

Reminders before we proceed: Your WAR will level up faster if  abuse Challenge Logs and Daily Roulettes! Also – Accuracy Food is a lot more useful than you think.


Warrior Level 30: Fresh off the Block

Reminder Level 30: Queue up for guildhests More than a Feeler and Annoy the Void.
> Level 30 Battlecraft / GC Leves: Costa Del Sol, Eastern La Noscea.

Facemelting and butchery continues! Picking up from the MRD Leveling Guide, you should be in Costa FATEing it up. You can do this until a MAX of level 35 (Warriors can move to Coerthas sooner…).  Same old same old – if FATES are hiding get your Warrior behind to the levemete.

Cross-class skills: When you equip your Warrior soulstone, your crossclass options reduce quite a bit. Flash, Provoke and Second Wind are the best bet for now.

Level 30 skill reminder – Defiance: DO NOT use this while soloing. DO USE this while in dungeons. This is your bread and butter tanking stance. Please, for the love of god… don’t be that “Oops, forgot defiance” guy.

Reminder Level 35: Queue up for guildhests Shadow and Claw and Long Live the Queen.
Level 35 Battlecraft / GC Leves: Observatorium, Coerthas. (Also, Wineport ELN)

At around level 35 you can move to Coerthas Central Highlands. This place has a bunch of people (most of the time) doing a bunch of fates. If you’re soloing you might not get to tag them all! Partying up in Coerthas is popular, so it’s easy to find one! The Svara quest chain is like swimming in a metaphorical pool of EXP. (Begins @ Svaras Fear)

Level 35 skill reminder – Inner Beast: Real talk – Inner Beast is a massive skill that uses up your warrior resource: Wrath. Learning about how and when and why to use Wrath and what for separates the Warriors from… well.. “b!tches”. Inner Beast gives a huge damage reduction for a small window. While it’s effects are straightforward, Inner Beast and its proper usage is a large part of a pro Warriors repertoire.

Level 38 skill reminder – Storms Path: This skill combos off Maim. It applies a SIGNIFICANT “damage dealt minus” debuff on the enemy. Great for single tanking painful enemies. It goes without saying – this skill is absolutely massive in raiding.

Warrior Level 40 to 50: The last stretch… for now…

Reminder Level 40: Queue up for guildhests Ward Up and Solemn Trinity.
Level 40 Battlecraft / GC Leves: Whitebrim, Coerthas. (or Bluefog NThanalan)

Once you hit WAR 40, your first objective is to get a burst of EXP to try and hit 41 or 42. How? Any free challenge log entries, daily roullettes, early hunting logs, and guildhests. Why? since our next destination is Ceruleum Processing Plant, Northern Thanalan to FATEGRIND. Why skip Mor Dhona FATEs? Not many people FATE there. It’s best to party up in CPP (especially the early levels) check the PF or Shout – there’s no downside to partying up here in the early 40’s.

Level 45 Skill Reminder – Unchained: Newer warriors may neglect this skill, but it’s the real deal. It cancels the damage reduction from Defiance. Learn to use this as often as able whilst tanking, and try to time your Berserk with it!

Reminder Level 45: No more guildhests for now :(
Level 45 Battlecraft / GC Leves: St. Coinachs Find, Mor Dhona (Or CPP, NThanalan)

At level 49, might as well finish your WAR hunting log – it’s the last chance anyway!

Level 50 Skill Reminder – Storms Eye, Infuriate: Storms Eye gives a slashing resist down debuff on the target (useful for many classes), a DPS and threat increase! Infuriate instantly gives you 5 stacks of wrath. It’s on a relatively short cooldown – so yes, this plus Inner Beast is balls. (It’s great for pulling with Unchained as well)

End-game resources for your Warrior

CONGRATS on reaching 50! What to do now with your sparkly new WAR?

It’s been a long journey leveling your Warrior – but fortunately the adventure is JUST BEGINNING! Thanks for reading! For more updates check Like our Facebook! Hit us up on Twitter! Ciao!

<nextpage> (Will paginate this once 3.0 portion is completed)

Warrior – leveling up 50 to 60

Level 50 Battlecraft / GC Leves: ???

Level 55 Battlecraft / GC Leves: ???

This section is reserved for The 3.0 Heavensward update. For now, check out our Heavensward info page and Heavensward preparation page.

Follow us on Facebook for more FFXIV updates!

FFXIV White Mage (WHM) Leveling Guide

How to level up your White Mage (WHM) fast! Useful cross-class skills, reminders, and the best places to be in any level – HERE!

So you’ve taken the White, huh? If you’re leveling a White Mage, you’ve found the right guide! First of all you might want to check out the White Mage Basics. You NEED to complete all CNJ class quests (last is level 30) (If you have Cure II, that means you’ve done it). Arcanist (ACN) class quests up to 15 (If you have Summon II on your Arcanist, you’ve done it). Again, this WHM leveling guide is meant to be used WITH the General Leveling Guide.

Help! Where’s the WHM Guildmaster / quest giver? It’s Raya-o-Senna, located in Camp Tranquil, South Shroud (18, 27). If there’s no quest available, check back in the CNJ guild in Gridania

Wait a second, I’m below level 30! Then you should be in the Conjurer Leveling Guide :) Coming into this guide, you should have completed your level 20-29 hunting log, and allocate all stat points into MIND. If you haven’t, you can go ahead and buy a Keepers Hymn from your Grand Company supplier and do so.

Reminders before we proceed: Your WHM will hit 50 faster if you continue to abuse Challenge Logs and Daily Roulettes! Again – Accuracy Food will help you more than you think.


White Mage Level 30: Patience of Mind

Reminder Level 30: Queue up for guildhests More than a Feeler and Annoy the Void.
> Level 30 Battlecraft / GC Leves: Costa Del Sol, Eastern La Noscea.

The grueling soloing and going out of mana continues! Picking up from the CNJ Leveling Guide, you should be in Costa FATE grinding right now. You can do this until a MAX of level 35 (But you can move to Coerthas sooner).  Same process – if FATES aren’t popping get your WHM butt over to the levemete!

Level 32 trait reminder – Freecure: An amazing trait every White Mage should abuse! Each cure has a chance to proc a free Cure II. This trait wont be seen much while soloing, but when you queue up for dungeons you should learn to be aware of it! You should adjust your HUD to make it CLEAR when you’ve hit a proc.

ffxiv freecure easy proc hud white mage leveling

As seen above, I have Freecure (and soon to be Overcure) right beside my partylist, and right under my character. It’s also a habit of mine to put CD’s there for easy checking.

Level 34 skill reminder – Stoneskin: Ah, this skill. Hate the long cast time, love the effect. This skill will make or break many a raid. But for now, learn to use it in between pulls for yourself when soloing, and for your tank when in dungeons!

Reminder Level 35: Queue up for guildhests Shadow and Claw and Long Live the Queen.
Level 35 Battlecraft / GC Leves: Observatorium, Coerthas. (Also, Wineport ELN)

At around level 35 you can move to Coerthas Central Highlands. This place is usually very populated, and contains a huge number of FATES. So numerous that ‘tagging’ them all might be an impossible task if soloing! Partying up in Coerthas is popular, so you wont have a hard time finding one! The Svara quest chain is exceptionally good for EXP (Begins @ Svaras Fear)

Level 38 skill reminder – Shroud of Saints: The White Mages only mana replenishment skill (pre 3.0). Use it early and often! Soloing as WHM can be painful because mana regen can be an issue – at least this helps you out somehow. In raids, needless to say, this skill is gold.

Before proceeding, as always, allocate all unused points to MIND, complete all White Mage job quests, and beat up your hunting log. Done? Okay.

White Mage Level 40 to 50: The last stretch… for now…

Reminder Level 40: Queue up for guildhests Ward Up and Solemn Trinity.
Level 40 Battlecraft / GC Leves: Whitebrim, Coerthas.

Once you hit WHM 40, the first thing you want to do is gain a few quick levels – How? Hunting Log (as much as you can), Challenge Log (any uspent entries), and Daily Roulette (Guildhest and Low Level). You need to get a few levels quickly here, since our next destination is CPP, Northern Thanalan to FATEGRIND. Mor Dhona is the next logical step, but it’s often not very populated. Check the PF or Shout – you’re gonna need a party for the early 40’s here.

Reminder Level 45: No more guildhests for now :(
Level 45 Battlecraft / GC Leves: St. Coinachs Find, Mor Dhona.

Level 46 skill reminder – Aero II: Well, finally you get another basic DPS skill. Starting off with Aero II -> Aero should be standard for any WHM! Of course, if the enemies are weak just spam Stone II.

At level 49, you might as well finish all your WHM hunting logs. They’re pretty much useless after.

End-game resources for your White Mage

So you’ve hit max level – CONGRATS! What to do now with your sparkly new WHM?

  • WHM BiS – Best in slot end-game gear and some tips on how to get there.
  • WHM Healing Guide – Some tips on how to maximize your WHMs potential!
  • Raid Guides Directory – You SHOULD be at least attempting to clear coil, right!

It’s been a long journey leveling your White Mage – but fortunately the adventure is JUST BEGINNING! Thanks for reading! For more updates check Like our Facebook! Hit us up on Twitter! Ciao!

<nextpage> (Will paginate this once 3.0 portion is completed)

White Mage – leveling up 50 to 60

Level 50 Battlecraft / GC Leves: ???

Level 55 Battlecraft / GC Leves: ???

This section is reserved for The 3.0 Heavensward update. For now, check out our Heavensward info page.

Follow us on Facebook for more FFXIV updates!

FFXIV Heavensward 3.0 Information!

All YOU need to know about Heavenward HERE! The first expansion of FFXIV: Come see what ‘3.0’ has to offer!

Hi guys! Get HYPED for HEAVENSWARD, the first official expansion of FFXIV! Heavensward (or FFXIV 3.0 Patch) has a veritable CHUNK of content. Let’s see what’s goin on in Heavensward! Forgive me for the long load time, there’s a chunky amount of info and images here! (will be constantly updated until launch)

Heavensward (FFXIV 3.0)

Trailer & Basic Info | Level 60 | New Areas |
New Jobs | New Race | Airships & Flying Mounts |
| Trials: Alexander, primals | DoH & DoL | Useful Resources

Official Heavensward Trailers(s)

Heavensward: Basic Information

FFXIV Patch 3.0 “Heavensward” will be released in June 23 2015.
If you pre-ordered Heavensward, you will be able to play in Heavensward Early Access: June 19 2015
Level cap raised to 60. Meaning new skills and traits for all classes and jobs
Being an expsansion pack, it must be purchased. Where to buy Heavensward?

Pre Order Heavensward! – NA Version (compatible with NA accounts)

You can test how you run Heavensward with the: Heavensward Benchmark Tool.


Level Cap Raised to 60! And everything that goes with it!

FFXIV’s level cap is raised to 60 from 50. What does this mean for us?

  • New gear (as seen here in this 3.0 gear preview)
  • New skills and traits! and cross-class skills too!
  • A new RELIC WEAPON! (yey? ugh?)
    • Yoshida mentions that our 2.0 relic will be relevant (at least in the early phase I speculate)

If you’re late to the party, or worrying to much about gearing for 3.0 – don’t sweat it. Gear obtained in 2.5+ will likely be of no real use come 3.0! ((Back to Top))

Massive New areas, and all things that entail!

So with the level cap increased, that means we will be having new areas to come along with it! This means a lot more than you might first think:

  • Specifically mentioned “Exploration on the scale of launch” meaning HUGE new areas!
  • New FATES, enemies, levequests, hunting logs, side quests…
  • Multiple new dungeons (more than 4 estimated)

The Foundation | The Pillars

heavensward new areas the foundation the pillars

Dravinian Forelands | Dravinian Hinterlands

heavensward ffxiv new areas dravinian forelands dravinian hinterlands

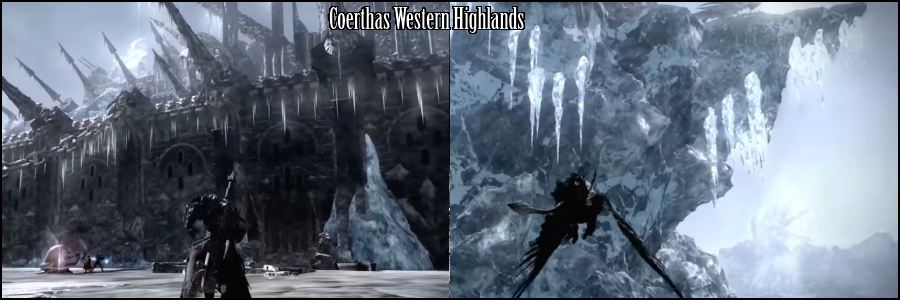
Coerthas Western Highlands

ffxiv heavensward new areas coerthas western highlands

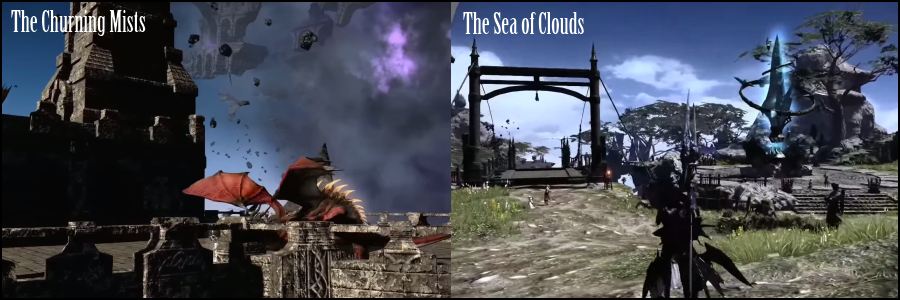
The Churning Mists | The Sea of Clouds

heavensward ffxiv new areas the churning mists the sea of clouds

And yes, some of those picstures do indeed have FLYING MOUNTS. These areas can be seen thru video @ Heavensward: Tour of the North. Again they say the new areas will be MASSIVE! And judging from these screens and vid, they look great. ((Back to Top))

3 New jobs in Heavensward

heavensward new classes dark knight astrologer machinist ffxiv

Dark Knight – Tank class that uses a 2-handed greatsword, supposedly does magical damage.
Vids & other previews:

Astrologer – Healer that uses a ‘celestial deck’, not much is known about this class but they seem awesome.
Vids & other previews:

Machinist – Ranged DPS that has little machine summons.
Vids & other previews:

Supposedly you only need level 30 of any base class to unlock these. My guess is they start at level 50 (purely speculation on the latter). ((Back to Top))

New race: The Au Ra

ffxiv heavensward new race au ra preview

The Au Ra are horned humanoids that we can assume have some relation to dragons (purely speculation). As I learn more about the lore about these guys, I’ll update! Please comment if you know anything. ((Back to Top))

Free Company Airships

Airships can now be built and used by Free Companies! What does this mean? Well the team has a bunch of stuff planned for Airships in 3.0, but not all of it might be implemented ASAP. Here are some of the features regarding FC(personal?) Airships:

  • Airships are built and or improved via Free Company Crafting. (Yeahp)
  • Each FC may own up to four Airships (Each consisting of 4 parts that make up its visual design and function)
  • On release Airships can be sent on ‘ventures’ to explore the vast Sky Islands. They increase in rank as you do this.
  • Airships can bring back rare items from these ventures.
  • In a later update: players may join these ‘air raids’ to find various islands with random properties.
    • Islands containing ‘Notorious monsters’
    • Islands containing rare gathering nodes
    • and, quoting SE, “We have a lot of ideas for these”.

Flying mounts are also coming if in case you missed that by now, haha. Aside from personal travel, not much else is known for their uses. ((Back to Top))

New Raid: Alexander! New (and Old?) Primals!

Primals in Heavensward

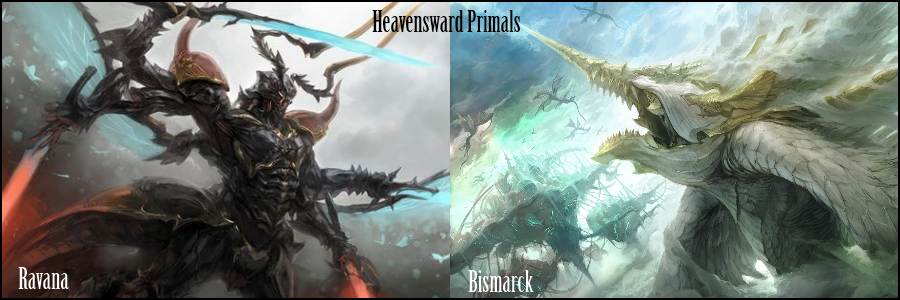
heavensward ffxiv new primals ravana bismarck

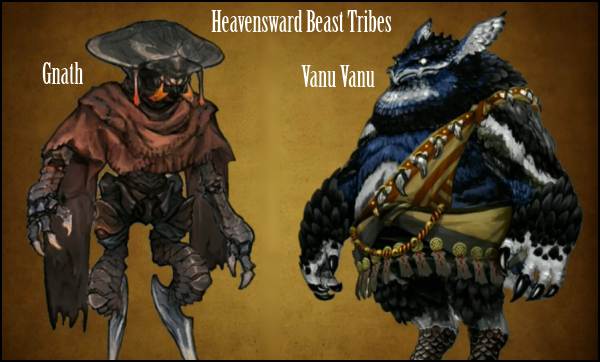
Many Primals will be part of the 3.0 storyline, and our trials. Older players would recognize Bismarck. An all new primal making it’s debut in FFXIV is also coming: Ravana. Of course, what are primals without BEAST TRIBES? Of course, 2 new beast tribes will be making their debut here in Heavensward as well. The Gnath and the Vanu Vanu.

ffxiv heavensward new beast tribes gnath vanu vanu

While they say Beastman quests might not be out for 3.0 straight away, they will definitely show up sooner or later. Of course, 3.0’s Primals and Beastmen are not limited by the two above, and we will likely see many old faces. ((Back to Top))

Alexander: Heavensward Raid

ffxiv heavensward alexander raid

Much like the Binding Coils of Bahamut, we assume 3.0’s entirety of raiding will take place in and around Alexander. Older players will recognize Alexander as a “primal”. He’s most known for his recent appearance in FFXIII series as the ‘summon’ of Hope Estheim. His elemental affinity in most FF games is Holy – and for the old school guys – would remember his epic battle versus Bahamut in FF9. His appearance in every FF aside from 13 is that of a FULL SIZED CASTLE.

3.0 will be the first patch wherein raiding is split into EASY and HARD mode. Easy mode is meant for more casual players to traverse through coil, while Hard Mode will yield the highest item level, and will be the main focus of progression raiding. How the loot/lockout/unlocking of these modes is still a mystery to us.

Well, what exactly his significance is in 3.0 is yet to be known, but surely I’ll be spending a lot of time in there. While many hardcore raiders like me are left with a ton of unanswered questions about progression, we are definitely happy nonetheless! ((Back to Top))

Changes in Crafting / Gathering?

Crafting in Heavensward

Crafting is getting new recipes, obviously. Mentioned above, there will be “company crafting” which caters to Airships and Housing Items. They said that houses can now be “Glamoured”. In any case the biggest news in crafting will be the introduction of specializations. Specializations will make it such that no one guy can craft everything. 

Oh, and crafters will be getting a brand new “AF” look, check out how DoH AF looks like in 3.0.

Gathering in Heavensward

Of course, new nodes will be appearing in 3.0+, but aside from that there seems to be no news regarding any major changes to gathering. If anything at least (like crafters) Gatherers get a brand new AF look in Heavensward.

I’m a a fan of crafting and hope they really expand on it. Gathering on the other hand…. well I hope they have some great plans for it come 3.0 :)
((Back to Top))

New player? Need help? Old player, need advice?

For new players: I specifically created a leveling up guide that will serve your needs till the foreseeable future: Leveling general guide. I would suggest any vet to read this too, you might learn something.

For old players: You can check out my ever-growing compilation of ways to prepare for Heavensward. Newer players should also check this out just in case.

((Back to Top))

Heavensward Resources

Heavensward: Official Trailer: SE’s first 3.0 trailer.
Heavesnward – Tour of the North:
 Official SE vid showing various maps. Seriously.. the soundtrack…
Reddit post detailing 3.0 in PAX East: translated ‘notes’ regarding 3.0
Heavensward Benchmark Tool: see how your rig runs 3.0
Preparing for Heavensward: Our little guide on what you can do NOW to affect your gameplay in 3.0

and again in case you haven’t already:

Pre Order Heavensward! – NA Version (compatible with NA accounts)

Please comment or add whatever else you may find out about Heavensward! Good luck for 3.0 and beyond!

Follow us on Facebook for more FFXIV updates!

FFXIV Tanking stats: Parry or DPS!?

Should you consider Parry on your gear? Should all tanks go DPS 100% of the time? Are Parry tanks baddies? COME IN AND LEARN.

Hey guys! If you’re here, then you’re probably wondering what’s all the fuss about tanking and parry. Here, I’ll let you guys know MY stance on tanking, parry and all things in between. (I also wanted to write a resource I could link to, instead of repeating myself ad infinitum, haha). Hopefully, this guide will help you decide what’s best for YOU in this regard. Here goes: FFXIV Tanking & Parry guide!

(Disclaimer: Even a post this long doesn’t encompass the entire argument. I will be adding to this in the near future)

The Problem: War of the Parry camps

Two main camps exist. “Parry sucks nuts” and “Parry is needed“. This mini-conflict has affected even me, when writing the PLD, WAR and soon to be DRK BiS lists. Now that I’m going to write this easy to go-to resource, that will change. I’ll list down the main points of each side.

Parry sucks nuts

Parry scales poorly, therefore don’t use it.
Parry is random, so how can we rely on it?
Parry sucks because all attacks are scripted
Parry should be replaced with DPS stats (DET > CRIT > SS)
(MAIN CON): Higher risk of death

One (human factor) thing I dislike about this camp is that SOME tanks on this camp call tanks with parry “bad”. While this is not true for most of them, it does exist. I definitely see why tanks would want DPS gear. Two main reason being: fighting DPS races. However, not all tanks/ scenarios/ statics are equal, so you cannot just blindly put DPS stats on your gear – and blame your healer when you die.


Parry is needed

Parry helps mitigate damage, every little bit counts
Parry is still a lot better than some DPS stats (CRIT & SS)
(MAIN CON): Garbage DPS

These guys are a little more old school, and I see why their logic is sound. The more damage you mitigate, the less risk for your raid. But I also concede that you cannot just blindly put parry on your gear. There is such thing as sacrifcing too many stat points into something you might not maximize.

So how do we make sense of all this? Both sides make valid points, both sides have ups and downs. We should ask ourselves a more constructive question. Instead of “Does parry suck or not suck?” we should ask ourselves a better question, “When should we focus on DPS, or Parry and why?

Analyzing Gains: What does each stat DO FOR US

DPS Stats for tanking: Why? Let’s ask ourselves, realistically, what gain can be had when itemizing for DPS?

  • Pushing phases.
  • Beating enrage timers.
  • E-peen

Parry for tanking: Why? Again, what gains can be had when itemizing Parry?

  • Less risk of death
  • More free mana and time for healers (subsequently increasing healer DPS)
    • This point is moot if your healers arent DPSing or conserving mana when needed.

These are all valid points. Let’s discuss each one, and let’s try to gain some insight on what exactly is going on here.

(DPS)Pushing Phases: First we must Identify when specifically pushing a phase matters. And I mean MATTERS, not just for some BS reason for the sake of pushing a phase.

Pre 2.4, upon entering T6 Savage, it soon became painfully obvious that having any more than 1 honey spells out a very, very difficult P2. So we squeezed out as much DPS as possible, this included having our Off-tank (Warrior) Mitlet Gyles wear more and more DPS gear until we were sure we could Phase with 1 honey even given sub-standard RNG. We weren’t just pushing phases for funsies – having 2 honey was FATAL. We can consider the above use of DPS stats, viable.

Example of not viable? “Wear DPS gear all the time just to push phases, because, you know… pushing phases is good”. Aye, I get it. Pushing phases is never truly a bad thing. But not all phase-pushing is equal! Sometimes you NEED it, and other times it’s just a luxury.

(DPS)Beating enrage timers: Very similar to the above. If you guys have a good run, but still lose to enrage – you have to squeeze extra DPS somewhere. Our first enrage wipe in T13 was at 3%, but had a death in final phase. It was too close to call – so our OT at the time Claes Henrietta (Warrior) wore another 2 DPS accessories to cover any possible randomness.

Example of not viable? Wearing full DPS gear in an encounter you just got into fearing enrage timer. You’re giving undue stress to your healers and not gaining as much experience as you can. So in essence, we should try for a more defensive setup when learning, and as you gain more experienced when to use cooldowns / knowledge of mechanics – we can push for more DPS.

(Mythbusting) DPS is king, Parry sucks ’cause everything’s scripted: BS. Pure BS. Yes, heavy attacks are scripted in (IE Death Sentence, Ravensbeak/claw, Flatten/Akh Morn). Basic attacks? no. If you’re gonna tell me to my face boss basic attacks don’t matter – you crazy. Having less damage from basics gives your healers a huge windfall in mana. Or in another perspective: opens up more healer DPS.

(PARRY) Less risk of death: The uncool counterpart to DPS’s points. I think because it’s a boring, linear point is why it gets so much hate. But is it true, no matter how you spin it. But this also has a small caveat: This only works when you’re actively taking damage. That’s one point we will discuss later.

(PARRY) More free mana and time for healers: Again, another upside. Less stress on healing. but to truly capitalize on this point – you need decent healers! If they’re wasting mana anyway, or never DPS… what’s the point!? I guess the only way around this is to monitor/advise/communicate as a TEAM. So this can be considered a con… “more parry doesn’t apply to all groups”, but also “more parry assists in the success chance of PUGs” (in terms of safety).

(SUMMARY) Both DPS and Parry are good: WHEN THEY ARE IN EFFECTThis is an interesting conclusion, while quite obvious, there are a lot of complex ideas behind that simple sentence. DPS stats are great, but are severely dulled while MTing. Parry is great too, but SUCKS when OTing! What a conundrum… But I think you see where I’m going with this.

The Solution: Maximizing your stats to your role

This is my stance. For a long time I haven’t been writing the most flexible of tank BiS’s because a page like this didn’t exist for further explanation. Now that I’ve gotten around to writing this – things will change. Now that we see how, when and why both DPS and Parry are good – how do we maximize this? If we cannot come to one solid scenario for a case to state “All tanks must parry”, or “All tanks must DPS” then we do what logically comes next:

As tanks, you should CREATE the ideal scenario to maximize your stats.

Okay let’s take a scenario, and try to maximize our gains for each type of tank.

Encounter example: T12 Phoenix
Main Tank: PLD
Off-tank: WAR

Phoenix has a forced tank-swap: Revelation. No tank can survive 2 Revelations, and we ASSUME that it comes every minute. With the exception of Hallowed Ground / Holmgang – a second Revelation will definitely show you the truth (AKA Respawn prompt). So if we go by every minute the tanking sequence end up like this

Assumptions

  • let’s say, 10 minute fight. We will see 10 Revs, and Phoenix dies before the 11th minute
  • First rev happens after 1m, then every minute after that.
  • for simplicities sake let’s ignore Brand
  • Also, swap 10s before next rev

So if they did things “normally” they MT 5 minutes each, split evenly.

If both tanks itemize DPS: for 50% of the fight, your DPS stats are reduced by 25% efficiency (from stance)
If both tanks itemize Parry: for 50% of the fight, your parry is useless. (not ideal)

That’s a big case for DPS right here. So in the most brainless of scenarios, DPS is the clear winner – at the sad expense of us healers (hehe). But is this the best we can do?

Now lets say we utilize our skillset to the fullest. The PLD will use HG to survive 2 “Second Revelations” and laugh death in the face… the tanking order looks like this.

  • PLD (01:00) Revelation
  • PLD (02:00) Revelation: Hallowed Ground
  • PLD (02:50) Revelation soon (Tank swap) (PLD 2:50)
  • WAR (03:50) Revelation soon (Tank Swap) (WAR 1:00)
  • PLD (04:50) Revelation soon (Tank swap) (PLD 3:50)
  • WAR (05:50) Revelation soon (Tank Swap) (WAR 2:00)
  • PLD (06:50) Revelation soon (Tank Swap) (PLD 4:50)
  • WAR (07:50) Revelation Soon (Tank Swap) (WAR 3:00)
  • PLD (08:00) Revelation eaten (PLD 5:00)
  • PLD (09:00) Revelation: Hallowed Ground (PLD 6:00)
  • PLD (09:50) Revelation soon (Tank Swap) (PLD 7:00)
  • WAR (10:50) Phoenix dies around this time or much sooner (WAR 3:xx)

So in this example, let’s use a a 65-35% uptime between PLD and WAR respectively.

If PLD itemizes Parry: for 65% of the fight Parry is working for you (an improvement to 50% in previous scenario)
If Warrior itemizes DPS: for 65% of the fight, DPS stats are at max (an improvement from 50% in previous scenario)

But wait… Warrior can and SHOULD use Unchained only when he’s tanking.. further increasing uptime!

If Warrior itemizes DPS: for 75% of the fight, DPS stats are at max (further improvement > 65 > 50)

The answer is dead simple, yet most people don’t see it. Parry is better the more you MT, DPS is better the more you OT… that’s quite an unexciting answer after all this discussion!

Clarifications, Summary and Recommendations

1) The more you MT, the better parry is (and the WORSE dps stats are due to stance) – So why spec DPS if this is the case? The more you OT, the better DPS stats are – SIMPLE! So instead of stubbornly picking and sticking to one camp – the first step of evolution is to keep the above statement in mind.

2) Warrior Unchained makes DPS stats more weighty. Ignoring the Defiance reduction is HUGE. This makes more sense for warriors to OT. Paladins make a more stable MT anyway, given they can also block! So why force the issue of “equality” – Maximize the strengths of both classes!

3) Adjust your strategy to accomodate these itemization choices: The most important thing we’ve learned here today is that all this theorycrafting is absolute garbage if you don’t find ways and means to push this strategic advantage to its absolute max. Some encounters already do this for you. In T13, you have a 14 minute encounter wherein the MT stands in front of Bahamut for 10 MINUTES. Not counting the Zoo phase, this gives warrior almost 100% uptime without Defiance! The only exception is the P2 adds (what… 1 minute total?)

Now I wont stop you if you still insist on stacking DPS stats if you MT most of the fight. But keep in mind, doing this is gimping your team. The solution? Owning a great mix of gear should cover all your needs. Being stubborn and inflexible isn’t pro – that’s being BAD.

“Im on 100% DPS gear and healers cant keep me up – damn pugs!” You can try wearing parry and see how it goes. Cleared the fight and didn’t hit enrage? Good. You hit enrage? Switch up some gear. Can’t clear with either sets? You or your group are fundamentally flawed – and itemization doesn’t matter.

“I cleared this/that boss with DPS/Parry and I don’t agree with you” If you’re overgeared, none of this matters. I can clear T13 with both tanks rocking 0 secondary stats if you’re in full 130. But if you REFUSE to see when a situation or strategy needs either Parry or DPS, that’s just limiting yourself. Having one statement be the clear RULE applying to all tanks/ composition / scenarios / encounters is downright FOOLISH.

But I’m sure as many tanks read this, we will still have diehard DPS campers, and diehard Parry campers – and that’s fine. I just wished to throw my stance out there.  Hopefully this helps out anybody whose considering being a tank – and those current tanks who might want to learn a thing or two. Again, these are my own thoughts and I’m not forcing anyone to side with me.

Anyways – GOODLUCK parrying and DPSing where necessary, haha! Hopefully our Parry vs DPS stat guide for tanking helped you out somehow. If you have anything to contribute, please comment.

Follow us on Facebook for more FFXIV updates!

FFXIV White Mage Healing Guide (Cooldowns, DPS, etc…)

Everything you need to know about WHM gameplay. (almost)

Hi there! If you’re here, then you’re probably interested in learning a little bit more about White Mage gameplay. Well, you’ve made the right choice! In this White Mage Healing guide, we will be discussing all aspects of WHM in-game mechanics – Healing, Cooldowns, DPS, and a smattering of my thoughts / experiences. Hopefully you guys will learn even a bit!

DISCLAIMER: This guides main purpose isn’t to tell you EXACTLY how to play your White Mage. My aim is to give you the tools necessary to make decisions, form up new strategies, or get value where you might not have before.

White Mage Healing: The tools of the trade

Regen: in 99.9% cases, Regen should always be up on your current main tank while actively engaging enemies/boss. That’s non-negotiable – but there are things you should consider:

DO NOT reapply Regen if your tank is in immediate danger. If your tank MAY die in the next 2.5-5s, DO NOT reapply Regen if  it’s down. Regen is a tool to be used when things are relatively safe, and helps you incrementally. It definitely won’t solve anything RIGHT NOW, and don’t be too anal about the 100% uptime.

Clipping Regen? Most of the time you DO NOT want to clip Regen (Reapplying it before it’s icon disappears). Before we discuss this we have to study some of Regens stats…

It takes 15 seconds for Regen to be equally mana efficient as Cure I. (6s left on Regen)
It takes 9 seconds for Regen to be equally strong as a Cure I (12s left on Regen)
Regen costs around 40% more than Cure I, but heals for around 160% more.

I would only clip my own Regen if I know my GCD’s will be very valuable in the immediate future. Some examples:

The height of T13’s Zoo phase is coming, I want to make sure my Regen will be “fresh” for the upcoming heavy damage. If there’s an existing Regen, I wont hesitate to clip it.

Divine Seal+Regen: My Divine Seal is about to wear off – squeeze value by making regen your last skill (even if it’s already on)
36s Divine Seal Regen: Applying Regen upon casting Divine Seal, and once again before it wears off results in a 36~ second mega-Regen.

Don’t be too anal about this. It’s not the end of the world if you clip regen – just make sure you do it for a reason.

The most experienced White Mages will have this simple mantra: “I will use the RIGHT spell for the situation”.

Cure I or Cure II?: Most white mages have a misconception about when to use Cure I versus Cure II. Some people have a mysterious stigma against using Cure II at all, which is laughable. First, ask yourself what is the CORE difference between these two heals.

“At the cost of a mana, we get out of potentially troublesome situations faster”

FASTER – that’s the feeling that drives most WHM’s from using Cure II. Two Cure I’s would be even stronger than a Cure II, but people want to be stress free NOW. The difference between a common and experienced White Mage? One of them knows when “faster is necessary”. What’s the main determining factor of this? RISK. The higher the risk of the situation, the better Cure II becomes. How do you know when it’s risky? EXPERIENCE with the encounter.

Doing too many Cure II’s is the sign of a panicked White Mage, and your mana will go dry asap. Doing too few? It’s a sign of an all too fussy WHM who’s obsessed with the thought that mana conservation gives you style points. The most experienced White Mages will have this simple mantra “I will use the RIGHT spell for the situation”.

Identifying and squeezing value out of Stoneskin, and integrating it into your raid strategy
is a mark of an exceptional WHM

Stoneskin: Our only shield, and an extremely important weapon in the White Mage repertoire. It’s main use is to prepare people for massive incoming damage. the downside? Its slow-ass cast time. Hopefully I don’t need to explain this (It’s primary use)  further. But is that all there is to Stoneskin? Certainly not.

– In about 5 seconds, you know an add will spawn. SS your off-tank!
– You’ve just switched on Cleric Stance and something ‘feels wrong’. After Aero II you decide that, to reduce risk, you need to heal somebody. Stoneskin isn’t affected by cleric stance! It still shields for the full amount.
-Stoneskin while MT is running to pull. It blocks another hit.


Need a more advanced example?

In T13 (early on) enrage was a real threat. Healing was also very tight in some phases (Mega->Rage->Giga). Megaflare stack + tower was FATAL even with succor + soil. This caused our BLM to move unnecessarily when MEGA+Tower happens.By Stoneskinning him, he didn’t have to move out for tower, allowing him to cast without interruption. Same for myself, I can IMMEDIATELY channel an AoE heal for Rage of Bahamut right after Mega+Tower, not needing to move out of tower. Instead of “wondering if tower will spawn on me, and having to move out” – a simple Stoneskin streamlined the process.

Remember, It’s our only shield. Yes, it has a prohibitive cast time and not always usable. But identifying and squeezing value out of Stoneskin, and integrating it into your raid strategy is one of the many points that separate a basic WHM froman exceptional one.

Medica II is the hero we deserve, but not always the hero we need

Medica, Medica II, Cure III?: White Mages have 3 AoE skills. What’s the right time for each?

The basic answer is: Medica II. Medica II is hyper-efficient and amazing as long as you’re actually healing anything. 99.9% of the time Medica II is mana WELL SPENT. But what about the others?

Medica I serves a niche purpose. When you need to heal more than 2 people NOW. It has a faster cast time and costs less than Medica II, but is much much weaker. Never feel bad about using it though, as long as those few guys NEED to be healed ASAP. Never, NEVER use Medica I after Medica II just so “their life bar is full”. Again the main feeling you need in your gut before you channel Medica I is “Do these people need to be topped up RIGHT NOW?”.

Here’s an example of when that’s necessary: AoE comes out and Medica II is, of course, the max value heal you can do. Now, some guys took heavier damage than normal (no DK or Path…). While Med II would usually be safe… due to error some guys need to be topped up. Multiple cures would be a waste of mana and time… just bite the bullet and Medica I.

Cure III? The oft forgotten brother in the bunch. Cure III is the strongest AoE cure (in terms of burst). It’s weakness? Proximity. Cure III isn’t always heard about because it requires 1 thing to pull off successfully: Strategy.

Okay, example. Megaflare followed by Giga right away. You Medica II’d because that’s SOP. Well, Gigaflare is coming in about 4 seconds. Your teammates are too spread out! Desperately, you attempt to Medica I but still get crushed by Giga. Cure III would have gotten you out of this situation quite easily. But everyone has to get the memo. Your raid must know that, even in fringe cases, WHEN to stack for Cure III. So while there are situation only CIII can handle, everyone has to be on the same page strat-wise.

Finding creative uses for Cure III should always be on your mind. Healing both tanks with Akh Morn? Check. Need a big heal on myself and the guy running toward me? Channel Cure III. There’s a ton of ways to use Cure III, but be careful – don’t try to force it just to show off.

WHM Cooldowns: Best Practices

Shroud of Saints: Our most important cooldown. It gives us back some mana – the reduced enmity part doesn’t matter most of the time. Shroud has a 2 minute CD. In a 12 minute fight, I would realistically want to use Saints 5 times. Any less, and you should consider it YOUR ERROR. A general rule? try to use it after the first or second minute of the fight, and on cooldown from there. Holding on to if for “when you’re really low” makes NO SENSE. Using Saints actively keeps you further away from the “really low” state.

Divine Seal: is our basic cooldown. Short duration, short cooldown. Basic increase to healing potency! What’s not to love. You know what’s not to love? When you aren’t using it enough!! Let’s run down the basics of DS. DS has a CD of one minute. Thankfully this lines up perfectly with alot of mechanics. It lines up with alot of mechanics. T13 P2 adds? Once a minute. Final phase Megaflare? Once a minute. T12? Bennu? Once a minute. So on so forth. DS has three main uses if we analyze the core of what drives us to use it. One is “saving mana“, “fixing errors“, and “increased output

Saving Mana: There are some lull phases in every encounter. You can do the “36 second Regen” during this time. This saves alot of mana since SCH pet + this can heal through alot of basic attacks. Also in some mechanics (T13 final phase Mega as an example) where Med II wont heal your team fast enough in preparation for the next mechanic. You can use Divine Seal to make sure it does. (A side note on medica 2… it leaves a HoT on MT so there really is alot of value in that spell)

Fixing Error: In any case wherein a sudden burst of healing may help you – IE partner healer dies, tank must get another add since OT dies, etc. Divine Seal can definitely help you out of a bind. Not much to explain here

Increased Output: would be the standard category wherein most DS uses fall. If an add spawns, use DSEAL and regen both tanks, greatly preventing risk to both. Increased CI/CII of course. Basically, stronger healing = lesser risk.

The best White Mages are aware of these scenarios, and balances the usage of Divine Seal so that it’s never “up for too long”. Only saving DS for the same niche scenarios every time is definitely value lost. Hell, you can even DS Regen on pull – that’s some value gained right there.

Presence of Mind: The ultimate WHM cooldown. Double Spell Speed is no joke (and a small bonus why I itemize SS~DET for my BiS). Presence of Mind will allow you, practically, to solo heal almost any known encounter for its duration. That’s not a joke when you think about it. PoM is so strong that I almost feel guilty using it. Identify the riskiest parts of each encounter and feel free to use PoM there! Combined with Divine Seal, this can lead to even more disgusting things. Note that PoM reduces cast AND recast rate, so enjoy your GCD’s!

Sadly, alot of PoM’s are wasted via “both healers have swiftcast down” scenario wherein it becomes a speed-up for Raise. This isn’t a bad use, take note, it’s a necessary evil sometimes.

Eye for an Eye: Often underused or misused. First, I’ll break down what E4E does:

Your target gets the buff for 30 seconds.
Anyone hitting the buffed party member has a 10% chance to be “tagged” each time they hit that person.
Any enemy tagged by E4E deals 20% less damage for 20 seconds. This can refresh.

So what are we looking for in targeting someone with E4E?

Must player must be “getting hit” for the next 30s at least. (Nearing tankswap? Just tanking an add? NOPE)
The enemy must be present in the battlefield for (at most) 50s. (Add that dies quickly? Boss about to invul? NOPE)

So 99% of the time using E4E on main tank is the correct choice, since most of the damage comes from the boss. The boss also has the highest chance of triggering E4E, and will likely live long enough. Lets study a specific scenario and how to improve E4E’s use:

T8 – Dread spawns in 15 seconds:

Scenario A: One or both E4E are used on MT and OT respectively upon dread spawn.
Scenario B: Apply E4E on MT right now.

Which scenario is best?

Scenario B is the right choice. Why? A doesn’t really do anything unless you have extreme luck. E4E might not even proc fast enough for it to help during this “heightened risk” time in the raid. So why is B more legit? If we E4E the MT early, we give it more time to proc on the boss. So once the dread comes out, our MT will be at less of a risk, and we can focus a little more on the OT’s survival!

Remember guys, the longer E4E has time to bite, the better it is. Don’t expect E4E to take effect ASAP – the best healers know to precast E4E so it will help them when they need it. Not leaving things up to RNG.

VirusAs a White Mage, virus sucks a bit. It doesn’t reduce magical damage unlike our Arcanist buddies. So most of the time we can throw Virus on adds without having the feeling of wasting it. In fact, you should be doing this! I can give billion examples of adds worth virusing by White Mage, since the SCH/SMN virus is far more important. T8 Dreads, T12 Bennu, T13 Red, T5 Asceplius, T6 superslugs, T7 Deathdancer – the list goes on.

Long story short, since Virus for WHM only reduces physical attacks, it severely lessens its practical applications. That doesn’t mean we shouldn’t use it as much as we can. We can even throw it to main boss if we’re sure Virus wont be needed in the next 45s (You cannot virus the same target 45s after initial Virus expires). Smart communication with your other casters in your raid should yield an optimal Virus setup for any encounter!

White Mage DPS Rotation

While a very unpopular choice, WHM’s can still DPS. In fact, if you do zero DPS, there’s something wrong with you. But sadly our horrific accuracy prevents us from doing this efficiently if we don’t specifically meld gear for it. Lets look at all the WHM DPS skills at the table below:

SpellInitial3s6s9s12s15s18s
Stone II170------
Aero50(+25)75100125150175(!)200
Aero II50(+40)90130170(!)210--

What does this table tell us? Well first of all our point of comparison is Stone II, which is for all intents and purposes, the WHM basic attack. Our only 2 other basic attacks are Aero and Aero II (DoT’s). The WHM DoT’s match up quite poorly to Stone II. Clipping them in any way doesn’t give a net gain of Potency at any practical point. Good news it they’re more mana efficient than Stone II. Bottomline is do not clip Aero or Aero II. On a side note – Holy is our strongest potency skill, but has a restrictive cast time and mana cost. Only use in packs of 3 or more (sometimes 2). IE, AoE situations.

DoT’s fell off? It’s not the end of the world. Aero I should never be cast on an enemy whose life expectancy is less than 15s. Aero II should never be cast on an enemy whose life expectancy is less than 9s. Basic stuff, but it should be mentioned.

Here are some guidelines to get max value from your DoT’s
– Once Aero I has 1 second left on enemy, it’s 100% safe to recast it.
– Once Aero II has 2 Seconds left on enemy, its 100% safe to (pre)cast it.

Aero I is a little special, though. It’s a zero cast time skill, which WHM’s only have 2 of (Regen, and Aero). So it’s an excellent filler while moving even when out of cleric stance. It also serves as a great spell to use before using any of your buffs. Clipping it because you’re moving isn’t so bad. It’s better than just staring into space.

Most of the time, I consider WHM baseline DPS to be switching to Cleric, doing Aero II, Aero I, Fluid Aura then switch out. If you do this every 30s (CD of fluid), you’re probably doing more DPS than 90% of WHM’s out there.

I can go on a long explanation why SCH’s are supposed to do more DPS than a WHM. There’s plenty of reasons, but the main one would be SCH’s 3 skills which CANNOT MISS, as well as being in Cleric Stance as less disruptive to the SCH kit as compared to WHM’s. I guess portion belongs in my upcoming geberal healing guide.

Best DPS opener for WHM

Areo II, Aero, (Walk during GCD + Swiftcast), Holy (Stone II if mana may be an issue), Fluid Aura (on GCD), consider Saints Shroud (Revert to healing, or continue to use Stone II). Consider using PoM in this opener, too! But like all things healing, this isn’t so cut and dry. This opener does 1950 potency if you used 7 Stone II’s in your PoM. You can use a Mind Potion, too. That’s a ton of burst.

Related WHM Resources

White Mage BiS

(more resources to be added when they’re fixed, I guess)

Well thanks for reading my White Mage healing (and other things) guide. “But Mahiko San-” ADD IT IN COMMENTS! I’d love to hear from you guys. This is feels a little bloated at nearly 3000 words so I’m consideration halving it or… well I just kept writing and this is where it’s at (for now).

Follow us on Facebook for more FFXIV updates!

FFXIV Chocobo Breeding & Racing: Whip it good!

How to breed the ultimate Chocobo – Rip up the racetrack and read the many many FAQS of breeding and racing! Feed, Pedigree, RNG and MORE!

So you’ve decided to exploit your feather friend(s) in Chocobo Racing? In this Chocobo Racing guide, we will discuss both major parts of the whole system: Breeding, Training, Feeding (everything about Raising) Chocobos is discussed in page 1 of this guide. Page 2 will be detailing the Racing Side (Tracks, Strategy and other race related information)

But for the 1M MGP question: “How do I start/unlock Chocobo Racing!?Gold Saucer, WEST of ENTRANCE DESK there is an elevator lift, here’s where you start the quest for Chocobo Races. Remember to activate the aetheryte here so you can aethernet goin’ up here.

All about Chocobo Breeding & Raising

Chocobo Feed (for Racing)

You are what you eat. Not surprisingly, this applies to Chocobos as well. Each time your chocobo levels up, you get ONE TRAINING SESSION. This basically means you can give him 1 piece of food. Grade 1 food gives 1 of the chosen stat, Grade 2 food gives 2 of the chosen stats, Grade 3 food gives three of the chosen stats.

You can buy grade 1 food in Bentbranch Meadows, CSH (20, 22). for 1500 Gil. You can buy Grade 2 food in GS for XXX MGP and Grade 3 food in GS for YYY MGP. First of all let’s look at how this pans out for the future of your chocobo racer. (For the table below, we assume average of 4.5 stats gained per level up, and looking at minimum breeding rank of 40)

Chocobo Feed?LevelupsFrom foodTotalCompare
1 all the way190402300%
2 all the way1908027017.4%
3 all the way19012031035% (15%)

Note that stat CAPS increase as the grade of your chocobo increases.

Hopefully you can make sense of this table. Though the importance of feed will SEEMINGLY be alot less as our chocobos rank up, time will tell. All I know is, the better feed you use, the easier it is to level up early on. Why? Because your chocobo will be a chunky % stronger than any chocobo fed on lower tier food – making winning races easier. It’s important to note that FEED DOESNT IMPROVE STAR RATING (I guess you can say the stars are genetics).


Chocobo Feed FAQ

Where do I farm Gregarious Worms / Mazlaya Greens? These appear in the unspoiled nodes of Gold Ore and Black Truffle respectively.
Mazlaya Greens: ETH XPM (Mazlaya is in slot 2, Black Truffle is in slot 7)
Gregarious Worms: ETH 9AM ET (Worm is in slot 1, Gold Ore is in slot 6)
They can only be gathered ONCE though.

How do I maximize each Worm/Green node? Use toil to discover the unreachables (no way around this). Gather the non-worm or non-green node until you’re at the last hit. Then use Blessed Harvest / Kings Yield so you can get more than 1 of these guys. You need close to 700 GP to do this (Since you gain a little gp while hitting… im guessing 675 is enough)

How can I easily get these feeds? Grade 1 can be bought with gil (don’t bother crafting this). Grade 2 can be bought with MGP or crafted, Grade 3 can be bought with MGP only. I prefer to craft Grade 2’s, because MGP is a bit harder to come by.

Where do I get this fruit!? that seed!? Okay, this needs table. (remember, Krakka Root seeds are bought from housing vendors)

Stat foodPlant neededCross 1Cross 2
SpeedSylkis BudKrakka RootAlmond
AccelerationPahsana FruitKrakka RootLinseed
StaminaMimett GourdKrakka RootMidland Cabbage
EnduranceTantalplantKrakka RootWizard Eggplant
CunningCuriel RootKrakka RootChamomile
Gregarious WormETH9AMSlot 1
Mazlaya GreensETH1PMSlot 2

Remember, if you’re attempting to breed these on your own, crossbreeding happens when you plant the seed. I guess the guys over at (ffxivgardening/planner) are a better source for this.

Breeding the ultimate Chocobo

I wish I could tell you guys more about this, but here is what I know for now:

Minimum Breeding Rank is 40. Once you “cover” (aka resign) your chocobo, you will now get something like a breeding permit. This breeding permit records the stats of the chocobo you retired. There are, however, some curious caveats. Once you cover a choco – you can use it to breed a max of 10 times.

AS I WAS WRITING THIS, I HAD TO DELETE A CHUNKY AMOUNT OF TEXT – There is still to many unknown factors, but I’ll continue to my conclusions in a bit. Check these out for other breeding info – here’s my take.

The ultimate Chocobo is a grade 9 4 star in each of the 5 statsWhile that may be obvious, we need to understand “how” we’re going to get there. And trust me, the HOW part is the bummer.

Star ratings are genetics: You cant improve them: no matter what grade of food, you cannot improve genetic garbage. Stars determine 2 things (starting stats, stat cap and possibly stat growth)

Stap cap calculation: Is a bit weird. I’ve seen some examples.. but I think I need to see more grade 3 and 4 chocobos. But in a nutshell – better star rating, higher stat cap. This formula I found, by /u/fawksb seems to hold up so far: (40x((Pedigree-1)+Star Rating))+20. So this would mean the ultra chocobo has 500 max in all stats, which is 2500 total stats.

When does my chocobo learn a skill? At level 10, your choco learns a random skill. Using MGP, you can unlearn a skill your chocobo got. If you unlearn, you get a new random skill the next time you rank up.

Follow us on Facebook for more FFXIV updates!

FFXIV Triple Triad ULTRA Guide (Card & NPC list, etc…)

All you need to know about Triple Triad! Card list, NPC challenge list, where to get cards, Progression… basically, CARDS.

Hey fellow Triple Triad fanatics! In page 1 of our Triple Triad Guide, I’ll be putting what most people are here for: NPC list, Card checklist and Pack checklist. I will be adding a page 2 to this, which will likely contain explanation to Triple Triad Basics, Rules explanation and Progression. (Confused about plus/same?)

But lemme just answer the basic of the basics: How do I unlock/play Triple Triad? Unlock Gold Saucer from Ul’dah (Questname to follow), from there just take the introductory tour. but most of you are here for these:

Navigation
P1: Triple Triad NPC | Triple Triad Card list | Triple Triad Packs
Page 2: Rules, strategy & progression

List Triple Triad Challengeable NPC’s

ZoneXYLocationRule ARule BFeePrizeOther Prizes (Chance)
GS47Gold SaucerTriple Triad MasterAll Open-510Spriggan, Chocobo
GS47Gold SaucerJonas of the Three SpadesOpenSame1022Ixal, Moogle
GS47Gold SaucerGuhtwint of the Three DiamondsThree OpenPlus1532Chocobo, Scarface Bugaal Ja
GS47Gold SaucerAurifort of the Three ClubsThree RandomOpen2050Goobue, Scarface Bugaal Ja
GS37Gold SaucerRuhtwyda of the Three HeartsAscension-2559Godbert Manderville, Urianger
GS37Gold SaucerKing Elmer IIIPlus-30117Godbert Manderville, Bahamut
LIMSA1111Upper Decks (Adventurers Guild)BaderonThree Open-2049Baderon Tenfingers
LIMSA1312Upper Decks (Maelstrom base)R'ashaht RhikiSamePlus30117Y'shtola, Leviathan, Merlwyb2PM to 7PM Eorzea time
ELN3530Costa Del SolGegejuruSudden DeathSwap30117Y'shtola, Minfillia
LLN2535Moraby DrydocksMimidoaThree Open-2049Biggs & Wedge-
LLN3515The Grey Fleet (N of Mist)TratchoumThree Open-2047Moogle, Titan8PM to 8AM Eorzea time
ULN1424Memeroons Trading Post (W)MemeroonAll Open-1023Amalj'aa, Memeroon-
ULDAH119Steps of Nald (Adventurers Guild)MomodiThree Open-1533Momodi
ULDAH98Steps of Nald (Near Aetheryte)WymondThree Open-1533Coblyn
ULDAH88Steps of Nald (Flames base)SwiftChaos-30110Ifrit, Raubahn6AM to11AM Eorzea time
WTH2217HorizonFufulupaThree Open-2048Thancred
CTH1930The Coffer & CoffinRogerAll Open-1022Pudding, Morbol
CTH2313The Bonfire (Materia place)F'hobhasThree Open-1533Mutamix
ETH2021HighbridgeHelmhartThree Open-2021Ultros & Typhon, Gerolt10AM to 8PM Eorzea Time
STH2440Sagolii Desert (Southmost)HabDescencion-30104Godbert, Thancred, Hildibrand & NashuComplete "Zombies are people too"
CCH1315Whitebrim FrontJoellautThree Open-2048Ixal, Alphinaud & Alisaie
CCH622near SnowcloakOurdilicOrder-2560Blue Dragon, Behemoth
GRID1111New Gridania (W of Aetheryte)MaisentaAll Open-1022Sylph, Coblyn
GRID1113New Gridania (Adventurers Guild)Mother MiounneThree Open-1532Gobbue, Mother Miounne
GRID911New Gridania (Twin Adder base)Vorsaile HeuloixAscension-30117Papalymo & Yda, Ramuh10PM to 3AM Eorzea time
CSH1618Above the 'ramp tree'MarcetteChaos-2560Frixio, Garuda4PM to 8AM Eorzea time
ESH1726Hawthorne HutPiralnautThree Open-2050Succubus, Frixio
SSH1720Buscarrons DruthersBuscarronOrder-2559Raya-O-Senna & A-Ruhn-Senna, Papalymo & Yda
SSH1628Camp TranquilLandenelFallen AceRandom2553Odin, Titan
NSH2423Ixal beastmen campSezul TotolocSamePlus2552Biggs & Wedge, Behemoth, CidMax rank Ixal Reputation
MD215Revenants TollRowenaRandom-30118Gerolt, Louisoix
MD1117Castrum area (Fogfens)Indolent ImperialAscension-30120Livia, Rhitahtyn, Nero

As always, new discoveries or other notes – comment or let us know!


Triple Triad Card Checklist (and source)

Card NameRarityUpRightDownLeftObtained fromType
Dodo CardCommon*4234Free-
Tonberry CardCommon*2272Wanderers Palace (Normal or Hard)-
Sabotender CardCommon*2344Free-
Spriggan CardCommon*2435Bronze Triad Card (520 MGP), Triple Triad Master (GS)-
Pudding CardCommon*2435Bronze Triad Card (520 MGP), Roger (CTH)-
Bomb CardCommon*3433Free-
Mandragora CardCommon*4253Free-
Coblyn CardCommon*3334Bronze Triad Card (520 MGP), Maisenta (NGRID)-
Morbol CardCommon*5252Roger (CTH), Aurum Vale-
Coeurl CardCommon*2525Free-
Ahriman CardCommon*5522Dzmael Darkhold-
Goobbue CardCommon*2552Bronze Triad Card (520 MGP), Mother Miounne (NGRID), Aurifort (GS)-
Chocobo CardCommon*3721600 MGP, Jonas (GS), Guhtwint (GS)-
Amalj'aa CardCommon*1471Silver Triad Card (1152 MGP), Memeroon (ULN)-
Ixal CardCommon*6134Jonas (GS), Joellaut (CCH)Beastmen
Sylph CardCommon*2454Maisenta (NGRID), Silver Triad Card (1152 MGP)Beastmen
Kobold CardCommon*2246Silver Triad Card (1152 MGP)Beastmen
Sahagin CardCommon*4533Sastasha (Normal of Hard)Beastmen
Tataru Taru CardCommon*7232Silver Triad Card (1152 MGP)-
Moogle CardCommon*2137Jonas (GS), 840 MGP-
Siren CardUncommon**3672Pharos Sirius-
Ultros & Typhon CardUncommon**2367Helmhart (ETH), Dragons Neck-
Demon Wall CardUncommon**6723Amdapor Keep (Normal of Hard)-
Succubus CardUncommon**7326Haukke Manor (Normal or Hard), Piralnaut (ESH)-
Chimera CardUncommon**7722Cutter's Cry-
Blue Dragon CardUncommon**2277Ourdillic (CCH), Stone Vigil (Normal of Hard)-
Scarface Bugaal Ja CardUncommon**6662Guhtwint (GS), Bronze Triad Card (520 MGP)Beastmen
Momodi ModiUncommon**7553Momodi (ULDAH), Gold Triad Card (2160 MGP)-
Baderon Tenfingers CardUncommon**3755Baderon (LIMSA), Gold Triad Card (2160 MGP)-
Mother Miounne CardUncommon**5537Mother Miounne (NGRID), Gold Triad Card (2160 MGP)-
Livia sas Junius CardUncommon**3771Indolent Imperial (MD), Castrum Meridiuanum-
Rhitahtyn sas Arvina CardUncommon**7137Indolent Imperial (MD), Cape Westwind-
Biggs & Wedge CardUncommon**7317Sezul Totoloc (NSH), Mimidoa (LLN)-
Gerolt CardUncommon**5375Helmhart (ETH), Rowena (MD), Gold Triad Card (2160 MGP)-
Frixio CardUncommon**1773Piralnaut (ESH), Marcette (CSH)-
Mutamix Bubblypots CardUncommon**6266F'hobhas (CTH)-
Memeroon CardUncommon**2666Memeroon (ULN)-
Behemoth CardRare***6662Bronze Triad Card (520 MGP), Sezul Totoloc (NSH), Ourdilic (CCH)-
Gilgamesh & Enkidu CardRare***8373Battle on the Big Bridge (Gilga)-
Ifrit CardRare***7167Ifrit HM/EX, Swift (ULDAH)-
Titan CardRare***1776Titan HM/EX, Trachtoum (LLN), Landenel (SSH)-
Garuda CardRare***7617Gaurda HM/EX, Marcette (CSH)-
Good King Moggle Mog XII CardRare***7671Mog HM/EX-
Raya-O-Senna & A-Ruhn-Senna CardRare***5666Buscarron (SSH), Landenel (SSH), 4800 MGP-
Godbert Manderville CardRare***6656Ruthwyda (GS), King Elmer III (GS), 9600 MGP-
Thancred CardRare***2387Hab (STH), Fufulupa (WTH)-
Nero tol Scaeva CardRare***4187Indolent Imperial (MD)-
Papalymo & Yda CardRare***3782Vorsaile Heuloix (NGRID)-
Y'shtola CardRare***7814Gegejuru (ELN), R'ashaht Rhiki (LIMSA)-
Urianger CardEpic****8147Ruthwyda (GS), Silver Triad Card (1152 MGP)-
Ultima Weapon CardEpic****7891Ultima HM, Gold Triad Card (2160 MGP)-
Odin CardEpic****8818Odin, Landenel (SSH)
Ramuh CardEpic****8188Ramuh HM/EX, Vorsaile Heuloix (NGIRD)-
Leviathan CardEpic****8881Leviathan HM/EX,-
Shiva CardEpic****1888Shiva HM/EX,-
Minfilia CardEpic****9835Minfilia Silver Triad Card, Gegejuru (ELN)-
Lahabrea CardEpic****4948Silver Triad Card (1152 MGP)-
Cid Garlond CardEpic****5992Gold Triad Card (2160 MGP), Sezul Totoloc (NSH)-
Alphinaud & Alisaie CardEpic****9339Swift (ULDAH), Joellaut (CCH)-
Louisoix Leveilleur CardLegendary*****9493Rowena (MD)-
Bahamut CardLegendary*****9596King Elmer III (GS)-
Hildibrand & Nashu Mhakaracca CardLegendary*****18A8Helmhart (ETH), Hab (STH)-
Nanamo Ul Namo CardLegendary*****A648400,000 MGP-
Gaius van Baelsar CardLegendary*****4A59Indolent Imperial (MD), Praetorium-
Merlwyb Bloefhiswyn CardLegendary*****59A3R'ashaht Rhiki (LIMSA)-
Kan-E-Senna CardLegendary*****9A17Vorsaile Heuloix (NGRID)-
Rhauban Aldynn CardLegendary*****629ASwift-
Warrior of Light CardLegendary*****A25AGold Triad Card (2160 MGP)-
FirionLegendary*****A5A1???-
Onion KnightLegendary*****828AWorld of Darkness-
Cecil HarveyLegendary*****4A4A???-
Bartz KlauserLegendary*****44AABattle in the Big Keep (Gilga)-
Terra BranfordLegendary*****AA52The Dragons Neck (Ultros)-
Cloud StrifeLegendary*****93981,000,000 MGP-
Squall Leonhart CardLegendary*****6AA1Achievement: Defeat 30 NPCs at Triple Triad-
Zidane Tribal CardLegendary*****5A68Gold Triad Card (2160 MGP)-
Tidus CardLegendary*****A971???-
ShantottoLegendary*****4979Achievement: Win 30 Triple Triad tournament matches-
Vaan CardLegendary*****17A9Achievement: Win 300 Triple Triad roulette matches.-
Lightning CardLegendary*****917A???-

Please lemme know thru comments/whatever of the Card Types.

Triple Triad Pack checklist

Packs
Bronze Triad CardPuddingSprigganGobbueCoblynScarface Bugaal JaBehemothNONENONE
Silver Triad CardKoboldAmaljaaIxalSylphTataruUriangerMinfiliaLahabrea
Gold Triad CardMiounneMomodiBaderonGeroltCidUltimaZidaneWarrior of Light

Obviously, don’t buy these if you’ve gotten all possible prizes.

Navigation
Page 1: Triple Triad NPC | Triple Triad Card list | Triple Triad Packs
Page 2: Rules, strategy & progression

I will be adding a nice progression guide and other things to this, but for now this is the most important stuff you need to know. Here are other Triple Triad resources from outside the site. Good luck flippin’ up those cards and praying to the 12 for ‘Plus’ regional – you’ll need all the divine intervention to win versus these cheaters.

Follow us on Facebook for more FFXIV updates!

FFXIV Heavensward Preparation: What to do?

How to prepare your character before 3.0 hits so you can come bursting out of the gates! Powerlevel and get ahead of the mass!

If you’re asking yourself “What can I do to prepare my character for Heavensward?” you’ve come to the right place. Here, we discuss what you can to BEFORE 3.0 hits so you can gain a slight, but meaningful advantage.

Feel free to comment/suggest more ideas for Heavensward preparation!

General Preparation (All character types~)

Finish your STORY QUEST: I’ll mention this again near the end of the guide – but this is pretty damn important! Make sure you’ve completed the VERY LAST STORY QUEST in 2.x questline.

Rested EXP: MAX OUT your rested EXP, as this will help you out immensely. AFAIK 72 hours in a sanctuary is the maximum (Anyone else know the exact amount?)

Prepare Food: We’re not really after the stats, so don’t worry about not having a stack of Flint Caviar, haha. The 3% EXP Bonus is what you’re after.

  • Gathering food for gatherers (perception isn’t important when leveling up)
  • CP/Craftsmanship food for crafters (Basic stuff, control is so-so leveling up)

Heat of Battle I / II: I’m talking about the Free Company Actions – A flat bonus to EXP gained from killing enemies. This USED TO STACK, although I/we haven’t done this in a while. Remind your FC leader/officers to buy a few of these.

99 Gyashl Greens: Take your chocobo out of the stable and stock up on Gyashl Greens, self-explanatory. Leveling up with a choco sure beats leveling up without one.

Find a group to play with: Goes without saying. Doing dungeons and other things without a group sucks compared to with.

Stocking up on Currency: We cannot know truly how useful they will be come 3.0, but might as well if you have nothing else to do…

  • Gil: of course, never a bad thing. Used for crafted gear, materia and other things.
  • Allied Seals: from hunting – you never know if it will be relevent!
  • GC Seals: surely will be relevant… cap it out before 3.0 comes!
  • Ventures: never a bad thing to stock up on. Remember, these guys will level up, too!


Disciple of War / Magic

For the love of god, AGAIN, please check that you’ve completed your story quest, first and foremost. Under your Quest Log > Complete > Main Scenario Quest > TBA should be the last entry.

10 Maximum Completed Levequests: You can get a chunky boost of EXP by completing a total of 10 relevant Levequests for DoW/DoM classes.

  • 4 Levequests from St. Coinachs Find (Battlecraft)
  • 6 GC Levequests from St. Coinachs Find
    • 2 From each GC (Maelstrom, Adder, Flames): You can do them even if you’re not part of that GC.

Note that level 40 Leves incur a penalty (Bluefog/Whitebrim), so I don’t recommend these. You also have a max of 16 active leves between all types. If you have no plans of leveling a crafter or gatherer, by all means repeat the same process in Whitebrim.

6 Maximum Beastman Quests: Complete any (preferably max reputation) Beastman Quest from any NON-IXAL Beast Tribe to get another 6 quests of bonus EXP. You can also do the highest 3 and second-highest 3 from the same tribe so you dont have to travel around. Note that you can only have a maximum of 6 Beast Tribe quests active.

Any random quest you have unfinished: Impractical, but if you have some high level quests lying around submit them before 3.0

Disciple of Hand

6 Maximum Completed Levequests: There are a total of 6 total relevant leves you can pre-complete to gain EXP in 3.0 – 3 from your crafter Hometown, 3 from local levemete (Mor Dhona).

  • From your crafters hometown: 1 Single-submits, 1 Courier, 1 Triple.
  • From St. Coinachs find: 2 Single-submits, 1 Triple.

Items needed for these leves: 4 from single/courier and 18 from repeatables,

What’s my crafters ‘hometown’? ALC, GSM, WVR: Ul’dah. CRP,LTW: Gridania. ARM, BSM, CUL: Limsa.

6 Maximum Beastman (IXAL ONLY) Quests: Complete any (preferably max reputation) IXAL quest to get another 3-6 quests of bonus EXP. Naturally, take the 3 highest rep quest first, then go downwards.  Note that you can only have a maximum of 6 Beast Tribe quests active.

GC Supply Missions: The moment you login, craft/buy the required items for the GC submission. This is a free leve, and if its a star-item, submitting HQ will chunk your EXP up a huge amount.

Disciple of Land

4 Maximum Completed Levequests: A decent chunk of EXP can be gained by doing this, make sure you have at least 1 of each “evaluation” levequest (since they give the highest exp).

  • 4 Levequests from St. Coinachs Find (Fieldcraft)

A decent gear set: While BiS is something most hard-core gatherers have, newer players might not have the time or gil to build this up. Remember, when leveling Gathering is far more important that Perception. So just buying i55 greens and capping Gathering is a good idea if you’re short on gil.

GC Provisioning Missions: The very second you login, farm/buy the required materials for the GC submission. This is a free leve, and if its a star-item, submitting HQ will chunk your EXP up a huge amount.

Spreading it between all classes?

So all these preparations have a combined limitation: 16 total active levequests & 6 total active beastmen quests. Here’s what I’ll be doing:

  • 4 Battlecraft Leves & 6 GC Leves completed on Main Character.
  • 6 Leves for Goldsmith
  • 6 Beastmen Quests for Goldsmith

There’s a bunch of ways to squeeze value here… for example:

  • 2x Triples & Courier for CRAFTER 1.
  • 2x Triples & Courier for CRAFTER 2.
  • 2x Evaluation for Miner.
  • 2x Evaluation for Botanist.
  • 2x Triples for Fisher.
  • 6x Leves (GC?) for Main Combat Class.
  • 6x Ixal quests split between 2 Crafters

In the end, it all depends on what you want to get up first. Since I’ll be raiding ASAP when 3.0 hits, I will be spending a lot of these resourced on my White Mage.

What to do before Heavensward?

I guess this is part of Heavensward preparation as well.. here are some things you might think about

Cross-class skill classes to 50: If you’re really bored, I suggest leveling up your base-classes to 50 – Why? For example, you main a BLM (50), so you got your ACN to 34 for Eye for an Eye, and Archer to 34 for Quelling Strikes. What if Heavensward releases a level 50+ cross-class skill from Archer or Arcanist? This idea dawned on me quite some time ago, so I decided to level up my mains cross-class classes to 50 (WHM: ACN, THM). You better do the same – it’s better to be safe than sorry. (DONT LET THIS BE SOMETHING YOU REGRET)

Level up some gathering? A luxury for most content… I mean, as of right now you aren’t missing much. This is a brainless source of gil for anyone who bothers themselves with it. Gathering classes are insanely easy to level up with rested EXP. (Related resources: Mining leveling, Botany leveling, Fishing leveling) It’s always better to HAVE the option to gather, rather than rely on others.

Level up some crafting? Again, another luxury, but if you’re out of things to do, might as well start! Max DoH classes might seem troublesome, but the ability to repair your own gear in duty is cool. And for most people, you’ll be able to make a constant stream of gil from any crafting endeavor. I’ve never been sad to be a Builder of the Realm since 2.0, and I think everyone should work up to it. Crafting is fun!

Related Resources:
ALC Leveling, ARM Leveling, BSM Leveling, CRP Leveling, CUL Leveling, GSM Leveling, LTW Leveling, WVR Leveling

Well, good luck preparing for Heavensward! To be honest, these are the ones I thought up of on the top of my head. Again, the most important part of this whole document may just be the bit about cross-class skills. If you have suggestions PLEASE COMMENT!

Follow us on Facebook for more FFXIV updates!