FFXIV Dawntrail Aether Currents Guide

Just a simple guide detailing where to find Aether Currents in Dawntrail, to ease the stress a little!

Hey there would be flyers! This is my simple Dawntrail Aether Currents Guide. While the DT currents are pretty stress-free, it’s nice to be able to see them all in one place.

This is a work in progress, I’ll finish the MSQ and this in a day or two!

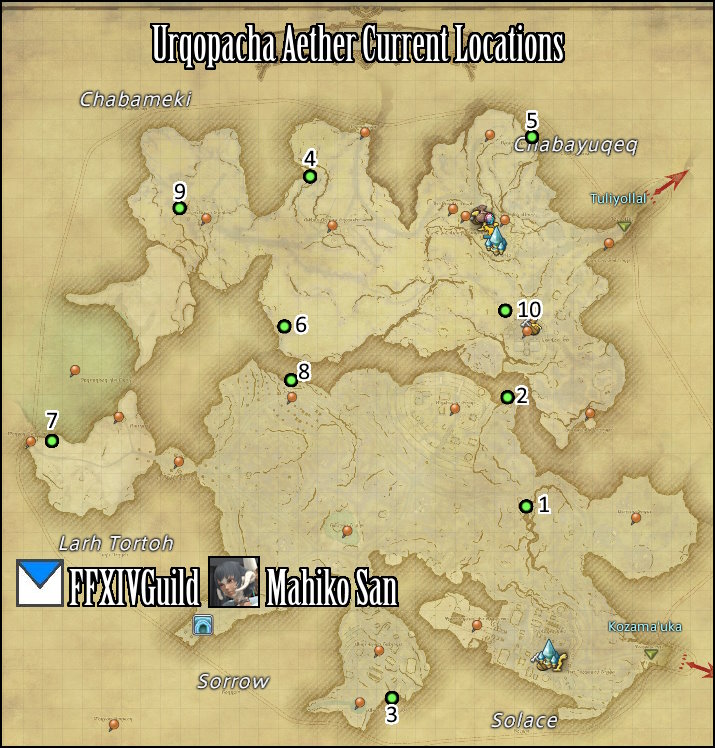
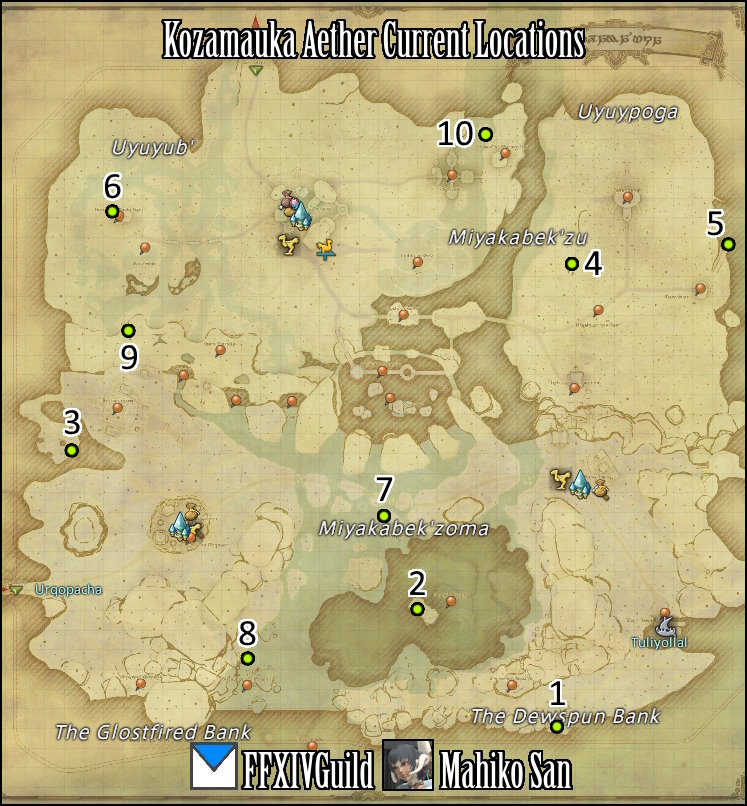
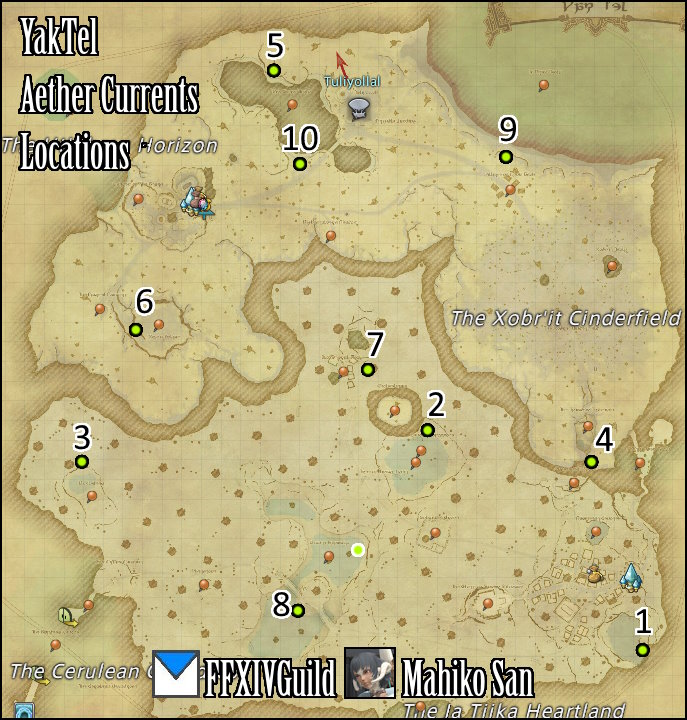
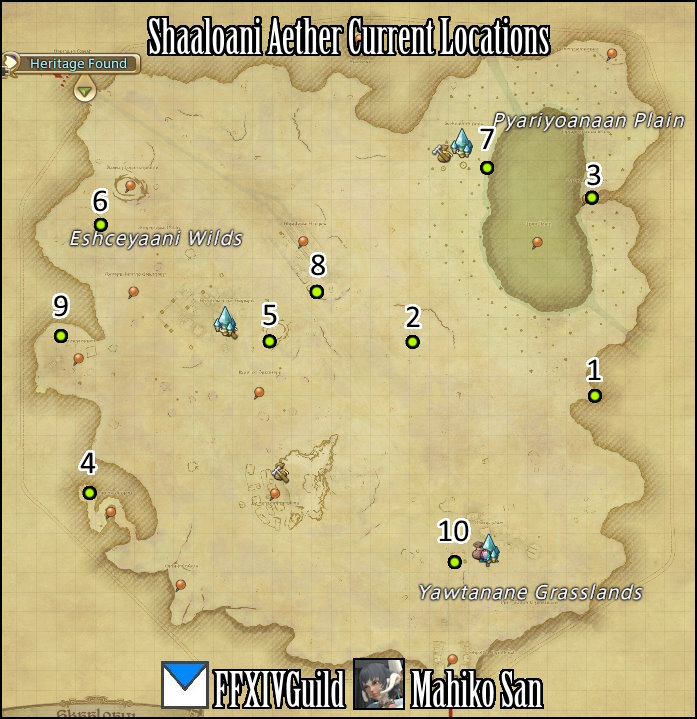
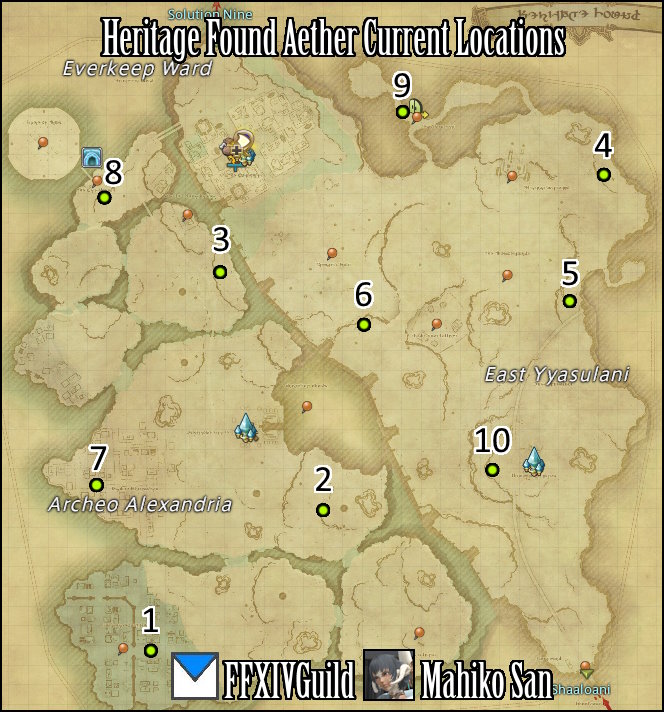
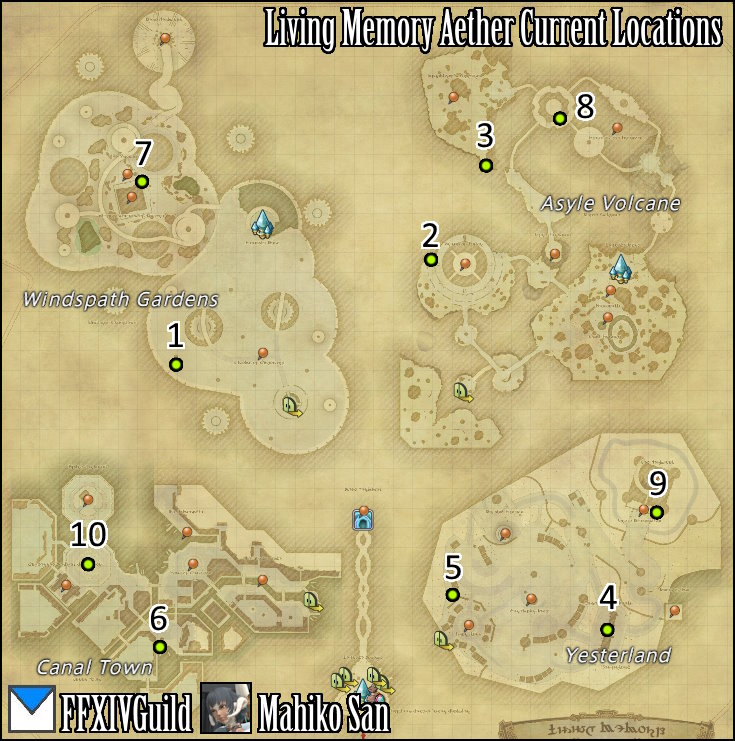
The tables are numbered, corresponding to the “green diamond” in your Aether current tracker. All Aether Current quests have a “blue exclamation point”, but I’ll list down the names either way for each map. These are the yellow markers on your tracker.

Urqopacha Aether Currents

#XYZAetherytethenNote
129.426.73Worlar's EchoNOn a cliff north of Worlars Echo, approach from the right-ish. (Left of Naryor Gorna)
228.921.32.8Worlar's EchoNEASY FAR. Northern edge of the South half of the map. E of Shades of Grief
322.836.32.2Worlar's EchoWEASY. VERY FAR. At the very south middle of the map, E of Chirwagur Lake.
418.79.81.2WachunpeloWestMID. Approach from the left of Ciblu's Coffee Grounds.
529.87.80.8WachunpeloNorthEASY. At the very top of the Hill in Agave Jaws.
617.417.51.4WachunpeloWestEASY. On a rock SW of this "field" in between the town and farm.
75.223.62.7Worlar's EchoWestRight before you queue up for trial 1. Far west of the map, Left of Sentinel.
817.520.32.4Worlar's EchoNWEASY. MSQ brings you right here. N of Proof
912.211.51.9WachunpeloWestEASY. On a ridge overlooking the "farm".
1017.417.51.4WachunpeloSouthEASY. Right on top of a rock formation.
1Worlar's EchoThe Flames Burns No More
2Worlar's EchoAn Illuminating Ritual
3WachunpeloA Crisis of Corruption. MSQ direct unlock.
4WachunpeloA Traveler to the Rescue. MSQ direct unlock.
5MSQMSQThe Feat of Ice

You’ll “come back here” in the MSQ – you can’t complete it on your first visit.

Kozama’uka Aether Currents

#XYZAetherytethenNote
131.1381.2Many FiresSouthEASY, FAR. Southeast of Deceiver's Mantel by the river at the edge of the map.
224321.1Many FiresSWEASY. On the island at the south lake.
36.423.91.3EarthenshireNWMID. In a cave northwest of town. West of The Imperious
431.714.60.1Ok'HanuEastEASY. North of Stride of the Sun, east of the river from Ok'Hanu.
539.813.40.1Ok'HanuEastFAR EASY. A long walk all the way to the eastern edge of the map. NE of Dock Poga
68.611.70Ok'HanuWestEASY. Right at the stairs of House of Winds High
722.427.21.4Many FiresWestEASY. In between Many Fires and Earthenshire. N of Marsh Ligaka
815.534.21.1EarthenshireSouthEASY. By the river. You'll see it as you MSQ.
99.4180Ok'HanuSouthwestEASY. It's "downstairs" at the coords. In a cave south of Bopo'ulhih.
1027.47.70Ok'HanuEast NEASY. Nearby the stairs to the big tree.
1EarthenshireAll Good Potpacts Must Come to an End, after MSQ The Shape of Peace.
2EarthenshireDivine Inspiration MSQ direct unlock. Shape of Peace
3Ok'HanuRite of Winds Chosen
4Ok'HanuRipe for the Offering
5MSQReward for MSQ Sibling Rescue.

You’ll “come back here” in the MSQ – you can’t complete it on your first visit.

Yak T’el Aether Currents

#XYZAetherytethenNote
136.435.71.2MamookSEASY. Ridge above the Southest side of the lake S of Mamook Aetheryte.
225.524.61MamookNWEASY. At the lake (downstairs), right north of Cenote Neyozzote.
37.926.21.3MamookWW Far. N of Ankledeep.
433.726.13.1MamookNWBefore descending The Ty'iinbek Traverse, go southeast of it. On the cliff.
517.76.43.2Iq Br'aaxNEEASY. NW of the airstrip above Yak Awak Tsoly
610.418.72.9Iq Br'aaxSIn the path gonig down into the pit E of The Fanged Foundry.
722.221.41.4MamookNWEASY FAR. R of Moxutural Zooj
819.133.90.8MamookWMiddle of the lakebed SE of Cenote Jayunja
929.710.63.1Iq Br'aaxEEASY. On a ridge overlooking the beach N of Village f Ilyon Asoh
1019.110.93Iq Br'aaxEEASY. South of Yak Awayk Tsoly, near the bridge.
1MamookLost and Powerless
2MamookBeast of the Heartlands
3Iq Br'aaxAiming High
4AirstripSecrets in the Cinderfield
5MSQRoad to the Golden City

Shaaloani

#XYZAetherytethenNote
134.623.10.9HhusatahwiNEOn the middle eastern most point of the map, in a tiny alcove.
225.120.30.8HhusatahwiNEOn a flat rock in the fields between-ish all the aetherytes.
334.4130.6MehhwatsoanEastEast of the lake, right at Otsekairi Shore.
49280.6ShesheneweziSWAt the end of Yowekwa Canyon. DO THIS ALONGSIDE "Meeting of the Spirits"
517.620.41.1ShesheneweziEast sEASY. Really near town on the bottom right, on a hill.
69.314.41.1ShesheneweziNWSW of Mount Loazensasaya
72911.30.5MehhwatsoanSouthSouth of Mehhwatsoan, just near the lakeshore.
82017.90.9ShesheneweziEast nEASY. Really near town to the right and a little up.
97.2201.2ShesheneweziWestEasy. Near the "bandit town", N of Tonatenyawi.
1027.331.50.7HhusatahwiSWSW part of town, on the second floor of a building.
1ShesheneweziA Bad Case of the Blue Devils
2HhusatahwiWhen the Bill Comes Due
3MehhwatsoanRroneek Seeker
4HhusatahwiMeeting of the Spirits
5MSQA Hot Commodity

Heritage Found

WIP – Finishing my MSQ!

???

WIP – Finishing my MSQ!

Summary, Outro, Related Info

Well that’s about it for my Dawntrail Aether Currents guide. It’s a lot easier than the old days, ey?

I’ll update as I complete MSQ! Image to follow!

FFXIV Where is Fonjentaine? (Dawntrail MSQ)

You’re at “The Success of Others”, with objective “Search for Fonjeantaine.” I hope to give others success looking for this shy Elezen!

Looking for Fonjentaine? For clarification, this is part of “The Success of Others”, with objective “Search for Fonjeantaine.” Dawntrail MSQ. No BS – answer right here:

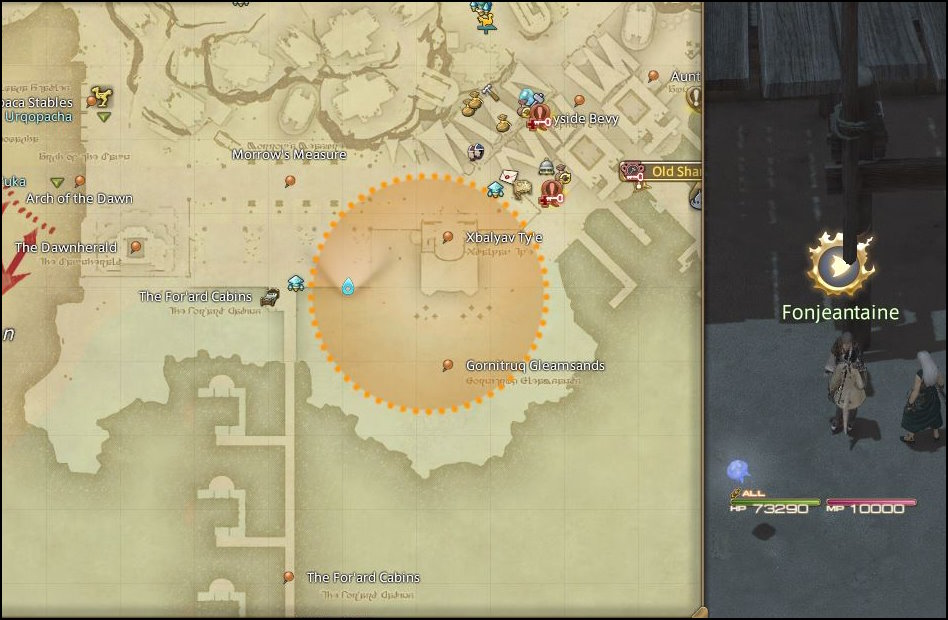
You can find Fonjentaine at (11,5), on the left side of the red circle. In between the restaurant and the pier, at the beach. He’s leaning on the wooden poles near the stairs.

Here’s a picture of Fonjeantaine’s Location:

Well, I’m guessing you won’t be looking for Fonjentaine for long after this. Enjoy Dawntrail MSQ! It’s surprisingly difficult to type his name out…

I plan on making a spoiler free walkthrough to answer all of these little questions in the near future. But for now, this is it.

FFXIV Viper STARTER GUIDE: Rotation, Setup, etc

You’re cut out for Viper hmm? Learn about the Viper Rotation, Setup, and other basic info + tips here! Viable? Perhaps!

DAWNTRAIL HYPE! Initial guide updates...
See:
Viper STARTER Guide / Rotation | Pictomancer Starter Guide / Rotation
How to Unlock Pictomancer & Viper


Welcome to Mahiko San’s very basic FFXIV Viper (VPR) Starter Guide! Here I aim to teach you the basics of the Viper Rotation, and Job, what’s the Unlocking Viper, Starting Gear, Basic Setup and other tips! 

The most important part of this guide is:
The basic Viper rotation at 80 – with notes up until 100.

This guide is written with those in mind that are about to, or just unlocked the Viper Job, and need some help figuring out how to make sense of it all!

“Man… I didn’t think I would ‘Slice and Dies’.”
Mahiko “Edgelold” San

Viper Starter Guide – Scroll to: Top (Basics, Unlock, Gear)
Rotation summary | 2 Button | Dreadwinder | Reawaken | Utility Skills

Starting out with Viper: Basic Info

Viper Basic Info

What exactly is a Viper?

Genus Vipera is a family of snakes most commonly…  Oh… Viper is a Melee DPS class released in Dawntrail. Pretty much inspired by Zidane from FF9. Has two swords that can become one sword-staff thing.

Aesthetically, and by play, kind of similar to Reaper – if I was forced to make a comparison to a similar job. Also kind of like a Dragoon! Has lots and lots of OGCD weaving so high latency players beware…

Unlocking Viper

How to Unlock Viper

Teleport to Ul’dah – Steps of Nald (It’s near the main Aetheryte), check for quest Enter the Viper.
See: How to Unlock Viper and Pictomancer, or FFXIV All Jobs Unlocking & Requirements

You need another combat class at L80 as a prereq for Viper!

VPR Leveling Gear

Viper leveling gear?

While the free one will serve you “fine”, the Augmented Cryptlurker Set you can buy in Crystarium (or main cities) will last you until L90 easily. If you got old tomestones to spare, go for it (can be used for other scouting leveling 80+ too).

at 90+, again, if you have tomestones go for the Augmented Credendun (Endwalker tier) from Radz-at-han (or Old Sharlayan? Old Main Cities likely have it). This will last till 100.

Anything further won’t be covered here in a “starter” guide haha.

Viper Rotation L80 (w/ notes to L100)

First, some assumptions, this is about L80 Viper (the level you unlock at), and I have notes leading up to L100 as well. Let’s cut the whole thing into more manageable pieces – a summary of the Viper rotation you can refer to:

Two button combo – Dreadwinder combo – Reawaken combo
LOTS OF OGCD WEAVING! Many buttons “evolve” into other skills.

2 Button ComboDreadwinder Combo(L90) ReawakenUtility

Button A1 (Steel Fangs) changes to A2,A3.
Button B1 (Dread Fangs) changes to B2,B3.
(Hotbars and gauge light up which is the “right” side to press)

    • A1) Steel Fangs – Higher potency default attack. OR
    • B1) Dread Fangs – Debuff enemy, you deal more damage to the it. Maintain this debuff!
      • then…
    • A2) Hunter’s Sting – Gives you a damage buff. Maintain this buff! OR
    • B2) Swiftskin’s Sting – Gives you a “speed” buff. Maintain this buff!
      • then…
    • A3) Flanksting Strike – Deals bonus damage on targets flank.
    • B3) Hindsting Strike – Deals bonus damage from behind.

Using Flanksting buffs your next Hindsting, and vice versa.

All of this happens in two buttons.

Combo finishers give Serpent’s Offering Gauge, and activates Serpent Sting into Dreadwinder (see next tab)

Pre note: Twinfang and Twinblood are your main weaving skills. They evolve into various skills, but are all OGCD weaves. TLDR: Use the one that lights up, only double on “long skills”(?).

    • Serpent’s Tail / Dreadwinder after previous combo finisher.
    • Use BOTH Hunter’s Coil, and Swiftskin’s Coil in “any order”. (positionals)

Each Dreadwinder also gives 1 use of Rattling Coil, a ranged nuke. Tracked by the Red Diamonds on your bar. (L82)

This whole chunk is at L90+, ignore for now if you like.

    • Reawaken through Gauge or Serpents Ire.
    • Use First, Second, Third, Fourth Generation in order.
    • L100, interweave First, Second, Third, Fourth Legacy in between.
    • Use the final stack on Ouroboros (same button as Reawaken)

Reawaken itself does point blank AoE damage!

It’s fast, and quite busy, but thankfully you don’t need THAT many buttons thanks to “evolutions”, as well as many buttons “lighting up” for assistance.

For a more detailed explanation, read below. 

The 2 Button Combo

The basic portion of your rotation involves a “2 button, multi-path flexible combo”. These two buttons transform into the next step together. Let me try to explain.

Button A is  Combo A1 > Combo A2 > Combo A3
Button B is Combo B1 > Combo B2 > Combo B3
You can press A,B,A to complete your combo. (AAA,BBB,BAB, etc)

Viper Combo First Stage

A1) Steel Fangs – higher potency default attack.
B1) Dread Fangs – Debuff enemy, you deal more damage to the it. Maintain this debuff!

Viper Combo Second Stage

A2) Hunter’s Sting – Gives you a damage buff. Maintain this buff!
B2) Swiftskin’s Sting – Gives you a “speed” buff.

Viper Combo Third Stage

A3) Flanksting Strike – Deals bonus damage on targets flank.
B3) Hindsting Strike – Deals bonus damage from behind.

These also have additional effects: on both, they give Serpents Offering Gauge. Secondly, they “evolve” their opposite for the next round in your rotation. For example…

Flanksting Strike used! on your next cycle, Hindsting Strike is “buffed”. The reverse also applies. Hindsting will buff your next Flanksting.

These buffs also change the names of the skill to Flanksbane and Hindsbane – but have no implications on your hotbars. This all happens in two buttons.

The AoE version is essentially a mirror of this, except there’s no positionals. You just alternate between A and B finishers.

THE SKILL AND SWORD GAUGE “LIGHT UP” to tell you WHERE TO PRESS.
It “smartly” detects your ideal next combo (supposedly).
It’s actually pretty cool, depending where you slot the skills left or right.

next step – Serpent’s Tail / Dreadwinder

Serpent’s Tail (L55) evolves after you do any combo finisher. “Always use it”. This is the second part of your rather long combo chain…

Serpent’s Tail 1 – Dreadwinder (L65). Strong OGCD that gives the same debuff as Dread Fangs. (Pit of Dread is the AoE version)

the skill names give much clues on their buff / debuff / purpose.
Notice Dreadwinder gives the same debuff as Dread Fangs.

After Dreadwinder you gain access to a pair of attacks Hunter’s Coil (L65), and Swiftskin’s Coil (L65). A flank and back attack.  Use them both in any order you like. They also give the damage and speed buff.

FURTHERMORE There’s Twinfang (L75) and Twinblood (L75). These evolve into your OGCF weaved follow-ups to certain attacks. There is a correct order to press them, but I’m pretty sure they light up anyway. Only double weave on “long” attacks.

At L82 Dreadwinder also gives Rattling Coil (L82), which allows you to use Uncoiled Fury. It’s a long range powerful nuke, so you can save this for movement. These are the red diamonds on your gauge.

Serpent’s Offering Gauge / Reawaken

(This is L90+ stuff, but worth talking about)

After gaining enough gauge, or using Serpent’s Ire (L86) you can Reawaken (L90). Giving you 5 Stacks of Anguine Tribute. Reawaken itself does damage to nearby enemies, notably.

Basically, you need to use the first four of these stacks on these skills – First Generation, Second Generation, Third Generation, Fourth Generation. These aren’t new buttons – your old skills evolve into them. There’s an order to this, so to simplify it – follow the lights, haha.

At L100, Serpent’s Sting (the button for Dreadwinder) becomes yet another weaved OGCD to be used after every generation. Namely First Legacy, Second Legacy, Third Legacy, Fourth Legacy.

The final attack, the 5th stack, should always be used on Ouroboros (it’s the same button as Reawaken).

Viper Utility Skills

Finally, the odds and ends – Viper Utility, Defensive, and Mobility skills.

Writing Snap (L10) – essentially useless desperation ranged attack,

Slither (L40) – Rush to an enemy, or allies location. Multiple charges, good range.

Serpent’s Ire (L86) – Gives one use of Uncoiled Fury (L82 ranged nuke).Tt L90 grants Ready to Reawaken , which… readies you to Reawaken…

Viper uses Melee DPS Role Actions.

Summary, Closing, Other Info

“Typing late night dried out my wit. It’s a double edged sword.”
– Mahiko “Couerl Hand” San

OUTRO. Well, I hope my Viper Starter Guide helped you out somehow. If you cut through the BS, The rotation’s pretty sharp right!

After studying the skills and rotation, I’m actually super impressed with the “design” of it. It’s really snake-like, haha. Long, with left or right cycles, quick strikes in between, ending in “two fangs”. The Dawntrail classes knock it out of the park.

If you’re here you might wanna check out the Pictomancer Starter Guide. Seriously I’m proud of the puns there. I’m NOT proud of how long the Starry Sky explanation is…

FFXIV Pictomancer STARTER GUIDE: Rotation, Setup, etc

Your first strokes starting as Pictomancer ey? Learn about the Pictomancer Rotation, and other basic info and tips here! Go from meme-tier to Masterpiece!

DAWNTRAIL HYPE! Initial guide updates...
See:
Viper STARTER Guide / Rotation | Pictomancer Starter Guide / Rotation
How to Unlock Pictomancer & Viper


Welcome to my very basic FFXIV Pictomancer (PCT) Starter Guide! Here I aim to teach you the basics of the Pictomancer Rotation, what’s the best gear for Pictomancers starting out, plus other basic setup and tips!

The most important part of this guide is:
The basic Pictomancer rotation at 80 – with notes up until 100.

This guide is meant for those just about to, or just unlocked the Pictomancer Job, and needs some help making sense of it all! Let’s go!

“The part on Starry Muse is exactly 269 words. It’s one skill.”
Mahiko “-dak” San

Pictomancer Starter Guide – Scroll to: Top (Basics, Unlock, Gear)
Rotation summary | Palette + Paint | Motif + Muse | Utility Skills


Starting out with Pictomancer: Basic Info

Picto Basic Info

What exactly is a Pictomancer?

I’m glad you asked. It mances enemies via Pictures. No, seriously, they paint pictures. Pictomancer is a “ranged” magical DPS class released in Dawntrail. Their job aesthetic is, pretty much, a painter. Inspired by Relm from FF6 I’m guessing. Has very cool animations IMO – “Colorful and Splashy”, even.

Their rotation and playstyle somewhat reminds be of black mage if I really had to stretch to answer that question. I find their rotation unique in that it has “two halves”.

Unlocking Pictomancer

How to Unlock Pictomancer 

Teleport to New Gridania -> Conjurer’s Guild, check for quest The Joy of Pictomancy.
See: How to Unlock Pictomancer and Viper, or FFXIV All Jobs Unlocking & Requirements

You need another combat class at L80 as a prereq for Picto!

PCT Leveling Gear

Pictomancer leveling gear?

While the free one will serve you “fine”, the Augmented Cryptlurker Set you can buy in Crystarium (or main cities) will last you until L90 easily. If you got old tomestones to spare, go for it (can be used for other casters leveling 80+ too.

at 90+, again, if you have tomestones go for the Augmented Credendum (Endwalker tier) from Radz-at-han (or Old Sharlayan? Old Main Cities likely have it). This will last till 100.

Anything further won’t be covered here in a “starter” guide haha.

Pictomancer Rotation L80 (w/ notes to L100)

First, some assumptions, this part speaks about an L80 Pictomancer (the level you unlock at), and I have notes leading up to L100 as well. Let’s start the party with a summary (outline, draft?) of the Picto rotation you can refer to.

“Do Paint / Palette if you don’t have any Motif / Muse goin’ on”

Paint / PaletteCreature / LivingHammer / SteelStarryUtility
    •  “One Button Basic Combo” Fire – Aero – Water. +Palette Gauge, +White Paint.
    • Subtractive Palette uses the gauge, allows use of “powerful combo”.
    • “One Button Powerful Combo” Blizzard – Stone – Thunder. +White Paint.
    • Holy in White to use White Paint Stacks

This is it for L80. Future evolutions:

    • Subtractive also converts 1 White Paint into 1 Black Paint.
    • Comet in Black to use Black Paint Stacks.

Picto AoE Rotation? Use Fire II in Red, and Blizzard II in Cyan instead, but is pretty much identical to single target either way.

Creature cycles between Pom, Wing (L80), Fang, and Claw (96)

    • Creature Motif 1 – Pom – use Pom Muse.
    • Creature Motif 2 – Wing – use Winged Muse.
    • After Pom and Wing, you can use nuke Mog of the Ages.

This is it for L80. Future evolutions:

    • Creature Motif 3 – Claw – use Clawed Muse.
    • Creature Motif 4 – Maw – use Fanged Muse.
    • After all four, slam Retribution of the Madeen (L96).
    • The cycle repeats again at “Creature Motif 1 – Pom”.
    • Hammer Motif activates Striking Muse which in turn sets up…
    • Hammer Stamp. Instant cast nukes.

This is it for L80. Future evolutions:

    • combo extends into Hammer Brush > Polishing Hammer.
    • ALL HAMMER ACTIONS ARE IN ONE BUTTON!

These hammer skills are auto CRITICAL DIRECT HITS.

There’s alot to unpack here… Basically, it’s youre ultra two minute cooldown. And I MEAN ULTRA.

    • Starry Sky Motif activates Starry Muse.
    • Leylines-like area buff to party damage.
    • Subtractive Spectrum, basically 1 free Subtractive Palette.

This is it for L80. Future evolutions:

    • 5 Hyperphantasia stacks (L82 trait), reduces cast time on many skills. Use these up to gain…
    •  Rainbow Bright (L92). Makes Rainbow Drip (L92) instant. +White Paint.
    • Note: Rainbow Drip should only be used here (Swiftcast in niche scenario).
    • On initial use, grants Starstruck, allows use of Star Prism (L100).

Tempera Coat – Self shield, refreshes if shield used up.

Smudge – Forward dash

Tempera Grassa – Spreads your self shield to all friends. Your personal shield must be up to use it.

Role Actions: Magical / Caster DPS.

In an attempt to summarize: Picto’s rotation has two halves. The paint / palette (infinite cycle), and the motif / muse (cooldown based). These two are for the most part independent of each other. Within the motif / muses, they three too are all “isolated” from each other.

For a more detailed explanation, read below. 


The Palette / Paint half of PCT Rotation

This is your basic bulk actions. Your broad strokes, so to speak. Do this if you don’t have any motifs going on (more on this later).

Basic Cycle

Fire in Red (L1) is your “basic combo” all in one button. This automatically  turns into Aero in Green (L5), and finally Water in Blue (L15). Finishing this combo with Water in Blue grants you PALETTE GAUGE, as well as WHITE PAINT. We’ll call this chain the “BASIC COMBO”.

Palette Gauge?

What to do with Palette Gauge?

Subtractive Palette (L60) uses Palette Gauge to (in simple terms) unlock the use of your other “POWERFUL COMBO” – Blizzard in Cyan (L60), into Stone in Yellow (L60), into Thunder in Magenta (L60). Again this is all in one button. This also generates White Paint.

For now, don’t think about it so much. Once you have the Palette Gauge for Subtractive, use it, then do your powerful combo.

How about Paint Stacks?

What to do with Paint Stacks? (White Paint)

White Paint stacks can be used with OGCD Holy in White (L80). At L80, this is all you need to know.

At L90 in the near future, Subtractive Palette also converts 1 stack of White Paint into Black Paint, which basically upgrades Holy in White to Comet in Black (L90). While not relevant right now, get used to the idea of holding at least 1 White Paint.

Use White Paint “freely” on Holy in White whenever you can, but it’s better practice to use them up before you overflow, rather than always running on 0/1 stacks.

Palette + Paint Summary

Summary of Palette / Paint basics

    • Basic Combo (Fire – Aero – Water), gain White Paint and Palette Gauge. All in one button.
    • Use Palette Gauge w/ Subtractive Palette, allowing use of your “Powerful Combo”.
    • Powerful Combo (1 combo usage per Subtractive) Blizzard – Stone – Thunder. All in one button.
    • Use Holy in White to get rid of excess White Paint.
    • Rinse Repeat

At L80, this is it. In the future…

    • Subtractive Palette converts 1 White Paint into Black Paint.
    • Use Black Paint for Comet in Black.

=== Picto AoE Rotation? ===

Fire II in Red (L25) Is the AoE version of the “basic combo”. Leading into Aero II in Green, then finally Water II in Blue. Again, all in one button. The same goes for your AoE version of the “powerful combo”, Blizzard II -> Stone II, Thunder II.

It’s pretty much the same exact thing except
pressing the AoE version of Fire and Blizzard.

The Muse / Motif half of PCT Rotation

Oh boy. This one is hard to get a grasp on when reading / writing / explaining, but I’ll try my best. This does not really interact with the whole Pallete / Paint system above.

You have three canvases – Animal, Weapon, and Landscape. These are essentially separate from each other, just knowing they don’t interact with each other kind of gives you peace right?

In an attempt so summarize and simplify it:
using a MOTIF “paints” on the “canvas”, allowing you to use the corresponding MUSE spell.

  • Painting Creature Motif (paintings cycle) allows the use of Living Muse. (more on this later…)
  • Painting Weapon Motif (always hammer)  allows the use of Steel Muse. (Hammers)
  • Painting Landscape Motif (always Starry Sky) allows the use of Starry Muse (huge cooldown)

Annoyingly, these Motif Skills in the skill book change name once placed onto the hotbar. And in the case of Creature Motif, changes further.

Here, I explain each pair:

Creature / LivingHammer / SteelStarry

Creature Motif (Pom, Wing, Claw, Maw) and Living Muse

Each time you do Creature Motif (L30), you will get a corresponding painting that cycles through Pom, Wing, Fang, and Claw. Then, your Living Muse (L30) transforms its corresponding skill depending on which painting you have (and some special cases). At L80, this cycle stops at Wing.

Placing Creature Motif into your Hotbar turns it into Pom Motif (initially).

    • Creature Motif 1 – Pom – Living Muse becomes Pom Muse.
    • Creature Motif 2 – Wing – Living Muse becomes Winged Muse.
    • After Pom and Wing, you gain a special buff “Moogle Portrait”.
    • Moogle Portrait allows you to use Mog of the Ages (can save a few charges)

It stops here at L80, but just to illustrate the higher levels…

    • Creature Motif 3 – Claw – Living Muse becomes Clawed Muse (L96).
    • Creature Motif 4 – Maw – Living Muse becomes Fanged Muse (L96).
    • After all 4 cycle, they all get wiped off and you get “Retribution of the Madeen”.
    • this allows you to cast Retribution of the Madeen (L96).
    • The cycle begins anew at “Creature Motif 1 – Pom”.

Makes more sense when you lay it out like this ey…

Weapon / Hammer Motif and Steel Muse

Thankfully much simpler than the Creature one. Placing Weapon Motif (L50) into your Hotbar turns it into Hammer Motif.

    • Hammer Motif (L50) turns Steel Muse into Striking Muse (L50). Grants “Hammer Time”
    • Hammer Stamp (L50) can now be used, always a critical direct hit.

This is it al L80, but to give you a preview of higher levels…

    • Hammer Brush (L86) is the next combo step from Hammer Stamp.
    • Polishing Hemmer (L86) is the combo finisher.
    • All of these are Critical Direct Hits! and are ALL IN ONE BUTTON!

Basically, press Hammer Motif and “Go Ham”, more.

THIS IS JUST A VERY ROUNDABOUT WAY OF SAYING:
“This is my 2 minute ultra giga cooldown!”
(It’s impractical, but admittedly pretty cool)

Landscape / Starry Sky Motif and Scenic Muse

Placing Landscape Motif (L70) into your hotbar turns it into Starry Sky Motif (L70).

    • Using Starry Sky Motif turns Scenic Muse (L70) into Starry Muse (L70).
    • Starry Muse has many effects… I’m not joking either. *inhales*
    • In a large area, the party deals increased damage for a moderate duration.
    • Gives Subtractive Spectrum, which is basically 1 free Subtractive Palette.

This is it until L80. But wait, theres more…

    • Grants Inspiration, and 5 Stacks Hyperphantasia… (L82 addition effect)
    • Inspiration reduces cast time of “various” spells as long as you’re in the Starry Muse area. Each time you use this reduction, it’s -1 stack. Using all 5 stacks removes Inspiration. (WHY HAVE 2 STACK TYPES? Why not 5x Inspiration!?)
    • Once you lose Inspiration, gain Rainbow Bright (L92 additional effect)
    • Rainbow Bright – allows the use of Rainbow Drip (L92) with much shorter cast time. This also gives white paint. Rainbow Drip shouldn’t be cast without this or Swiftcast…

Thought we were done? Just like Ardbert said,
“If you had the strength to take another step… could you do it?”

    • Grants Starstruck upon use (L100 additional effect)
    • Starstruck allows the use of Star Prism (L100). A giga nuke with AoE healing.

Let me remind you. This is ONE skill. My friend and FC mate Tiffany Faye sent me an example of another skill from the same game, FFXIV:
Bloodspiller (DRK L62): Delivers an attack with potency of 580.

It might seem like a lot, but trust me it makes a lot of sense in-game, haha.

Pictomancer Utility Skills

Finally, the odds and ends – Pictomancer Utility, Defensive, and Mobility skills.

Tempera Coat (L10) is a self-shield which you can use again if the shield gets completely used up. (I thought it was Tempura Coat. Like the breading on a Tempura – you can’t unthink it now, ey?).

Smudge (L20) is a short forward dash.

Temperra Grassa (L88) – Spreads your Tempera Coat (the above shielding skill) to all your friends. You MUST have Tempera Coat on yourself active to use it. (Wait a second… Tempura Oil? Hmm)

Mahiko San Note: Tempera is actually a method of painting in the old days.

As for the other utility skills, Pictomancer uses Magical / Caster DPS Role Actions.

Pictomancer Starter Guide – Scroll to: Top (Basics, Unlock, Gear)
Rotation summary | Palette + Paint | Motif + Muse | Utility Skills

Summary, Closing, Other Info

Is it Pallette? Pallete? Palette? Pal, it’s whatever…
Mahiko “nfused” San

Man are my fingers tired. I wanna put links here or other things, but Starry Must got me shook. In any case, I hope you found my Pictomancer Starter Guide helpful, hopefully the rotation won’t be so abstract to you anymore!

Im honestly super impressed with Picto as a whole – both Dawntrail classes are very cool. If you’re here, check out Viper Starter Guide / Rotation.

FFXIV How to Unlock Viper and Pictomancer

No BS. How to unlock the new Dawntrail jobs: Pictomancer and Viper.

If you’re here, you’re probably excited about Dawntrails release and the two new jobs that come with it, and so am I. This is a short and sweet post to about unlocking Viper and Pictomancer – the new Jobs in Dawntrail! Beastmaster? Not much info yet will update asap. So, dawn’t wait any longer! Lesgo!

How to Unlock Viper (VPR)

Below are the quest details for Unlocking the Viper Job.

  • Viper Unlock Quest Name: Enter the Viper
  • Location: Ul’dah – Steps of Nald (9.3, 9.2), it’s near the main aetheryte.
  • NPC: Worried Weaver
  • Prerequisites: Level 80 Disciple of War or Magic.

The most important detail here is you need an L80 combat class. After that, you’re ready to rip!

Viper is a melee DPS (Damage Dealer) that seems to lean on the faster pace of things. Is it the class for you? No harm in trying right!? My friends say they’re very similar to Reapers playstyle… Who knows.

Aesthetically, you get what they’re going for. Who doesn’t love a good edgelord. In fact, this one’s double.

Mahiko San Note: Viper is compared to Zidane from Final Fantasy 9, who also uses dual-wielded shortswords OR the “combined” double bladed “thief sword”. I’m unsure if this was ever officially stated, but they’re pretty damn similar.

Supposedly the three letter code for Viper is VPR, let’s see.

How to Unlock Pictomancer (PCT)

See: Pictomancer Starter Guide
Rotation, setup, gear, tips and more!

Here’s the quest info for Unlocking the Pictomancer Job.

  • Pictomancer Unlock Quest Name: The Joy of Pictomancy
  • Location:New Gridania -> Conjurer’s Guild (8.0, 10.3)
  • NPC: Cheerless Hearer
  • Prerequisites: Level 80 Disciple of War or Magic.

Remember you need an L80 combat class to unlock this, and you’re prepared to paint the town!

Pictomancer is a magical caster DPS (Damage Dealer) that is mostly comparable in-game to Black Mage, both having “limited mobility”, or so they say. I tend to agree with this assessment.

They have a very lively aesthetic, using “paint” and some “cute’ attacks – their main weapon is a Brush ffs. I personally can’t wait.

Mahiko San Note: Picto is most definitely “inspired” by Relm from Final Fantasy 6. A nice callback for an old ancient treebark such as myself.  In fact, according to that wiki her Job is indeed Pictomancer haha. Even some of her actual skills are very similar to Picto’s.

You can say it’s “Relm Reborn”
– Mahiko “My Picto” San

Supposedly the three letter code for Pictomancer is PCT, let’s see.

Summary, Closing, Other Info

Welp, there it is How to Unlock Viper and Pictomancer, both new jobs in Dawntrail. Have fun out there guys, remember to eat well, drink well, and rest well – as if you’re reading this you’re likely chomping at the bit to enter Dawntrail’s pre-release!

Happy stabbing and sketching out there!

FFXIV Caster DPS Role Actions: Guide & FAQ (Dawntrail UPDATE)

All you need to know about Caster Role Actions in FFXIV, the replacement for cross-class skills!

Here’s quick  guide about Magical Ranged Role Actions! (previously the cross-class skills system). This time around, we no longer have to choose – and have access to all Role Actions! (As a note, people informally refer to these classes as “Caster”)

Dawntrail Update: Added Pictomancer (PCT) into the mix. Dawntrail changes are:

  • Addle: Duration up to 15s from 10s. (L98)
  • Swiftcast: Cooldown reduced to 40s from 60s. (L94)
What Jobs get the Magical Ranged Role Actions?

Job Classes

Black Mage (BLM)
Pictomancer (PCT)
Red Mage (RDM)
Summoner (SMN)

Base Classes

Arcanist (ACN)
Thaumaturge (THM)

Caster DPS Role Actions – Navigation:
Caster Role Actions List | Role Actions Uses & Discussion

Magical Ranged Role Actions List

LvlActionDescriptionDurationCastRecast
8AddleLowers target's intelligence and mind by 10% for 10s.10Instant90
10SleepPuts targets to Sleep in an AoE.302.52.5
14Lucid DreamingRegain MP over time.21Instant60
18SwiftcastNext spell is cast without cast time.10Instant40
44SurecastSpells can be cast without interruption. Ignore most position altering effects.6Instant120

Swiftcast improves it’s cooldown from 60 to 40 via Role Trait at L94.

Caster DPS Role Actions: Quick Strategy & Discussion

Here we talk a little bit about each of the role actions, and their applications.

Addle

Very useful for raids and other boss fights. Severely reduces the targets magic damage for a short period of time. Usually used to help mitigate heavy tank busters or raid AoE. Remember it only works on magic damage!

Sleep

An AoE sleep spell with giga long duration. Amazing for story content. (Sleep -> interact). Very niche to borderline useless otherwise.

Lucid Dreaming

Slowly restores mana. Should be used often (I suppose) for Red Mages, Summoners, and Picto to regain mana over longer fights. Is it even useful for Black Mages!?

Swiftcast

Usefulness depends from class to class, but generally speaking any caster can benefit from this. Will mostly be used to “move while doing a cast”, and can be saved for a fast Resurrection for Summoners.

Can improve DPS by converting longer (2.5+) cast speed spells into instant ones.

Surecast

Anti-knockback. Super useful for raiding. Negating a knockback is huge to “cheese” mechanics, but also prevents your cast bar from being interrupted.

Swiftcast improves via Role Trait at L94.

Caster DPS Role Actions – Navigation:
Caster Role Actions List | Role Actions Uses & Discussion

Well, that’s about it for the Magical Ranged Role Actions! FOR NOW! I’ll be adding to this soon.

Like us on Facebook for more updates!