FFXIV Turn 13: Bahamut Prime Strategy Guide

Turn 13: Bahamut Prime Strategy Guide! EARN your Final Witness title! Enter Heavensward as a KING and not a CHUMP! Let our T13 Guide help YOU!

   SO! You’re finally here! Turn 13 – the final boss of 2.0… Bahamut Prime! Let our turn 13 guide help you get past this unbelievably epic trial! Like Samuel L Jackson always says, “Hold on to yer butts!”. After thirteen turns of struggle – and an endless grind for tomestones… Bahamut Prime stands as your final challenge. Begin your journey into Heavensward as a Final Witness.

Navigation:
Page 1: Pull to 52% (First Divebomb) | Page 2: “Zoo”, Akh Morn

Bahamut Prime: Phase 1

Megaflare: Megaflare is a multi-part skill. Lets see what happens step by step:
1) a random number of people in your party get tagged by Megaflare initial damage. This is AoE (Spread out, don’t hug your partymembers)
2) Those not hit by the initial AoE become “Friends“. Friends are marked by a ring around them.
3) 3 random people get a large circular ground effect under them. This explodes after some time – GTFO (dont put many these in the melee/stack zones)
4) ALL FRIENDS MUST UNITE (stack on top of each other), or else bad things happen. IE, Death.

As a general reminder: Succor > Split > No Hugs > Friends Unite > Medica II > Prepare for a Flame Breath

Flatten: Flatten is the early T13 tank buster. It deals HEAVY damage. Tank must mitigate this, to be safe. Healers must always shield this. To make matters worse, flatten is always followed by FOUR FLAME BREATH in phase 1.

Flame Breath: Massive elemental damage cleave. Happens many, many times during the fight and is something you should get used to ASAP. Your healers shouldn’t “be surprised” by this as you progress with learning the fight.

So here’s what happens: Megaflare > Flamebreath > Flatten > Flamebreath x4. Your MT must be healthy because the Flamebreath before Flatten CAN be lethal if you slacked on regens and got some unlucky hits. Make sure you guys prepare for that first of all. After that first one, the long flatten channel time begins. Stoneskin and Adloquium should be cast on tank. Once flatten completes, precast cures and physics to prepare for the next 4 Flame Breaths. Don’t just spam Cure II and Adlo here… save some mana by adjusting the cure needed depending on how heavy the damage is.

Tanks should ALWAYS spend a mitigation skill here if available.

Earthshaker: Chooses two random people between all DPS and Offtank. After a short delay Bahamut will fire lasers that damage everyone in its path, towards each selected person. Upon each impact, a pool of sludge remains – this happens 3 times. Standing on sludge will WRECK you for 3k a second so it’s not a good idea. Maximize efficiency by having each guy line up the sludge in opposite corners. Healing? This does physical damage. Healing this can easily go sour if you time it incorrectly. Channeling your heal right after the marker disappears is generally a safe timing. The safest rotation would be WHM: Cure II, Cure I, Regen. SCH: Adlo, Physick, Physick. Each healer should choose which “side” they’re going to heal. The afflicted guys, of course, have to travel to opposite sides quickly.

at 75% Gigaflare signals the phase change. This does an extreme amount of damage. Arcanist Virus should be SAVED for this and make sure there is no antibody. Get everyone up to full, Cure 3 if needed. Succor and Soil – hope for the best. Casting Succor at 76% prevents alot of BS. He may cancel his Flatten Combo just to phase – be wary of this combo. Make sure your Scholars Virus finger is fast.

A Note on Gigaflare: Gigaflare has a notoriously late check in our experience. a really late virus doesn’t actually reduce the damage. Same with succor shields… often times Giga goes off with our Galvanize intact. Counter this by pre-empting it more than you’re used to.

Bahamut Prime Phase 1 Rotation:
Megaflare, Flatten Combo, Earthshaker, (Repeat until 75%), Gigaflare -> Phase 2

Rotation Prime Phase 1 Rotation with Flamebreath:
Megaflare, Flamebreath, Flatten, Flamebreath x4, Earthshaker, Flamebreath (Repeat until 75%), Gigaflare -> Phase 2

All of these skills happen in different occasions in the fight. Get used to them ASAP cause you’ll be seeing them for a loooooooong time. On to phase 2: Balls.


Bahamut Prime: Phase 2 Balls

Adds (Shadow Of Meracydia): Hard hitting, each add should be virused (pref BLM or WHM). Two sources of Virus can tag all 3 dragons (You’ll be seeing 3 of these before phasing btw). These adds should be dragged all the way across from Bahamut, otherwise a tether forms between them and gives DEF+ and DMG+ to both of ’em. Do not want. These guys spawn around 1 minute apart from each other. Rouse and Divine Seal line up perfectly with this so keep it in mind.

Before we go any further, you WANT to use up your limit break sometime during this phase. Melee LB on bahamut is recommended. Use your judgment on this one. The idea is to wipe your LB bar sometime in the middle of P2. Melee LB1 or 2, either or – the reason is you need LB3 for Last Bastion later on, and don’t wanna waste excess LB. Using Eye for an Eye on Bahamut when each add spawns is a good practice, too.

Flare Star: spawns 1-3 “balls” that have to be picked up by raidmemers. These balls are tethered to somewhen upon spawning, and will slowly travel towards them. After a short period of time the balls rush. They can spawn randomly in sets of 1,2,3 or 4 – but will always total to 7 per total rotation. Each ball gives a stack of STACKNAME, increasing damage dealt by a skill later on – Bahamuts Rage. Taking 3 balls is pretty much lethal for a non-tank. 2 balls is still risky – and extra attention will be needed to survive Bahamuts Rage. (more on this later)

Megaflare upgrade – Tower: Each Megaflare now comes with a tower. This tower spawns on a random raidmember before friends explode. The tower must be absorbed by somebody, taking moderate damage. If you fail to do so, massive AoE damage and partywide Bleeding debuff WILL CAUSE A WIPE. Note that you have to stay in the tower until you HEAR the explosion and SEE the visual effect. Just standing there as it disappears won’t cut it – better safe than sorry. It is unadvisable for friends to absorb towers – this can be fatal depending on composition and HP. (TIP) Healers shielding themselves before mega can have massive value. If healer is a friend, and tower spawns under you – you might have to move out and cancel your own cast (which is integral at this point). If you’re shielded, you can safely survive Friends + Tower combo – and fire your heal off.

Bahamuts Rage: This skills damage goes up for each Flare Star ball you ate. 1 is pretty standard, and you shouldn’t really worry about it. TWO is pretty heavy. BLM Apocatastasis is the best way to ensure someone with a 2-stack lives. Otherwise, full HP and shields would be good. Sacred Soil is some value here, since it happens right after megaflare. The main reason Rage is lethal is because your party will likely be damaged from the previous Megaflare. Stacking up for Cure III is the most value you’re gonna get from MP (ratio wise)

Think of this phase as 3 rotations. Each rotation will have an add, 7 total flarestar balls (3 times cast), megaflare and rage! Just survive this rotation thrice and you’re good!

at 52% Gigaflare signals the phase change. Mitigate it the same way as P1 Giga. Virus is essential, full HP, Succor/Shield. If it’s your first time past this phase – you will wipe to divebombs in about 10 seconds. There is a sucky way to phase which you should avoid. Having him phase with the combination of “Mega, Rage, Giga” is extremely painful. DPS harder to avoid this – Potions, Melee LB, etc…

Bahamut Prime Phase 2 Rotation:
Add, Flare Star, Flare Star, Flatten, Flare Star, Megaflare, Bahamuts Rage (Repeat until 52%), Gigaflare -> Phase 3

Bahamut Prime Phase 2 Rotation (With Flamebreath):
Add, Flare Star, Flame Breath, Flare Star, Flatten, Flame Breath, Flare Star, Megaflare, Flame Breath, Bahamuts Rage (Repeat until 52%), Gigaflare -> Phase 3

Follow us on Facebook for more FFXIV updates!

Navigation:
Page 1: Pull to 52% (First Divebomb) | Page 2: “Zoo”, Akh Morn

FFXIV T12: Phoenix Strategy Guide (FCoB T3)

How to beat Turn 12’s boss: Phoenix. Beat the birds and bennys using our anti-avian strategy guide!

So you’ve beaten Kaliya, huh. Well get ready for Turn 12’s boss: Phoenix! I hope you channel your own revival powers – this may take more than a few wipes! Let our Phoenix guide help you out reducing that!
Navigation: [Page 1: Pull to 52%] [Page 2: Bennyland, Fountains]

Phoenix Phase 1: Benny, Blackfire & Whitefire

Bennu spawns every minute starting around 5s~ in. Don’t underestimate this little dude, he hits like a truck. Any free Virus should be used on benny (SMN, but BLM or WHM preferably). While killing Bennies isn’t too hard, Bennys must not die too close to each other (From here on we will call them Benny). Kill them fast or else Phoenix gets a stack of (forgotname). YOU DONT WANT THIS. Each time a raidmember dies, he also gets a stack.

Revelation is Phoenix’s tank buster. It’s a massive elemental damage nuke that cleaves. A tank CANNOT eat 2 straight revelations or he will die (it gives a debuff that increases the next revelations damage… to around 40k). This is why SMN and SCH Virus should be saved for Revs, and untraited Virus for Benny.

Blackfire & Whitefire: These two mechanics are right next to each other. Blackfire targets ONE DPS, ONE HEALER and OFFTANK always (considering all people are alive). It leaves an add (Blackfire is the name of skill and the add). You must not have 2 blackfires too close to each other. and never walk into a blackfires hitbox. Failing to do these things will result in a damaging pulse and a vulnerability up debuff.


Whitefire also targets ONE DPS, ONE HEALER and OFFTANK. A large white circular AoE spawns on the targets. They will take heavy damage. Remember not to get “venn diagrammed” by two whitefires – you will likely die. Whitefires AoE must hit Blackfires. Successfully tagging them gives then a HUGE HP DOWN debuff. Once the debuff is applied, kill the Blackfires.

How do we deal with this? Have all DPS pile up… both healers pile up… and offtank go off somewhere on his own (haha). This prevents blackfires from spawning too close to each other. For the following Whitefire, DPS tags the DPS Blackfire… Healer tags healer Blackfire… and tank on tank. Prevent alot of BS and reduces the needed communication when taking care of this mechanic.

Help! Blackfire timing is a little weird!! Yeah… its just something you have to get used to. After the castbar finishes, theres a short delay, then Blackfire spawns. The instant it spawns you HAVE to get out. Again, a few attempts at this and you should be okay.

We got three Benny?! Okay, theres no HARD CODED penalty to having alot of Bennys. However, practically speaking, having 3 Benny in Phase 1 means you’re sorely lacking DPS. A total of 5 Benny during Phase 1 + Phase 2 is the “practical maximum”. Bennys spawn around 1 minute after the last – so the first phase should last no longer than ~3 minutes.

Phoenix’s phase 1 rotation:
Benny – Revelation – Blackfire – Whitefire (Repeat)

Again, this is a really short phase. Here’s what your Phase 1 should look like ideally:
Benny – Revelation – Blackfire – Whitefire – Benny – Revelation – Blackfire – Whitefire (79%). Below 80%, Phoenix enters Phase 2.

Phoenix Phase 2: Brands, Blue + Red

Brand of Purgatory is the first skill you’ll encounter in this phase. It leaves a green (or sometimes purple) mark on a random (likely ranged or healer) party member. This skill has a few mechanics.
1) When phoenix casts Flames of Unforgiveness, if the debuff wasn’t passed… the current owner dies.
2) Passing the debuff is done by simply sticking together.
3) Damage is done to BOTH parties upon switching. A short delay later another chunky damage is done to the original owner.
4) Reminder is: Unforgiveness? Pass – Damage on both – Damage on Initial.

How do we deal with this? We pass it between both healers. Everyone else should be mindful to avoid their little area. Stoneskin and Adloq on the original holder, and a small shield on the recipient should be okay. We have the CLEAN healer approach the DIRTY healer when flames is being cast. The dirty one casts a large heal on him or herself while the recipient is travelling (to survive the second hit). Passing happens shortly after bluefire – so keep it in the mind of your healers “Bluefire? Shields up“.

Help! Brand went to a non-healer! It’s okay. Shield him and have the healer take it on Unforgiveness.

Next up in this phase Bluefire and Redfire. Bluefire is similar to T9 stardust. Once the blue marker expires a freeze field will spawn where the person was. Being in this field shortly after it spawns gives you a slow, heavy and DoT… it generally sucks. Once the field goes away it leaves a little pool of ice. Standing in this pool gives you a bebuff (Buff?) – It’s used for Redfire. Redfire spawns a slow moving fireball. It gets tethered to a random person in your raid. Have 1 guy (Healer or Bard, preferably) take the ice buff and stand in the redfire tether – this cancels it out. Failing to cancel out redfire tether will result in massive raidwide damage and a huge DoT.

Benny continues to spawn in this phase. Remember what was earlier mentioned, they have to die far from each other, a good formation is a huge X, with each point on the sides and middle becoming a benny death spot.

Phoenix’s phase 2 rotation:
Brand (only phase change) – Blue – Unforgiveness – Red – Revelation (Every ODD red) – Repeat (Benny every 1 minute)

This keeps repeating until Phoenix reaches 52% – then onto Phase 3 “Bennyland”. Again, remember to kill Bennies fast, and keep deaths to a minimum – you DO NOT want any stacks if possible. When it phases GTFO of the nearby area surrounding Phoenix. An autokill field spawns and you don’t want to be there. Getting to Phase 3 with 5 or less Bennys and having your party in good shape is the first hurdle you face in Phoenix – so remember to DPS hard and NO DEATHS!

CONSIDER USING MELEE LIMIT BREAK to Phase before a third Benny spawns in Phase 2. Having a total of 4 Bennys is a massive stress reliever for the next phase.

Follow us on Facebook for more FFXIV updates!

Navigation: [Page 1: Pull to 52%] [Page 2: Bennyland, Fountains]

FFXIV T11: Kaliya Strategy Guide (FCoB T2)

How to beat Kaliya! Our strategy guide to beating the boss of Turn 11 (FCoB T2)! Don’t let this chumpy hydra tear you up!

So you’ve beaten Imdugud and well on your way to becoming a Final Witness! Don’t take a rest yet, chump – If you’re reading this, then that means you’re only 25% of the way!!!  Get off your butt and get your free kill on this MFing Hydra! How to beat the T11 boss: Kaliya!!! Luckily Kaliya doesn’t have a ton of mechanics but the fight culminates in a rather stressful final phase.

Navigation

T11 Kaliya Phase 1: Pull to adds (60%)

“Okay I’ll MT” – Lisie Quiloud, last words (from our first pull)

Lets discuss some mechanics that happen thru most of the fight (except the P2 Adds phase).

Double frontal cleave – Kaliya does a two-hit wombo combo frontal cleave. This is deadly to non-tanks, if it isn’t obvious by now. This damage is shared by both tanks. While you can solo tank this, it’s recommended to double tank for 99% of groups. We gave this skill(s) a nickname: “HHHAAAAAUNK“.

Nerve Gas – covers 1/3rd of the map with a nasty ground effect. Do not be here when the cast ends. You will take heavy damage and a Vulnerability Down debuff. Nerve Gas always happens in sets of 3. A good reminder for your raid is to keep in mind that “After third, HHHAUNKing”. Drill that into your mind, people dying to haunk after cloud is more common than you think.

Secondary Head – a rather unexciting tank buster.

At 90% Kaliya casts Barofield. This remains up until Kaliya is dead. Barofield just meant you cannot pass THROUGH Kaliya during Nerve Gas. A dangerous field that does heavy damage, a slow and VULN UP if you enter it. Yeah, it’s a bad idea. So get used to dodging Nerve Gas WITHOUT passing inside Kaliya.

After Barofield goes up Kaliya gains two new abilities. They’re some kind of “missile” that Kaliya shoots in the air. We call them “Stack and Split” (sometimes Blue for Stack, Red for Split). After each Nerve Gas rotation Kaliya fires BOTH of these missles – the only question is which one lands first. Stack (as the name implies) means you have to stack to share the damage – 3 guys is enough, 4 recommended. Split (You guessed it) means you have to stay far from each other so you dont get tagged by two. Tips on surviving this:

  1. You can easily hear the sound effect of these missles. Be aware of it!
  2. If you DO NOT see a marking after the sound effect, it’s SPLIT first then STACK.
  3. Inversely if there is a marking after the sound effect, it’s STACK first then SPLIT.
  4. For the sake of consistency, make your splits look the same each time or at least assign a general area to prevent hugs.

Phase 1 is basically a tutorial for the basic mechanics of Kaliya. Phase 3 is pretty much a mirror of phase 1 (with 2 additional mechanics). This goes on until Kaliya reaches 60%. Once Kaliya reaches 60, she finishes whatever skill is happening and then proceeds to walk to the middle. GTFO of the middle because an insta-kill field will come up a few seconds later. Onto Phase 2!!!


Kaliya Phase 2: Kindergarten Shapes (Ball, Egg, Cube)

“Animation locked… haha, I wonder how strong this laser is?” – Eirlys Castillo, last words.

At 60% three adds spawn. The Cube, Ball and Egg (Not their in-game names). This phase is time-based, regardless if you complete what you need to do – Kaliya will phase after around 2 minutes 30 seconds (double checking). First of all lets summarize your objectives during this phase:

  1. Kill Ball & Cube at roughly the same time.
  2. Kill egg before phasing (roughly 2:30 duration)
  3. DO NOT have any 2 shapes come near each other.
  4. Prepare for massive AoE during phase transition (Nerve Cloud)

Sounds simple enough, ey? LOLNO! There’s tons of things that can go wrong here! But lets go through it one by one to maximize your chances. The Egg keeps moving around in a circle – again, they ANY ADD MUST NOT BE NEAR EACH OTHER. The main challenge is dealing with the ball.

Ball has a chunky amount of HP. It also greatly reduces magic damage taken. So it’s ideal that you use physical DPS to kill it. It has a strong cleave and good old Repelling Cannons, which is shared damage to all partymembers near the ball. Have all your physical DPS and 1 healer stay near the ball at all times. If thunder happens to go to this pile, simply have the victim move backwards. Most of the fatal damage comes from the Ball, so it’s recommended to throw a random virus on it when you can, and cycle Eye for an Eye on the ball tank. Also, we use WAR to tank the ball so he can be Storms Path’d. It does all magic damage so Halones STR Debuff doesn’t work on it.

Cube greatly reduces physical damage taken. So obviously have your MDPS beat it up. Aside from this, it’s not really special. Again, you should aim to kill ball and cube within 5 seconds of one another. If not, Egg will absorb the other – turning into Voltron and will wipe the floor with your face. Keep in mind the Cube has considerably less HP than the Ball.

Egg doesn’t have many special properties. It can only take damage when you’re near it. Aside from this, it’s main purpose is to punish parties that kill the cube or ball sooner than the other. If you’re struggling with DPS, consider Melee Limit Break on egg after both the Cube and Ball die.

One healer (preferably WHM) should walk around the inner circle following the ball group. This is so Medica II can heal the entire party – theres alot of random damage so keeping it up every 30s is a good idea.

Lastly there’s a few environmental effects while all of this is going on. Triple lasers which are insanely deadly on a long cast time. A periodic random Thunder Debuff(very similar to T9’s Thunderstruck). Also, touching the inner circle results in instant death. Get used to calling out thunder in your VOIP, it’s a common mess-up.

Egg is dead! Now what!? Prepare to resume your position from Phase 1. Nerve Cloud is coming right up. Make sure to soften the damage from Nerve Cloud by: Arcanist Virus, Succor and Sacred Soil. Warrior Storms Path, Monk Dragon Kick. Also, you may want to Stoneskin, Adloq or Apocatastasis those who may have weakness. This nuke is rather strong!!!

This phase may be confusing so lets summarize yet again what you need to do:

  1. Call out Thunders, Avoid Lasers
  2. Reduce damage of ball (Eye for Eye, Storms Path, Virus, Dragon Kick)
  3. Coordinate kill speed of ball and cube.
  4. Kill Egg (consider Melee LB)
  5. Prepare for Nerve Cloud (into Final Phase)

If you’ve survived, it’s on to Kaliyas Final Phase!

Kaliya Phase 3 (Final): Tethers (Nanospore Jet)

“Where does blue stack again?” – Mahiko San, last words.

Welcome to T11 final phase! The most annoying and stressful mechanic rears its ugly head here almost instantly: Nanospore Jet (commonly refered to as Tethers). Before we get into that – Kaliya RETAINS ALL SKILLS from Phase 1. By now, I hope you guys can avoid them well! Because tethers are effin’ annoying.

Nanospore Jet targets 2 sets of 2 people. One couple will be the “Green” tethers and the other will be the “Blue” tethers. From here on we will distinguish the two by calling it Green and Blue. First of all there is no difference between colors – they have the exact same effects. Here are the rules for each tether:

  • You can see the color of your tether from the status bar, or a visual effect.
  • They take some time to “settle in” – position during this settling time.
  • Once tethered you CANNOT GO TOO FAR from your partner.
  • ANY GREEN may not be near ANY BLUE; vice versa.
  • Failing the above results in heavy damage + Vulnerability Up.
  • Any tethered person who dies, instantly kills their partner.
  • Tank + Non-tank is never a tether combination. If one tank is tethered, the other tank will always be it’s partner.

You got that!?!? Drill it into your head! Nanospore Jet doesn’t F around and punishes slackers. As easy as Kaliya is; FOCUS is ultimately important in the final phase. So you’ve survived your first set of tethers? Good job! Now welcome to the real stress – Tethers + Nerve Gas.

How to deal with Tethers + Nerve Gas!? This basically sums up Final Phase. If you can do this well, this is gonna be a walk in the park. Otherwise, it’s gonna be a walk in the shart. Luckily we’ve devised a barbaric way to deal with this, or at least a way with the smallest amount of thought applied. For this we have 2 rulesets to follow: Positioning Rules and Movement Rules.

Positioning Rules determine where green or blue will initially stay (to prevent killing each other due to proximity). If you follow these by order, you shouldn’t have a problem!

  • If Tanks are tethered, other couple must be in complete opposite side.
  • If Melee is tethered, partner must approach melee.
  • No melee or tank tether? (Worst) Blue left, Green right.
  • All non-tethers people stack~ on any tethered couple (for baiting nerve gas, explained below)

These three simple rules will get you past the first hurdle of simply dying once tethers settle in. Once you’ve gotten used to this, here we have the Movement Rules.

  • Dodge to path of least resistance (wherever the clean floor is nearer)
  • Head on nerve gas? Dodge left (Clockwise). Opposite pile adjusts accordingly.
  • Keep in mind – after third Nerve, haunk.

Easy as that. If you followed the positioning rules and movement rules – tethers play out themselves. Of course, this may take a few wipes to get used to! I cannot stress the above mentioned POSITIONING RULES and MOVEMENT RULES. If your group refuses to organize or at least have a set behavioral pattern for tethers – Kaliya will best you 99 times out of 100. If you’re struggling with pugs, feel free to suggest the rules above! It’s better than winging it!

Turn 11 Kaliya Loot List

I really don’t know how to present by-turn loot list nicely so check this out for now: Bahamuts Coil Loot List.

Well, that’s about it! Feel free to comment with any other advice or (hopefully nonviolent) reactions! Best of luck killing Kaliya and getting past Turn 11!!!

Follow us on Facebook for more FFXIV updates!

FFXIV T10: Imdugud Strategy Guide (FCoB T1)

Strategy guide on beating Imdugud! Charges, Prey! All you need to know about this SHOCKING fight!

So you’ve taken your first step into Final Coil! Good luck! The first boss you face is no pushover. I’d say the main points you need to maintain here are Focus and mechanics awareness! Our strategy guide for the boss of Turn 10 (Final Coil Turn 1) Imdugud!

“He’s too good.” – Everyone who stepped into T10

Navigation:
[PAGE 1: Phase 1: Pull to 85% – Phase 2: Adds]
[PAGE 2: Phase 3: Heat Lightning – Phase 4 Adds II – Final Phase]

Imdugud Phase 1: Full to 85%

Right off the bat we’re faced with 3 of his basic mechanics you’ll be seeing throughout the fight.

– Massive frontal cleave that does heavy damage to all guys. Naturally you want to face the boss away from the raid for this. I will reiterate that this cleaving mechanic is MASSIVE and the damage is no less BEEFY.
– Tailswipe that is easily avoidable. You can “bait” this to come out by going behind Imdugud. (He doesn’t do basic attacks during this time so it’s advisable to do so)
– Critical Rip is your usual tank-buster. A long wind up leading to a haymaker. It’s your tanks responsibility to use a mitigation skill for this. Healers should Stoneskin / Adloq this when possible.
— The above abilities will be used throughout the fight. The next two abilities will be, too, but I’d consider them special mechanics.

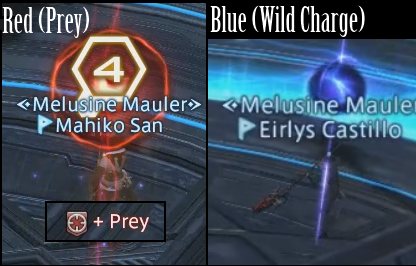
prey wild charge imdugud t10 ffxivWild Charge (Blue)
A two part mechanic. First a blue marker appears on top of a random, non-tank raidmember. There is no debuff icon for this. After a short delay, ALL PARTYMEMBERS NEARBY (and including) the marked person will be stunned and a Vulnerability UP debuff placed.

Next up Imdugud channels Wild Charge. He makes a beeline to the marked guy and will deal heavy damage to all guys in his path. However, this damage can be reduced by standing in front of Imdugud. The more people blocking, the less damage the victim takes. There is a caveat – the frontmost guy takes the most damage. Only a tank can survive this! So make sure the engine on your choochoo train is your offtank :D. Virusing charge is the largest value you can squeeze from Virus in this fight.

Prey (Red)
Another two part mechanic, albeit much simpler. First a red marker is placed on a random raidmember. Once the timer of this expires, it will deal MINOR damage to the afflicted person (500~). Easy to spot since there is a debuff icon. If this damage goes through (ANY of it), a new debuff is placed. Once this second debuff expires, it will deal a cripplingly huge amount of damage, coupled with a paralysis. Prevent all this BS by having your SCH Adloq or WHM SS after the initial red marker appears.. For SINGLE reds, it’s advisable for SCH to do it since Adloq has a significantly less cast time. For doubles, it’s discussed in P2.

For the remainder of this guide I will refer to them by (what our static uses) Blue & Red. Again these 5 attacks will be used for the ENTIRE DURATION OF THE FIGHT.

——————————————————————-

Before we discuss the second phase we will discuss a bit on Positioning and Markings

adds spawn points imdugud t10 ffxiv

A & B are where the adds spawn in both add phases (more on this later) Mark these areas whenever you zone into T10 so you won’t get confused. Easy reminder: The first dot in the first ring direct East and West is A and B. There are two practical ways to position boss (and adds, too):

  • Outwards Facing (less space efficient, safer for mechanics)
  • Sideways Facing (more space for your team, slightly higher risk for cleave)

A basic cycle of Red, Blue, Rip will repeat until he’s at 85%. He will become invincible at this point then on to Phase 2. The skill “Electrocharge” means he’s phasing – have your tanks position accordingly.


Imdugud Phase 2: Adds (Sons and Daughters)

“Cream the daughter first!! R@P3 the son now!” – Normal T10 Conversations

So, in case you haven’t noticed by now, the stage gets smaller and smaller, leaving a dangerous electric field whenever it recedes. This will continue to happen until you have nothing left to stand on. Anyways…

2 Sets of 2 adds spawn (total of 4, for the confused). 1 Son of Imdugud and 1 Daughter of Imdugud for each tank. If a son gets close to another son, they will be tethered and become extremely beefy. Same applies for daughters. In a nutshell, keep them AWAY from each other. Both the son and daughter of Imdugud inherited his skills (Not much of a surprise there). All adds have the massive frontal clear and tailswipe. So you’re going to want to position them facing outwards (like their daddy).

As per their individual traits… Daughter of Imdugud hits hard, Son of Imdugud leaves an electric pool on the ground (takes a while to vanish). Killing Daughter first is always a smart move. You don’t want people maneuvering around an electric pool. Remember to move the son as close to the edge as possible before killing, to minimize the area affected by the pool.

Red happens during this phase, too. But it can now sometimes target two people. As far as I remember it cycles between 2-1-2-1 targets before phasing. Could be 2-1-1-2-1-1 (will check later). For this, the WhiteMage has to Stoneskin one, Scholar has to Adloq the other. To make sure we dont target the same guy we arrange our party the same way (Healers > Tanks > DPS). One healer goes from the top of the list, the other goes from the bottom. If both healers get the mark, shield themselves. (Once succor reaches 500 or 600 due to gear, you can just use that)

This phase is TIME BASED. So wether or not you beat the adds before time expires, he will continue on the to next phase. The good news is, if you beat up the adds quickly you get to DPS imdugud for FREE until the timer runs out! The phase is ending when he begins to channel Electric Burst. (Generic AoE skill that you shouldn’t worry about!) From here you’re off to Page 2: Adds II to Final Phase.

Follow us on Facebook for more FFXIV updates!

Navigation:
[PAGE 1: Phase 1: Pull to 85% – Phase 2: Adds]
[PAGE 2: Phase 3: Heat Lightning – Phase 4 Adds II – Final Phase]

FFXIV 2.4 Patch Information, Patchnotes & Changelog

READY FOR 2.4!? FFXIV reveals a MASSIVE patch with a chunky amount of new content! Find out MORE about 2.4 HERE! (Release Date, Information, Patchnotes)

ffxiv 2.4 patch notes changelog information

FFXIV Patch 2.4  is finally here!!! Here’s our “human friendly” FFXIV 2.4 patchnotes and changelog! As usual we will have 2 major chunks in this guide, a starting quest table and new content guide.

Navigation: 2.4 Starting Quest List | 2.4 Patchnotes & Changelog

2.4 Starting Quests Chart

We will be putting together a table of quests in 2.4 that unlock newer content, much like in our 2.3 Patch post. It will be up as soon as the specific information is available.

Traitor in the Midst
(Story Quest Continuation)
Disciple of War or Magic level 50
The Rising Stones (X:6 Y:5)
NPC: Minfilia
Players must first complete the main scenario quest “Brave New Companions.”
Fragments of Truth
(FcoB)
Disciple of War or Magic level 50
The Waking Sands (X:6 Y:4)
NPC: Urianger
Players must first complete the quest “Alisaie’s Resolve.”
Eight-armed and Dangerous
(Hildebrand Continuation)
Disciple of War or Magic level 50
Eastern La Noscea (X:32 Y:30)
NPC: Ellie
Players must first complete the quest “A Case of Indecency.”
Death of a Mailman
(Delivery Moogle)
Disciple of War or Magic level 50
Limsa Lominsa – Lower Decks (X:10 Y:11)
NPC: Deputy Postmoogle
Carrier level 12
It’s Definitely Pirates
(Sastasha Hard)
Disciple of War or Magic level 50
Mor Dhona (X:22 Y:8)
NPC: Bloezoeng
Players must first complete the main scenario quest “The Ultimate Weapon.”
The Wrath of Qarn
(Sunken Temple Hard)
Disciple of War or Magic level 50
Mor Dhona (X:22 Y:8)
NPC: Hugubert
Players must first complete the main scenario quest “The Ultimate Weapon,” and have completed The Sunken Temple of Qarn.
Peasants by Day, Ninjas by Night
(Ninja)
Rogue level 30 / Pugilist level 15
Limsa Lominsa – Lower Decks (X:8 Y:16)
NPC: Jacke”
Players must first complete the quest “Cloying Victory.”
The Path of the Righteous
(Snowcloak [Middle of story quests])
Disciple of War or Magic level 50
Coerthas Central Highlands (X:12 Y:17)
NPC: Drillemont
Players must first complete the quest “First Blood.”

Navigation2.4 Starting Quest List | 2.4 Patchnotes & Changelog


What we know so far?

(FFXIV 2.4 Patch Official Trailer)

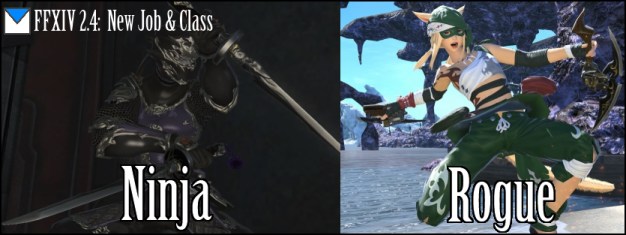
New Class and Job: Ninja and Rogue

ffxiv 2.4 ninja and rogue preview

For the first time in FFXIV:ARR a new class and job are introduced! Rogue and Ninja! As far as we know the Rogue and Ninja are Melee DPS classes which HOPEFULLY uses DEX as their main attribute so the loot distribution will be more even. Since Ninja is an advanced job, we currently do not know what the other level 15 class requirement is. We will be updating that when we can!

On Ninja Gear & Stats: Ninjas will be using any gear Monk can use that was introduced PRE 2.4. Coming 2.4 (FCoB Allagan drops), Ninja will have their own unique gear drops. Their main stat is DEX, and as such will be sharing right side drops with Bard. Ninja Primal Weapons and Relic weapon will be introduced as well.

The Rogue class cannot be chosen upon character creation. If you’re a new player wanting to be NINJA you should choose Pugilist then level it to 15, then proceed to become Rogue.

ROGUE GENERAL GUIDE is up as well as NINJA GENERAL GUIDE.

Preview of Rogue Skills | Preview of Ninja Skills

New dungeons!

Snowcloak: A brand new dungeon featuring FENRIR! The BGM of this dungeon is super sweet!
Sastasha (Hard): It’s DEFINITELY Pirates!
Sunken Temple of Qarn (Hard): Avoirdupois, come back…

New Primal Battle: Shiva

Well, finally! One of the three primary elemental summons(in the FF universe): Ifrit, Ramuh and Shiva are finally complete! The Shiva encounter location name is: The Akh Afah Ampitheatre. (Shiva preview in trailer)

The Final Coil of Bahamut

The sweet name on that one! 2.4 DELIVERS with, almost certainly, 4 more bosses! Is it time to see… “Him”? Item level is 130. Supposedly boss 3 and 4 are “Huge Spoilers”. The Oil of Time and Sands of Time system will be re-implemented in this coil (with different name of course). The new High Allagan gear (130) is called DREADWYRM.

You have come far… to know the truth.

Turn 10: “Allagan Behemoth”
Turn 11: “Allagan Hydra”
Turn 12: ???
Turn 13: “Is it Bahamut?”

Preview FCoB in trailer.

New tomestone: Poetics. (Tomestone Gear)

Mythology is now gone, Soldiery taking its place. Poetics is the new highest tier tomestone. Poetics tomestone gear is called IRONWORKS, with raid drop upgrades AUGMENTED IRONWORKS.

i110 Crafted Gear, New Glamor Gear

i110 Crafted left-side is confirmed. i110 right side (accessories) will probably come in a future patch.

Crafter & Gatherer Updates

New gear and recipes will be available for DOH and DOL classes. Here’s the breakdown…

New slots for both DOL and DOH

  • Off-hand
  • Hands
  • Legs
  • Feet

DOL ONLY

  • Chest

IXALI OAKNOTS are very important for these upgrades. So if you’ve been lazing off in your Ehcatl Nine quests… (like me) it’s time to help some beastmen.

Future Plans for FFXIV (Possibly 2.4-2.5)

3.0 Expansion: Heavensward announced. [Link: Heavensward Trailer] A token based loot system to mitigate RNG
The ability to help train friends in coil even if your loot lockout is finished.

OFFICIAL 2.4 PATCHNOTES: [FINAL?][Preliminary]

Navigation2.4 Starting Quest List | 2.4 Patchnotes

Well I think that’s about it! If you have anything to add, or we missed something let us know! As always, like us on Facebook for updates!